1. Hardware, Firmware, and Software Demystified
Hardware is any physical device used by the computer,
whether internal to the computer (such as the CPU on the computer's
motherboard), or attached externally to the computer. A discrete
hardware component that performs a given function is generally referred
to as a hardware device or just device
for short. You can use numerous types of hardware devices with a
computer. Printers, scanners, mice, keyboards, monitors, disk drives,
digital cameras, MP3 players, modems, and routers are all examples of
hardware devices.
Before I describe firmware, it helps to get a better understanding of software.
Software is program code that is written to perform a given function.
For example, all of the program code that makes up WordPad is software.
Likewise, all of the program code that constitutes Windows 7 is
software.
Device drivers are also software. A device driver is a
program that serves as an intermediary between a piece of hardware and
an application or the operating system. For example, a display driver
enables Windows 7 to communicate with and control your computer's
display. Likewise, a printer driver enables Windows 7 to communicate
with and control a printer.
Firmware is also software, in the context that it is
program code. The difference is in how the program code is stored.
Firmware is program code stored in a hardware device, typically in
read-only memory. For example, the program code that makes your Apple
iPod or your digital camera work is firmware.
Generally, as a typical Windows 7 user you
will deal with firmware only when updating firmware on your removable
devices, such as MP3 players. You will be adding device drivers and
working with Windows updates much more so than you will with firmware.
2. A Few Words About Device Drivers
As indicated in the previous section, device drivers
enable the Windows operating system to communicate with and control
devices. Although Windows 7 comes with a very large number of device
drivers for a wide range of devices, most device drivers are written by
and distributed by the manufacturers of a given device. For example,
your video adapter's device driver was written by the company that
designed and manufactured the adapter.
Device drivers are very much
device-specific. That is, a device driver written for one device won't
work for a different type of device. For that reason, make sure you have
the necessary device driver(s) for a device before you install it. If
you have just purchased a new device that requires a device driver not
included with Windows, that driver will be included with the new device,
typically on a CD. Because the version of the device driver was
developed specifically for the device, you don't have to obtain an
updated driver before installing the new device. However, you can
certainly visit the manufacturer's Web site to see if an updated driver
is available that adds features or fixes issues with the version you
have. I recommend installing the device with the driver you have, then
checking later for an updated driver as needed.
3. Using Hot-Pluggable Devices
Many modern hardware devices are hot-pluggable,
which means you just connect them to your computer and start using
them. There's no need to shut down the computer before connecting the
device. Nor is there any need to go through a formal installation
process after you connect the device. However, you should always read
the instructions that came with a device before you connect it for the
first time because sometimes you need to install some software before
you connect the device. When that's the case, as stated earlier the
software is usually on a CD that comes with the device.
|
Because Windows 7 includes a large library of device
drivers, you can just connect a device and begin using it without going
through the process of installing a device driver yourself. For example,
you can connect any USB flash drive and begin using it right away.
Because most digital cameras look and act to Windows 7 as flash drives,
you can do the same with cameras.
|
|
Hot-pluggable devices generally connect to the
computer through one of three main ports: USB, IEEE 1392, or PC Card
(different versions called PCMCIA, Cardbus, and ExpressCard). We look at
those in the sections that follow.
3.1. Connecting USB devices
USB (Universal Serial Bus) is the most common type of
hot-pluggable device. USB is used by flash drives, digital cameras,
some types of microphones, external disk drives, and many other types of
devices. Like most technologies, USB has evolved over the years, and
three versions of USB are currently on the market.
The main differences among USB standard versions have
to do with speed. USB 1.0 and 1.1 have two speeds: Low Speed (1.5 Mbps)
used by mice and keyboards, and Full Speed (12 Mbps), more often used
by digital cameras and disk drives. USB 2.0 added a third, High Speed,
data rate, which can transfer data at the much faster rate of 480 Mbps.
USB 2.0 is downwardly compatible with USB 1.1 and 1.0, which means that you can use a USB 2.0 device in a computer with USB 1.x
ports. However, the device will transfer at the 12 Mbps speed rather
than the 480 Mbps speed available only in USB 2.0. So you don't really
need to know exactly which type of USB your computer has. If you plug a
USB 2.0 device into a USB 1.0 or 1.1 port, Windows will display a
message telling you that you'd get better performance from a USB 2.0
port. The device will still work; it'll just be a lot slower than if
you'd plugged it into a USB 2.0 port.
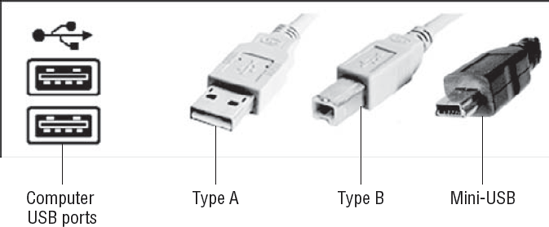
There are three different USB plug shapes, named Type
A, Type B, and Mini-USB or On-the-Go (OTG). The computer has female
Type A ports, into which you plug the male Type A plug on the cable. The
device might have Type A, B, or a mini-port. Figure 1
shows the symbol for USB and the general shape of USB ports on the
computer. Examples of Type A, B, and mini-ports are shown to the right
of those. The plugs are all keyed so that they only fit one way. Try
pushing the plug gently into the port, and it if won't fit, flip the
plug over and try again.
Connecting a USB device should be easy, providing
you've done any preliminary installations required by your specific
device. The steps are as follows:
If the device has an on/off switch, turn it off.
Connect the device to the computer using the appropriate USB cable.
If the device has an on/off switch, turn it on.
The very first time you connect a device, you might
get some feedback on the screen indicating that Windows is loading
drivers for the device. That message will be followed by one indicating
that the device is ready for use.
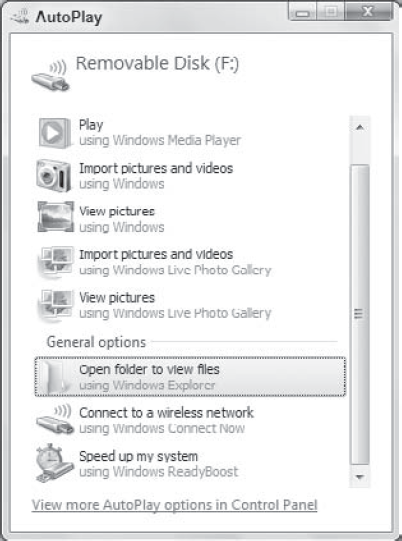
In many cases, you'll get an AutoPlay dialog box after you've connected the device. Figure 2
shows an example. From the AutoPlay dialog box, click whichever option
best describes what you want to do with the device. In the case of a
hard drive, that would most likely be the Open Folder to View Files
option, unless you were using that hard drive to store one specific type
of file.
|
Some USB devices can be used to speed up your system
with ReadyBoost. When you plug a flash drive into a USB port, AutoPlay
options might include an option to speed up your system using
ReadyBoost. ReadyBoost is a Windows 7 feature designed to speed up some
operations by using flash memory as intermediary storage between the
processor and the hard drive. It only works with USB devices that
actually can play that role. Flash memory has fast random I/O
capabilities, and therefore isn't supported by all USB devices.
|
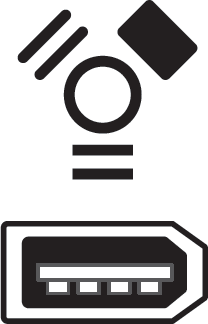
3.2. Connecting IEEE 1394 devices
IEEE 1394 (often called 1394 for short) is a
high-speed (800 Mbps) standard typically used to connect digital video
cameras and high-speed disk drives to computers. The symbol and plug
shape for an IEEE 1394 port are shown in Figure 3. IEEE 1394 also goes by the names FireWire and iLink.
|
1394a supports speeds up to 400 Mbps, and 1394b supports speeds up to 800 Mbps.
|
|
Connecting a 1394 device is much the same as connecting a USB device:
Leave the computer running, and turn the device off (if it has an on/off switch).
Connect one end of the 1394 cable to the computer and the other end to the device.
Turn on the device and wait.
As always, what happens next depends on the device.
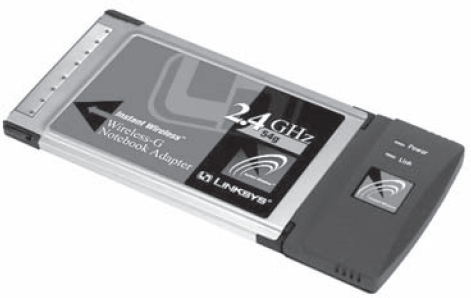
3.3. PC Cards
PC Cards, Cardbus, and ExpressCard cards are commonly
used on notebook computers. The device is usually a little larger and
thicker than a credit card. Figure 4 shows an example of a PC Card wireless network adapter.
Connecting a PC Card to a notebook computer is
simple. Just slide the card into the slot, right side up, and push until
it's firmly seated. As with USB and FireWire devices, you should get
some feedback on the screen indicating when the device is connected and
ready for use. How you use the device depends on the type of device you
inserted.
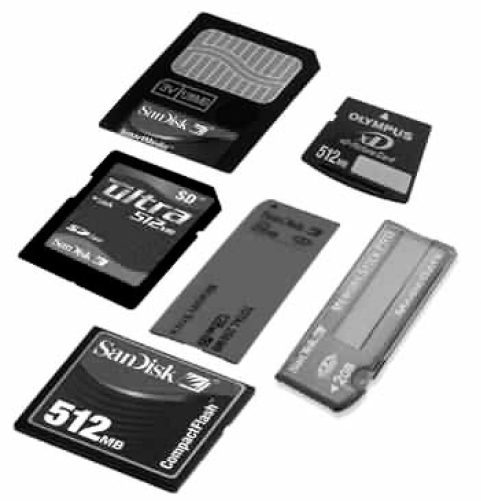
3.4. Using memory cards
Memory cards are hot-pluggable storage devices. Figure 5
shows examples of some memory cards. Most memory cards are used in
digital cameras and jump drives. You just connect the camera or jump
drive to a USB port to access the content on the memory card. However,
if your computer has slots for memory cards, you can also insert the
card directly into the appropriate slot.
After you insert a memory card into a slot, you
should get some feedback on the screen indicating that the card is ready
for use. That may be in the form of an AutoPlay dialog box, or an
Explorer window may open to show you the contents of the card. Either
way, the card will be treated as a USB mass storage device, as discussed
next.
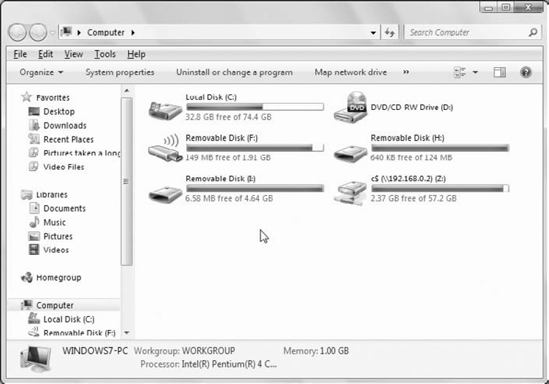
3.5. Memory cards and USB mass storage
Memory cards and USB devices that store data act like
disk drives when you connect them to a computer. As such, each will
have an icon in your Computer folder when it's connected. Figure 46-6
shows an example where I have connected an external hard drive (Drive
I:), a flash drive (Drive F:), and a memory card (Drive H:) through USB
ports. Drive Z: is a mapped network drive.
Using such a device is no different from using any
other disk drive. To see the contents of the device, open its icon. Use
the standard techniques to navigate through folders, to delete files and
folders, and to move and copy files and folders.
3.6. Disconnecting hot-pluggable devices
Before you disconnect a hot-pluggable device from a
computer, you might want to make sure it's not in the middle of a file
transfer, or holding a file that you have open in some program. To do
that, look in the Notification area and see if there's one that looks
like the one pointed to in Figure 7.
(That icon shows only when you have a storage device attached.) Note
that the icon doesn't display a tooltip, but if you view its settings in
the Notification Area Icons applet in Control Panel, you'll see that
its name is Safely Remove Hardware and Eject Media.
To safely remove a device, click the Safely Remove Hardware and Eject Media icon. The menu shown in Figure 8 opens listing each connected mass storage device. Click the action you want to take from the menu.
|
If it's difficult to reach around to the back of the
computer to connect a USB or FireWire device, just leave that end of the
cable plugged into the computer. Disconnect the cable from the device,
and leave that end of the cable within easy reach for future
connections. Or, get an external USB or FireWire hub, connect the hub to
the back of the computer by its cable, and leave the hub on your desk
within easy reach.
|
|
Simply click the Eject command for the drive you want
to disconnect. The media will not physically eject from the computer,
but Windows will close it and display a message that the device can
safely be disconnected from the computer. You can then safely remove it
from the computer.
Not all devices are hot-pluggable. Some
require a more elaborate connection and installation procedures. Those
kinds of devices are discussed in the next section.