4.4. Primary and extended partitions
You can divide a basic disk into multiple partitions. Each partition looks like a separate item in your Computer folder. The drive can be divided into a maximum of four primary partitions, or three primary partitions and one extended partition. The difference is that a primary partition can be used as a system partition, meaning you can install an operating system on it and boot the computer from it.
An extended partition can't be a boot disk and can't
contain an operating system. However, you can divide an extended
partition into multiple logical drives, where each logical drive has its
own drive letter and icon in the Computer folder, and looks like a
separate drive.
In Windows XP and previous versions of Windows, you
could explicitly create extended partitions using the Disk Management
console. Microsoft changed that in Windows Vista, and that change
carries over to Windows 7. Now rather than the option to create either a
primary or extended partition, Disk Management gives you the option of
creating a new simple volume. The type of volume created when you use
this command depends on the number of partitions already on the disk.
The first three partitions you create are created as primary partitions.
The fourth is created as an extended partition.
|
If you do need an extended partition, you can use the
DiskPart command in a command console to create it. To learn more about
DiskPart, open a command console and enter diskpart. At the DiskPart command prompt, enter Help to see a listing of commands.
|
|
Another concept to understand is that you can use three types of disks in Windows 7:
Basic: This is the type of disk supported by DOS and all previous versions of Windows.
Dynamic: This type of disk was introduced in Windows 2000. Dynamic disks support the following types of volumes:
Simple:
These volumes comprise space for a single dynamic disk, and can use a
single region on the disk or multiple regions on the disk.
Spanned: These volumes comprise space on more than one physical disk (they span multiple physical drives, hence the name).
Striped:
These volumes stripe the data for a single logical volume across
multiple physical disks, providing improved performance by distributing
the read/write load across multiple disks.
GPT:
This stands for Globally Unique Identifier Partition Table. GPT
supports theoretical volume sizes up to 18 EB. The primary advantages to
using GPT are the very large volume size and the large number of
partitions you can create on a GPT disk. Disk structure is also
optimized for performance and reliability.
|
EB stands for exabyte, which is equal to about a million terabytes.
|
|
Which disk type you choose really depends on the type
of disk and your needs. If you are installing a very high-capacity disk
in a Windows 7 computer, I recommend using GPT. If you need to create a
spanned or striped volume, use a dynamic disk. For general-purpose
disks, a basic disk is fine.
4.5. Partitioning and formatting the disk
|
Repartitioning and/or reformatting a disk that already contains files will result in the permanent
loss of all files on that disk. You should not attempt to repartition
or reformat an existing disk unless you fully understand the
consequences, and are fully prepared to recover any lost files. Again,
if you don't have any formal training and experience in technical
matters, it's best to leave this sort of thing to the pros.
|
|
After you have a new hard drive installed, you can
restart Windows 7 and use the Disk Management tool to partition and
format the drive. Log in to an account with administrative privileges
for this task. If the Computer Management tool doesn't start
automatically after you've logged in, you can get to it by following
these steps:
Click the Start button, right-click Computer, and choose Manage.
Click Disk Management in the left column.
The new drive appears at the bottom of the display,
most likely as Disk 1 (assuming the system has one other disk drive,
which will show as Disk 0). The drive's space is indicated by a striped
bar showing Unallocated in the lower-left corner.
To partition the drive as a basic disk with a simple volume:
Right-click within the unallocated space of the new drive and choose New Simple Volume.
On the first page of the New Simple Volume Wizard that opens, click Next.
The
next wizard page asks what size you want to make the partition, and
suggests the full capacity of the disk. You can choose a smaller size if
you intend to divide the disk into multiple partitions. After you make
your selection, click Next.
The
next wizard page asks you to assign a drive letter to the drive. It
suggests the next available drive letter, which is a good choice. Click
Next.
The next wizard page asks how you want to format and label the disk. Your options are as follows:
Do Not Format this Volume: If you choose this option, you'll have to format the partition later. I suggest that you not choose this option.
File System:
Your choices here depend on the disk type. For volumes on basic and
dynamic disks, you can choose between exFAT and NTFS. On a GPT disk, you
can only choose NTFS.
Allocation Unit Size:
This defines the cluster size. The Default option automatically chooses
the best allocation unit size given the type and capacity of the disk,
so that would be your best choice.
Volume Label:
This is the name that appears with the drive's icon in My Computer. You
can enter any name you want up to 12 characters in length (including
spaces). You can also change that name at any time in the future.
Perform a Quick Format:
If you choose this option, formatting will go quickly, but the drive
won't be checked for errors. Better to leave this option unselected.
Enable File and Folder Compression:
Only available if you chose NTFS as the file system, this option
automatically compresses all files and folders on the drive. This
conserves disk space, but there is a minimal performance overhead for
the compression/decompression as the drive is used. You can still
compress individual files and folders if you leave this option
unselected.
Click Next after making your selections.
The last wizard page summarizes your selections. Click Finish.
Now you get to wait for the disk to be formatted.
This could take some time, depending on the size of the volume. You can
continue to use your computer while the drive is being formatted, or
leave it until it finishes.
If you set up the drive as one large partition,
you're done when the Formatting indicator reaches 100%. You can close
the Computer Management tool and Control Panel.
If you are partitioning the disk into smaller units,
you can repeat the steps outlined previously for each partition. Just
make sure that you right-click an unpartitioned portion of the disk in
step 1. If you create an extended partition with the DiskPart command,
you will need to add one or more physical volumes to the disk through
the Disk Management console. Just right-click the extended partition and
choose New Simple Volume, then follow the steps described previously to
create the new volume. Repeat the process for any other volumes you
want to create in the extended partition.
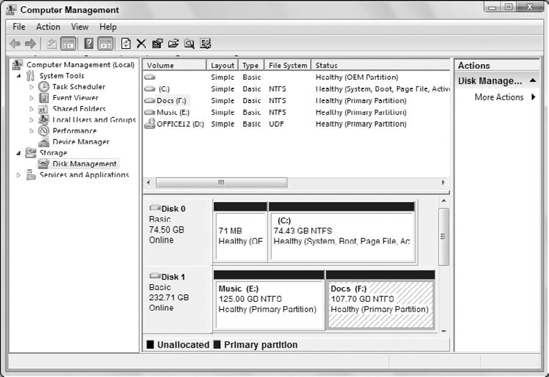
Figure 13
shows an example with a secondary drive (Disk 1) containing two
partitions, drives E: and F:. Their volumes' labels are Music and Docs,
respectively.
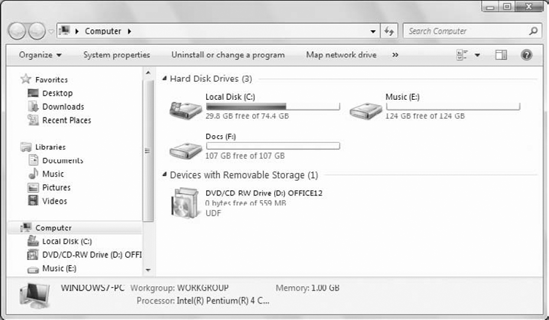
When all the partitioning and formatting is complete,
exit the Computer Management tool. Access the drive as you would any
other — through the Computer folder. Figure 14 shows an example. Notice how each Hard Disk Drive icon represents a drive (or partition) defined in the Disk Management tool.