7. Device Manager
The
Device Manager is so important in keeping your system working properly
that it can be accessed from two different categories: System and
Security and Hardware and Sound. When the Device Manager is launched,
you are presented with a category list of the devices installed in the
system (see Figure 7).
When there are no problems, the display is a bit bland (but in this
case, bland is good). To see the individual devices, expand any of the
listed categories. Then, to access a device’s Properties dialog box,
just double-click it.
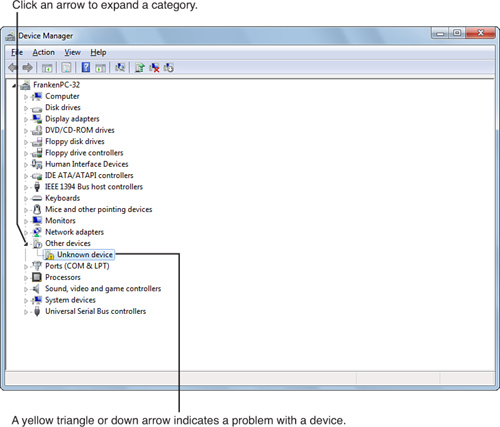
The
Device Manager serves several functions, the foremost of which is to
aid in the resolution of hardware problems. When any device fails to
function as expected, it will be highlighted with a yellow triangle or
a down arrow. The yellow triangle indicates a warning or a possible
problem, such as a driver that has not been loaded or an Unknown Device
(see Figure 7).
A down arrow indicates a disabled device, device conflict, or other
serious error. When the Device Manager is launched and a device has an
outstanding issue, its category will be expanded so that you can easily
see the warning or error icon.
When a
device’s Properties dialog box is opened, the General tab displays
basic information about the device, plus details on the device’s
current status. In most cases, the status report will point out exactly
what is preventing the device from functioning normally. You may
correct the issue on your own, or if you need help or guidance, click
the Troubleshoot button on the General tab for a wizard or further
guidance. This button has various labels, according to the problem you
have. For example, if you have a driver problem, the button is called
Reinstall Driver. If you have a resource problem, the button is called
Check for Solutions. If the device is enabled, the button is called
Enable Device, and so forth.
Depending on
the device, there can be many other tabs in addition to the General
tab. In most cases, you’ll see a Driver tab, and almost as frequently
you’ll see a Resources tab. The Driver tab offers details about the
currently installed driver for this device and enables you to update,
roll back, or uninstall the driver.
Device
driver rollback, just as in Windows XP and Vista, removes the current
driver and restores the previous driver (assuming there was one). The
ability to remove the current or newly installed driver and return to
the previously used driver is often a lifesaver. I can’t remember how
many times I’ve had to remove a new driver and then had to go through
the process of reinstalling the hardware just to get the old driver
back. The Roll Back Driver button performs this operation with a simple
click. No muss, no fuss.
The Resources tab
specifies the system resources to which the device is assigned. These
include IRQ, I/O ranges, DMA, and more. On Plug and Play (PnP) devices,
you can switch the settings from automatic to either a predefined
configuration set or a fully customized setting. For some PnP cards,
the settings on the Resources tab are read-only. In such cases, the
settings are configured by the system BIOS and by the expansion slot
the card is plugged into. See your system or motherboard documentation
to determine how to change BIOS settings, or to determine which IRQ is
assigned to a particular slot.
The
Details tab, added as a standard feature to the Device Manager in
Windows XP SP2, provides access to a huge list of technical details
about your device. It defaults to displaying the device description
(the same one you see on the main Device Manager window), but you can
also view approximately 25 arcane technical details such as the Device
Instance ID, Enumerator, and so on. Some devices may list additional
information. A few of the most useful ways to use this tab include
Use the Hardware IDs and Compatible IDs selection to determine the PnP information used to install the device.
Use the Manufacturer selection to determine the manufacturer of the device.
Use the Power Capabilities selection to determine the device’s support for various power management states.
Access
the Advanced tab found on some devices to configure special settings
used by that device. The Power tab on USB root and generic hubs can
help you determine whether a particular hub has enough power for a
particular USB device. The Power Management tab found on some devices
enables you to control whether the computer can turn off a device to
save power and whether the device can wake the computer from standby.
Tip
Some
devices are hidden from view in the Device Manager. Hidden devices
include non-PnP devices and devices that have been physically removed
from the computer but have not had their drivers uninstalled. To see
hidden devices in the Device Manager list, choose View, Show Hidden
Devices. A check mark should appear on the menu, indicating that hidden
devices are showing. Click it again to hide them. |
For any other tabs that may appear in a device’s Properties dialog box, be sure to consult the device’s user manual.
From the main Device Manager view, you can perform a few helpful actions:
Change
views between devices by type, devices by connection, resources by type
(IRQ, DMA, I/O port address, and memory), and resources by connection
(USB ports, legacy ports, and so forth)
Force a scan for hardware changes
Show hidden devices
Note
Windows
7 no longer supports the ISA bus, which has been with us in some form
since the first IBM PC of 1981. So, don’t bother trying to run Windows
7 on a motherboard with ISA cards. Legacy ports such as PS/2 mouse and
keyboard ports, serial ports, and parallel ports, which were originally
serviced by the ISA bus, are now serviced by a separate legacy I/O
controller on the motherboard or a legacy I/O controller component in
the I/O controller hub or South Bridge component of the chipset. |
Understanding and Resolving Hardware Conflicts
Windows,
together with its Plug-and-Play technology, has grown far better at
detecting and preventing hardware conflicts over the past few years.
Still, system conflicts do arise, especially when you’re using legacy
hardware, such as integrated serial and parallel ports.
Historically, configuration and installation problems were due to incorrect settings on ISA cards or integrated ports. If two cards
or ports were configured to use the same IRQ, base I/O port address,
DMA, or base memory address, a conflict would occur. Thanks to PnP
support for legacy ports, PCI, PCI Express, and AGP cards, resource
conflicts are almost unheard of in recent years.
Hardware uses four major resources:
IRQs
DMA
I/O port addresses
DMA channel
Tip
By
default, the Device Manager displays Devices by Type. To see IRQ and
other hardware resources in use in the Device Manager, click View,
Resources by Type. |
You
can view the resources used by a particular device, and, depending upon
the specific device and motherboard design, there are various ways to
solve the rare conflicts that might occur.
IRQs
PC architecture includes a means for a piece of hardware to quickly gain the attention of the CPU through a message called an interrupt request, or IRQ.
An IRQ is sent directly from hardware to the CPU, which then services
the request accordingly. A common example occurs when data comes in to
your system’s modem or LAN card. The modem or LAN card triggers the
predetermined IRQ, and the CPU then begins to execute the program code
that is appropriate for handling that interrupt. In fact, a part of the
OS called the interrupt handler is responsible for making it so.
Note
You
may see IRQs from 80 to 190 assigned to the Microsoft ACPI-Compliant
System when you view IRQ assignments in the Device Manager or with
System Information (MSInfo32). |
Most
systems suitable for use with Windows 7 feature an Advanced
Programmable Interrupt Controller (APIC). APIC permits PCI, AGP, and
PCI Express cards and non-legacy integrated devices (such as USB ports
and SATA host adapters) to use IRQ settings above 15 (often called PCI
IRQs). APIC is enabled through the system BIOS. Figure 8 shows a typical Windows 7 system with multiple devices assigned to PCI IRQs.
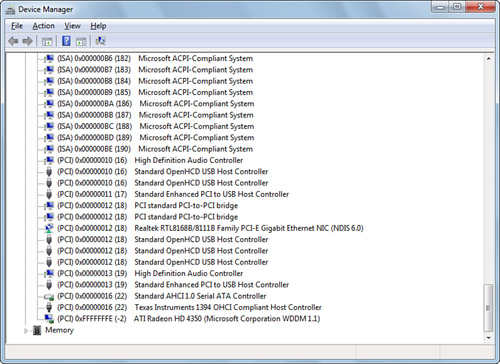
As shown in Figure 8,
IRQ sharing is enabled automatically by Windows 7 when the system
supports it. In some cases, however, some motherboards might not permit
IRQs to be shared, even by PCI devices.
Tip
If
you no longer use legacy ports, disable them in the system BIOS. By
disabling legacy ports, you enable the IRQs and other hardware
resources used by serial, parallel, or PS/2 mouse ports to be available
for PCI, PCI Express, and AGP devices, including integrated devices. On
some systems, it may also be necessary to open the PnP/PCI dialog box
in the system BIOS and assign the IRQs formerly used by legacy ports to
be available for PnP/PCI devices. |
If
you find yourself short on IRQs or if you have two devices attempting
to use the same IRQ and creating a conflict, try moving the PCI or PCI
Express card to another slot. On some machines, each PCI slot’s PCI
Interrupt (A through D) is mapped to an ISA-type IRQ (numbers up to
15). By simply moving a card to a neighboring slot, you may get your
hardware working. Note that PCI, PCI Express, and AGP slots all use PCI
interrupts, and that some systems assign the same PCI interrupt to two
slots, or to a slot and an integrated device. See your system or
motherboard manual for details.
DMA Channels
A
typical PC has eight DMA channels, labeled 0 to 7 (DMA 4 is used as a
cascade controller between DMA channels 0–3 and 5–7). DMA channels are
used for rapidly transferring data between memory and peripherals
without the help of the CPU. In current systems, DMA channels are used
only by parallel ports in enhanced capabilities port (ECP) or enhanced
capabilities port/enhanced parallel port (ECP/EPP) modes.
Although
recent EIDE hard drives use a variation of DMA called Ultra DMA (UDMA)
for fast data transfer, DMA transfers performed by PCI-based devices
don’t use specific DMA channels. The only time a PCI device ever needs
to use a DMA channel is if it’s emulating an ISA device that uses one,
such as a PCI-based sound card emulating an ISA-based sound card.
I/O Port Assignments
In
PC architecture, I/O ports are mapped into system memory and,
therefore, are accessed by the CPU using memory addresses. As you might
expect, each device that uses an I/O port must have a different port
address, or data intended for one device will end up at another.
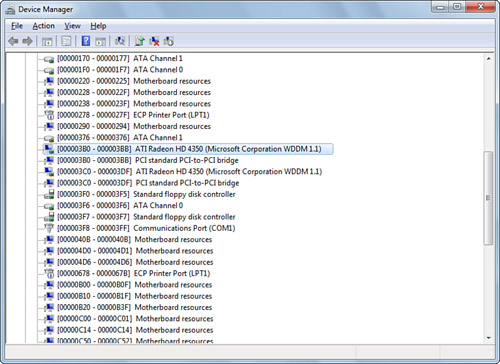
However, if a device must
use a bridge to communicate with the rest of the system, the device and
the bridge might use the same I/O address range (see Figure 9).
Note
A
common source of I/O contention occurs among video cards, SCSI devices,
and network cards. However, most devices can use a choice of several
I/O port address ranges to avoid conflicts. |
Check out the I/O folder off the Hardware Resources node in Computer Management, as shown in Figure 9,
to see a sample list of I/O addresses and assignments. As you can see,
this folder contains quite a few assignments. Note that the addresses
are in standard memory-mapping parlance—hexadecimal.
Memory Addresses
Similar
to the I/O port address, the base memory address is the beginning
memory address that some cards or motherboard hardware use to
communicate with the CPU. Sometimes, this setting is called the RAM starting address (or start address).
If
you open Computer Management and go to System Information, Hardware
Resources, Memory, you’ll see memory addresses such as the following:
This
address means the memory area between A0000 and BFFFF is assigned to
the PCI bus. (The 0x indicates that it is a hexadecimal address.) PnP
configuration enables the system to place devices that need memory
addresses in nonconflicting areas. Sometimes, memory address references
in hardware documentation omit the last zero (A000).
Solving Resource Conflicts
Although
PCI, AGP, and PCI Express cards and integrated devices are designed to
share IRQs, you may see a resource conflict when you attempt to install
a legacy port, such as a serial (communications) or parallel (LPT) port.
When a hardware conflict is detected, it’s reported by the wizard at the end of the device installation process.
If you cannot select a nonconflicting setting with the device you’re installing, you have a few options:
Change the settings for the conflicting device with the Device Manager.
If
the device you are attempting to install is an integrated legacy port,
restart the system and select different settings in the BIOS setup.
With a modern system, select Auto as the setting, which will enable the
BIOS or Windows 7 to select a nonconflicting setting. If you must
choose a particular IRQ or other hardware resource setting, make sure
you don’t choose a setting used by another port or card. For example,
it’s easy in most systems to choose the same IRQ and I/O port address
range for both serial (communications) ports, causing a conflict. Be
sure you choose different IRQs for each serial port.
In
some cases, particularly with legacy ports, you may not be able to
resolve a conflict and will need to disable the conflicting device on
one of the cards with the Device Manager.
Caution
In
general, be cautious about configuring resource settings manually. When
you change settings manually, the settings become fixed, and Windows
7’s built-in device contention resolution is less likely to work. Also,
if you install too many devices with manually configured settings, you
might not be able to install new PnP devices because none will be
available. In the worst-case scenario, the system might not even boot
if conflicts occur with primary hardware devices, such as hard disk
controllers or video cards. If you decide to use manual configuration,
make sure you know what you’re doing and have the specs for the
hardware in question at hand. |
If
you have a resource conflict, what should you do? Most drivers don’t
have resources that can be reassigned. Others have an option button
called Reinstall Driver that’s useful if the system thinks that would
solve a nonfunctioning-device problem. Most PCI, PCI Express, and AGP
cards (as well as integrated ports such as USB, FireWire, and
PATA/SATA) don’t permit their resources to be reassigned because they
obtain their resource settings from Windows or from the system BIOS.
Some systems allocate resources depending on which slot you use for a
particular card.
However, you can usually
reassign resources for legacy ports like serial (COM) and parallel
(LPT) ports. To reassign a resource, open the Device Manager, open the
Properties dialog box for the device, and click the Resources tab. To
select a different resource, uncheck the Use Automatic Settings box and
choose Change Setting.
To
select an alternative setting on most systems, clear the Use Automatic
Settings check box; then click Change Setting to change the settings.
If the system displays an error message, use the Setting Based On
scroll box to try a different Basic configuration.
Caution
Notice
the Setting Based On drop-down list on the Resources tab. It lists the
hardware configurations in which the currently selected device is
enabled. If you choose a hardware configuration other than the default,
and you change any resource settings, resource conflicts may occur when
you use the default hardware configuration. Resource conflicts can
disable your hardware and cause your computer to malfunction or to be
inoperable. |
On some older systems, you might be able to click the resource shown in the Resource Settings window and change it directly.
In
an attempt to prevent folks from inadvertently doing damage, the
Resources tab keeps an eye on what you’re doing. If you attempt to
reassign to a resource that is already in use using either method,
you’ll be warned about the conflict. Keep trying configurations until
the conflicting device listing is clear. Then, click OK and restart
your computer if prompted.