4. AutoPlay
AutoPlay
isn’t new to Windows 7. Its ancestor, Autorun, has been used to
automatically start programs from a CD or DVD drive since Windows 95.
In Windows XP, AutoPlay was extended to USB drives and other types of
removable-media drives. AutoPlay is found in the Hardware and Sound
category of the Control Panel and is also available in Classic view.
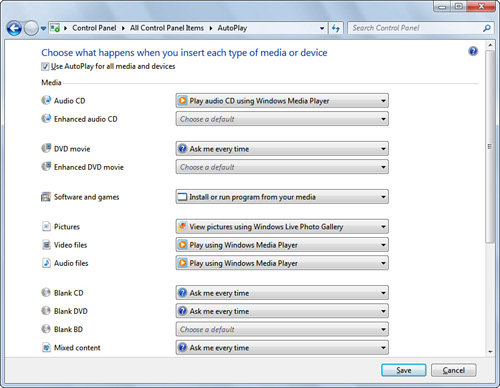
Windows
7 follows the lead of Windows Vista in how AutoPlay is configured.
Rather than being configured on a drive-by-drive basis through the
AutoPlay tab in a drive’s Properties dialog box as in Windows XP,
Windows 7’s AutoPlay applet (see Figure 6) permits you to configure AutoPlay defaults for different types of media and multimedia files on a global basis.
Unlike
Windows XP’s AutoPlay, which was primarily designed for photos, music,
and video files, Windows 7’s AutoPlay also includes support for various
types of CD and DVD movie discs, including HD DVD, Blu-ray Disc movies,
DVD-Audio, Video CD, and Super Video CD. This is made possible in part
by Windows Media Player 12’s built-in support for DVD video and also
enables you to use specialized players for certain types of video discs
if you want.
AutoPlay also includes
support for devices you connect to your system, as well as built-in
devices. As in Windows XP and Vista, the exact programs available for
any media or media file type vary according to the programs installed.
You can also disable AutoPlay for particular media or media file types
or globally.
Windows 7’s AutoPlay is safer than in its predecessors in two important ways:
Autorun.inf
files on non-optical removable media drives (such as USB flash memory
drives) are ignored by AutoPlay, so that users cannot be tricked into
running malware from the drive.
If the media contains one or more programs, AutoPlay indicates that the programs will be run from the media.
5. Color Management
The
Color Management dialog is designed to help you configure your
displays, printers, and scanners to produce more accurate color. Color
Management helps your display and printer to produce matching colors
and photo editing programs to create or edit images that are optimized
for web, print, or display purposes.
Color
Management uses files known as color profiles to achieve these goals.
Color profiles are provided by display, graphics software, and printer
vendors, and you can also create your own by using calibration software.
Color
Management has three tabs: Devices, All Profiles, and Advanced. Use the
Devices tab to determine what (if any) color profile is in use for your
displays, printers, and scanners. Use the All Profiles tab to display
the color profiles installed on your system. Use the Advanced tab to
select the color profile to use for various types of images and to
calibrate your monitor.
6. Date and Time
Date
and Time is a simple applet you’re sure to have used in the past to
adjust the system date and time. That is, it adjusts the hardware clock
in the computer, which is maintained by a battery on the motherboard.
The system date and time are used for myriad purposes, including date-
and time-stamping the files you create and modify, stamping email,
controlling the Task Scheduler program for automatic application
running, and so on. Date and Time is found in the Clock, Language, and
Region category of the Control Panel and is also available in Small
Icons/Large Icons views.
Note
The
Date and Time applet doesn’t change the format of the date and time,
only the actual date and time stored on your computer’s clock.
|
When
you’re a member of a Microsoft network domain, you should never need to
set the clock. It is kept synchronized to the domain controller
(Windows 2000 Server, Windows Server 2003, or Windows Server 2008).
Many network services, including authentication protocols and
replication, require exact or close synchronization of all systems
within the network.
If your system is part
of a workgroup or just a standalone system, you can sync your clocks
with an Internet time server. The Date and Time applet includes a third
tab for doing just that. However, this capability is not available on
domain clients. The ability to sync with an Internet time server
through the Date and Time applet is reserved for workgroup members,
standalone systems, and domain controllers.
The
Date and Time applet can also be accessed by clicking the clock and
selecting Change Date and Time Settings or right-clicking over the
clock and selecting Adjust Date/Time. To set the date and time, follow
these steps:
1. | Run the Date and Time applet.
|
2. | Click Change Date and Time.
|
3. | Alter
the time and date by typing in the corrections or by clicking the
arrows. The trick is to click directly on the hours, minutes, seconds,
or AM/PM area first, and then use the little arrows to the right of
them to set the correct value. So, to adjust the a.m. or p.m., click AM
or PM, and then click the little up or down arrow. After setting the
month and year, you can click the day in the displayed calendar. Click
OK.
Tip You can also adjust the time and date using the time and date
commands from a command prompt. For example, open a Command Prompt
window (click Start, All Programs, Accessories, Command Prompt), type time, and press Enter. This command displays the current time and a prompt to enter the new time, as shown here: The current time is:
21:39:31.78
Enter the new time:
Enter the new time, or press Enter to leave the time as it is. The same process applies to the date. Type date and press Enter. The current date is displayed with a prompt to enter the new date, as shown here: The current date is: Fri
09/29/2006
Enter the new date: (mm-dd-yy)
|
|
4. | Click
the Change Time Zone button to adjust the zone. Why? It’s good practice
to have your time zone set correctly for programs such as client
managers, faxing programs, time synchronizing programs, or phone
dialing programs. They may need to figure out where you are in relation
to others and what the time differential is. Also, if you want your
computer’s clock to be adjusted automatically when daylight saving time
changes, be sure the Automatically Adjust Clock for Daylight Saving
Changes check box is selected. Click OK.
|
5. | Click
the Internet Time tab. Click Change Settings. On this tab, you can
enable clock synchronization with an Internet time server. Five known
time servers are provided in the pull-down list, but you can type in
others. If you want to force a sync, click the Update Now button.
|
6. | Click OK to save changes and close the applet.
|
|
If
your system’s BIOS is also configured to automatically adjust for
daylight saving time (DST), you may find that your system’s clock is
set incorrectly when the time changes twice a year, because both the
BIOS and Windows make the adjustment. You should disable your system
BIOS’s DST adjustment and use Windows’ instead. There are two reasons:
First, it’s easier to configure time zones and settings from within Windows than from within the BIOS setup program.
Second,
starting in 2007, DST in the United States begins the second Sunday of
March and ends on the first Sunday of November. A Windows update or the
built-in Internet time synchronization feature will enable your system
to know when DST starts and ends. If you leave your computer’s BIOS in
charge of adjusting for DST, you will need to install a BIOS
update—assuming that your PC’s manufacturer is keeping up with U.S. law
on this topic. Wherever you live, keep in mind that Microsoft issues
updates on a regular basis for time-zone changes around the world, so
keeping your PC’s BIOS out of the time-zone adjusting business makes
good sense everywhere.
|
When
Internet synchronization is enabled, your clock is reset to match the
time servers once each week. Internet synchronization should be
configured only on systems with an active Internet connection. Clock
synchronization does not initiate a dial-up connection. Plus, if there
is a firewall or proxy server between your client and the Internet, the
clock synchronization packets may be blocked.
Additional Clocks
Are
you an eBay user? Do you need to know what time it is at headquarters?
Whatever your reason for keeping an eye on other time zones, you can
use the Additional Clocks tab to display up to two additional clocks.
Select
the time zone (eBay runs on Pacific time, by the way) and provide a
descriptive name to replace the default Clock 1 or Clock 2, and click
Apply, then OK. When you hover your mouse over the date and time
display in the notification area, the additional clocks are displayed
along with the primary clock.
7. Default Programs
Default
Programs can be found in the Programs category of the Control Panel, is
also available in Large Icons and Small Icons views, and can also be
opened directly from the Start menu’s right pane. It enables you to
choose the default program you prefer for a particular file type,
associate a file type with a particular program, change AutoPlay
settings , and specify which programs are
the defaults for web browsing, email, playing media, instant messaging,
and providing Java Virtual Machine (JVM) support.
Set Your Default Programs
Select
this option, and your default programs for web browsing, photo viewing,
media playback, and so forth are displayed in the left pane. Select a
program from the list, and select from two options listed in the right
pane:
Set This Program as Default— Choose this option to use the selected program as the default for all file types and protocols it can open.
Choose Defaults for This Program— Choose this option to specify which file types and programs the application will open by default.
We
recommend the second option. When you select it, each file and protocol
type you can choose from is listed, along with the current default. To
change all items listed to default to the selected program, click the
Select All check box. To change only selected options, click the empty
check box next to each item you want to change. Click Save to complete
the process.
Set Associations
The
Set Associations dialog box provides an easy way to change file
associations from a single dialog box, rather than requiring you to
right-click a file, select Open With, and choose a program. Set
Associations lists the file extensions supported by applications on
your system and the current default. Click a file extension to select
it, click Change Program, and select the program from the list of
recommended programs, or click Browse to find the program you prefer.
Select the program and click OK to finish the process.
Set Program Access and Computer Defaults
Select
this option, and you can select from up to four different
configurations for web browsing, email, and other common activities:
For
maximum flexibility, choose Custom. In the Custom configuration, you
can specify not only default programs but also whether to permit or
deny access to non-Microsoft alternatives to the default web browser,
email, media player, IM, and JVM programs on your system, such as
Firefox or Opera web browsers, Thunderbird or Eudora email clients, AOL
or Trillian IM clients, and so forth. Credit the existence of this
feature to antitrust litigation against Microsoft for embedding IE and
other technologies into the OS. In other words, this applet enables
Windows 7 to play nicely with other vendors’ products.