11. Notification Area Icons
For
years, the icons in the notification area (previously known as the
system tray) have been a frustration: If the software vendor
responsible for the icon didn’t provide a way to enable or disable the
icon, you were stuck with it. While Windows XP and Windows Vista added
the option to click an arrow
to display/hide inactive icons, users who have wanted to control
individual icon behavior have been looking for a solution. Now, Windows
7’s new Notification Area Icons applet (see Figure 16) enables you to manage those icons.
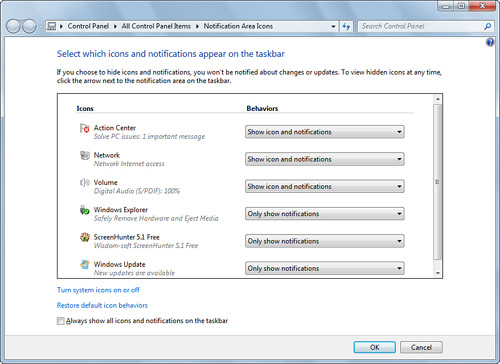
For each icon displayed, you can choose from three options:
You
can keep or override the default behavior for each icon, and you can
manage both standard Windows applets and icons provided by third-party
programs (such as the Wisdom-soft ScreenHunter program shown in Figure 16).
12. Performance Information and Tools
Performance
Information and Tools combines the Windows Experience Index (an updated
version of the computer performance rating system introduced by Windows
Vista) with easier access to a wide variety of performance-adjusting
settings used in previous Windows versions. The principle behind
Performance Information and Tools is to help you determine how well
your system runs Windows
7 and to make it as easy as possible to tweak your system for better
performance. It is available from the System and Security category of
Control Panel, or in Large Icons or Small Icons view.
The Windows Experience Index
When
you open Performance Information and Tools, the first item you’re
likely to notice on the main dialog box is the Windows Experience Index
(WEI) base score and component ratings (see Figure 17).
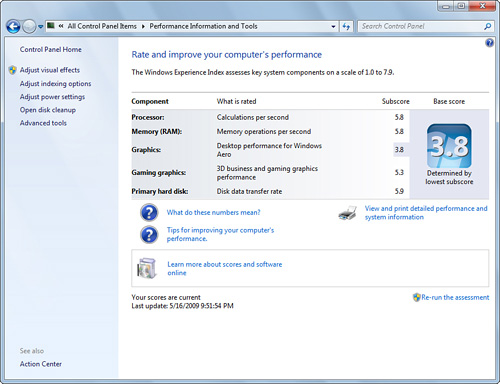
Five subsystems are evaluated to provide the basis for determining the WEI:
Your processor’s calculations per second (CPU)
Memory operations per second (RAM)
Desktop performance for Windows Aero (Aero)
3D business and gaming graphics performance (3D)
Your primary hard disk’s data transfer rate (HD)
Each item is scored, and the lowest score (note—not
an average) is used to calculate the computer’s WEI. This might seem
like an odd method to use, but the advantage is that it helps you
determine what part of your system is the principle performance
bottleneck. For example, in examining the system shown in Figure 18,
note that the lowest scores (3.8 and 5.3) are related to the graphics
card. By upgrading the graphics card to one with a more powerful GPU,
the system’s WEI should increase. The other scores are 5.8 or higher,
indicating satisfactory performance.
Interpreting the Windows Experience Index
How
important is the WEI base score (the lowest of the subsystem scores) to
your satisfaction with Windows 7? According to Microsoft, computers
with base scores of 2 or less will satisfactorily perform basic tasks
such as office productivity or web surfing but are probably not
powerful enough to run Windows Aero or advanced multimedia features.
Computers with a base score of 3 can run Windows Aero but may not be
powerful enough to run high-end features such as Aero across multiple
displays or display HDTV. Computers with a base score of 4 or higher
can use all features. Systems with higher scores will perform better in
3D gaming. The highest score, 7.9, was achieved by the
fastest-performing computers available when Windows 7 was released.
If
you previously used Windows Vista, you might recall that the highest
WEI score was 5.9. By increasing the maximum score to 7.9, Microsoft
provides more headroom for today’s faster subsystems. Microsoft’s
Engineering Windows 7 blog points out changes in WEI ratings of hard
disks and graphics:
Hard disks
with poor write cache flush performance will receive lower disk scores
compared to the same hardware measured under Windows Vista’s WEI. Most
conventional hard disks with properly operating write flush cache are
expected to score in the 5.0–5.9 range. Extending the scoring range up
to 7.9 provides headroom for SSDs and faster conventional drives.
Graphics
performance is affected by the DirectX version supported by the GPU,
the driver version used, and GPU performance. For example, if you have
a DirectX 9.0–compliant graphics card using WDDM 1.1, your maximum
score is 5.9. Higher scores are only possible with DirectX 10.x–compliant
graphics cards that perform at about the same frame rate as in DirectX
9 mode. For mainstream DirectX 10 gaming, you will want a card with a
WEI subsystem index of 5.0 or higher.
|
The TechARP website www.techarp.com/showarticle.aspx?artno=622 points out additional system components that affect your WEI score in Windows 7:
Processor
scores are determined by a combination of design and performance. For
example, mainstream quad-core processors will typically score in the
7.0+ range, while dual-core processors will typically score in the
4.8–6.5 range. Memory scores are
determined by memory size and performance. For example, the maximum
score a system with less than 3GB of RAM can receive is 5.5, while a
system running 64-bit Windows 7 with less than 4GB of RAM will top out
at 5.9. Systems utilizing dual-channel memory will score higher than
systems using the same memory size in a single-channel mode.
|
The
easiest way to improve the WEI in a major way is to upgrade one or more
of the major subsystems it rates. For example, replacing the video card
can boost scores for Aero and for 3D graphics. Adding more RAM can
boost memory scores. Upgrading to a faster processor can boost
processor scores. Upgrading to a hard disk with a larger buffer, faster
rotation rate, or both, can increase hard disk performance. Some
upgrades, such as RAM and CPU, will boost performance in multiple areas.
If you decide to upgrade your system, look at the following factors:
Integrated video—
If you can replace integrated video with a PCI Express (PCI-E) or AGP
video card that uses a GPU listed on the Windows 7–compatible GPU list,
you can significantly improve your Aero and 3D scores. Look for a unit
with at least 128MB of RAM if you are primarily concerned about
business graphics, or a unit with 512MB or more of RAM for 3D gaming.
The latest nVidia GPUs have model numbers in the GTX 2xx series, whereas the latest ATI GPUs have model numbers in the HD 4xxx series. Higher model numbers generally indicate better performance, but see the manufacturers’ websites for details.
Processor—
Economy processors such as the AMD Sempron, Intel Celeron, or Intel
Pentium Dual-Core have slower core clock speeds, slower front side bus
connections to memory, and smaller L2 cache sizes than their
full-performance counterparts (AMD Phenom, 64FX, 64 X2 or Intel Core 2
Duo, Core 2 Quad). However, a processor upgrade might also require a
motherboard and memory module upgrade as well. Look at other upgrades
first to improve your system’s base and subsystem scores.
Memory (RAM)—
Windows 7 runs best with at least 1GB of RAM available to Windows. Many
so-called “1GB” systems, particularly laptops, actually share 128MB of
RAM or more with the integrated graphics subsystem. Thus, for best
system performance, consider upgrading systems that use shared video
memory to 2GB or more of system memory.
To determine the amount of memory actually available to Windows, type DXDIAG
into the Instant Desktop Search box and press Enter. This runs DirectX
Diagnostics. The System dialog box indicates the amount of memory
available to Windows in Windows 7.
The System
Properties dialog box in Windows 7 now shows total system memory,
including memory set aside for graphics memory. The difference between
these amounts in Windows 7 is the amount of RAM used for shared video
(graphics) memory.
Hard disk drives—
The best hard disks for desktop computers feature spin rates (RPM) of
7,200 to 10,000 and 16MB or larger buffer sizes. If your hard disk has
a lower spin rate, smaller buffer size, or both, it’s limiting the
performance of your system. If you’re considering a hard disk upgrade,
keep in mind that new Serial ATA (SATA) drives are generally faster and
larger than traditional PATA (ATA/IDE) drives. However, some older
systems may have limited or no support for SATA drives. Laptop drives
tend to feature lower spin rates, smaller buffer sizes, and smaller
capacities than desktop drives.
Tip
When
you display your system’s WEI, you may see specific advice that a
particular program, process, or setting is slowing down your system.
Use this information to go directly to the best task to help improve
performance. For example, if a startup program is causing system
problems, you’ll be advised to use the Manage Startup Programs task. |
Click
the link Tips for Improving Your Computer’s Performance on the
Performance Information and Tools page to learn about the tools
provided in the Tasks list on the left side. Each of these tools is
discussed in the following sections.
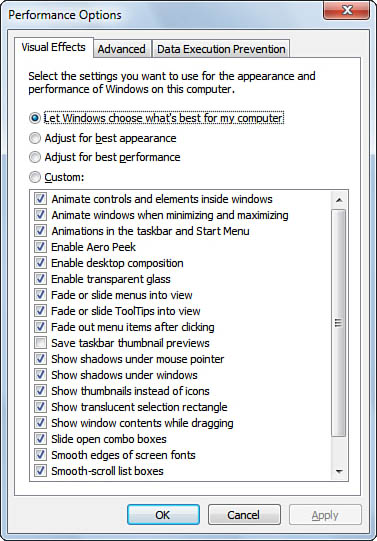
Adjust Visual Effects
When
you select Adjust Visual Effects from the Tasks list of Performance
Information and Tools, you open the Visual Effects tab of the
Performance Options dialog box (see Figure 18).
This tab provides options to allow Windows to manage effects, adjust
for best appearance, or adjust for best performance, or choose your own
custom settings.
When you select the
first three options, Windows 7 selects the appropriate settings. Click
Custom, or clear an effects checkbox or click an empty checkbox after
selecting any of the other options, and the Custom option is selected.
You can enable or disable a long list of effects. These effects include
animate resizing of windows, fade ToolTips, show shadows under menus,
and use visual styles on windows and buttons.
Tip
Keep
in mind that you can also boost your visual performance more
significantly by switching from Aero to Windows 7 Basic. By ditching
the 3D and transparency effects in Aero, your system will display
windows faster. |
Unless
your system is low on physical RAM or uses integrated video or a PCI
(not PCI Express or AGP) video card, there is little need to modify the
default settings for these controls in respect
to performance. However, if you think no shadows or no animation looks
better, you can customize the look and feel of the user environment all
you want.
Adjust Indexing Options
One
of the most important “behind the scenes” features in Windows 7 is the
integrated indexing feature. It enables you to find a file in just
seconds with Instant Desktop Search and zero in on the media you want
to play in Windows Media Player, to give just two examples of how
indexing makes life in Windows 7 land easier and more fun.
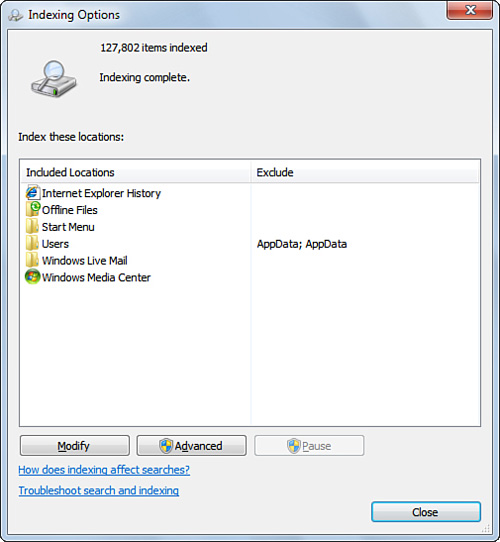
When
you click the Adjust Indexing Options task in the Tasks list of
Performance Information and Tools, you open the Indexing Options dialog
box (see Figure 19).
The top of the dialog box lists the number of items indexed and the
locations that are indexed. Click Modify to specify what to index; use
this option to enable or disable indexing of system or other drive
folders. Click Advanced (and provide Administrator-level credentials as
required) to repair or rebuild indexes (Index Settings tab) or to
adjust how indexing takes place for each file extension registered on
the system (File Types tab). Files containing readable text (.doc, .xls,
and similar extensions) are indexed by name and contents, whereas other
types of files are indexed by name only. If you have a low-performance
system, you can speed it up by disabling indexing.
Other Performance Options
Selecting
the Adjust Power Settings task in the Tasks lists opens the Power
Options dialog box. Selecting the Open Disk Cleanup task opens the Disk Cleanup utility.
Advanced Tools
Click the Advanced Tools task in Performance Information and Tools to open the Advanced Tools window (see Figure 20),
which provides specific suggestions for improving system performance
and links to nine different tools you can use to fine-tune performance.
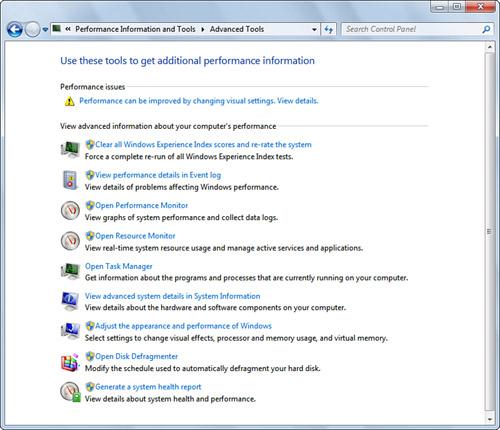
Click
each item under the Performance Issues category to open a pop-up window
with specific recommendations for improving performance.
Table 11 lists the advanced performance information tasks .
Table 11. Advanced Performance Information Tasks
| Task | Opens |
|---|
| Clear all Windows Experience Index scores and re-rate the system | Windows Experience Index tests |
| View performance details in Event log | Microsoft Management Console Event Viewer |
| Open Performance Monitor | Performance Monitor |
| Open Resource Monitor | Resource Monitor |
| Open Task Manager | Task Manager |
| View advanced system details in System Information | Information summary page |
| Adjust the appearance and performance of Windows | Visual Effects and Advanced tabs of the Performance Options dialog box |
| Open Disk Defragmenter | Disk Defragmenter |
| Generate a system health report | Performance Monitor, System Diagnostics Report |
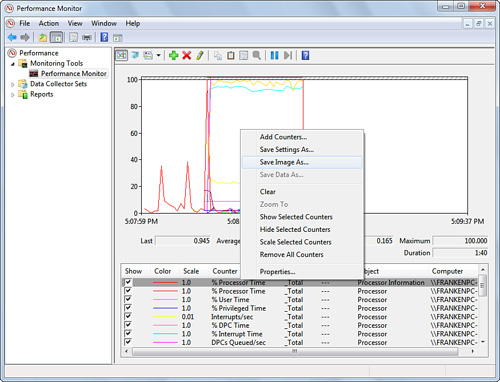
Performance Monitor
Performance
Monitor provides Windows 7 users with a one-stop solution for tracking
system performance. Performance Monitor opens to the Performance
Monitor Overview and System Summary (see Figure 21), which provides a real-time overview of CPU, disk, network, and memory subsystem performance.
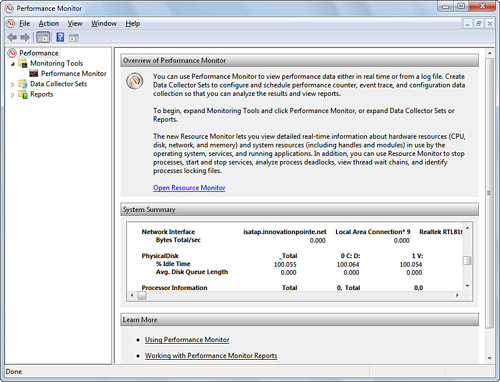
For
an even more detailed and customizable look at system performance data,
click the Performance Monitor node on the left. Performance Monitor
permits you to choose from dozens of performance counters ranging from
.NET to iSCSI, TCPv4 and -v6, WMI objects, and many others. You can
monitor local or network computers with Performance Monitor, and you
can view information in line, bar, or report modes. Right-click the
counter area to add, edit, or remove counters; save the current image;
or view properties (see Figure 22).
Resource Monitor
To
see a real-time graphical view of processes, CPU, disk, memory, and
network activity, start the Resource Monitor from the Advanced Tools
window (refer to Figure 20). Resource Monitor’s display (see Figure 23)
is somewhat reminiscent of the Performance tab in Windows XP’s Task
Manager, but the Overview tab provides four gauges, instead of two as
in Windows XP’s Performance tab, and provides detailed information for
each monitored process. To filter for a particular process, click its
check box.

System Diagnostics Report
When you click Generate a System Health Report in the Advanced Tools window (refer to Figure 20),
Windows 7 uses Resource and Performance Monitor to scan the system and
display a System Diagnostics Report. A typical example is shown in Figure 24.
The report includes information on system diagnostics, software
configuration, hardware configuration, and CPU, network, disk, and
memory subsystems, and concludes with a summary of the system and the
files used to create the report.
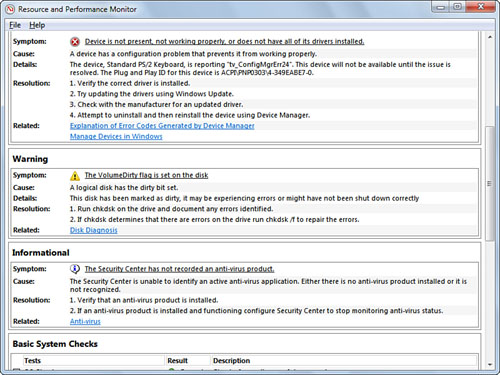
Some
of the system components tracked by the System Diagnostics Report
include disabled devices; device driver and other hardware problems;
antivirus and firewall protection status; resource usage; system
services; startup programs; SMART disk status; Windows Experience Index
score; network interfaces; and CPU, hard disk network, and memory
performance.
Power Options
Although
the Power Options icon is familiar to Windows XP users, the Windows 7
version of this fundamental Control Panel utility has gone through some
significant changes. On the main page of this dialog box, three
different power plans (known as power schemes in Windows XP and earlier
versions of Windows) are listed: Balanced, Power Saver, and High
Performance. The Balanced power plan strikes a happy medium between
performance and energy savings on a desktop, or between performance and
battery life on a portable system. Power Saver saves a lot of energy
(provides a long battery life) but does so by reducing performance and
dimming the screen on a portable system. High Performance maximizes
system speed but uses a lot of energy on a desktop and provides a short
battery life on a portable system. You can access Power Options through
the Hardware and Sound category, or in Large Icons or Small Icons view.