2. Changing User Permissions
You can use WMI to make some
modifications to group or user content. However, the changes you can
make are limited to simple modifications such as the user or group name.
In order to make significant changes, such as creating a new group or
user, or assigning an existing user to a group, you need to use the DirectoryServices namespace.
One of the first questions many developers ask about DirectoryServices is what they need to do when they aren't working on a domain. It turns out that the DirectoryServices
namespace classes work just fine on any machine, even if you don't have
a domain controller installed. In fact, the User Permission
Modification example shown in the sections that follow will work just
fine on a stand-alone machine.
2.1. Configuring the User Permission Modification Example
The User Permission Modification example begins with a
Windows Forms application. You need to add a button so that you can
invoke the code used to make an association between an existing user and
a new group that you'll create. In order to use the DirectoryServices, you must add a reference to System.DirectoryServices. The example also requires that you add the following using statement:
using System.DirectoryServices;
Before you can use this example, you need to create a
group to experiment with. You don't want to experiment with a group
that has any rights, so this group is simply an entry that has no rights
whatsoever. Use the following steps to create the group on Windows 7:
Choose Start => Control Panel => Administrative Tools to display the Administrative Tools window.
Double-click Computer Management to display the Computer Management console shown in Figure 4.
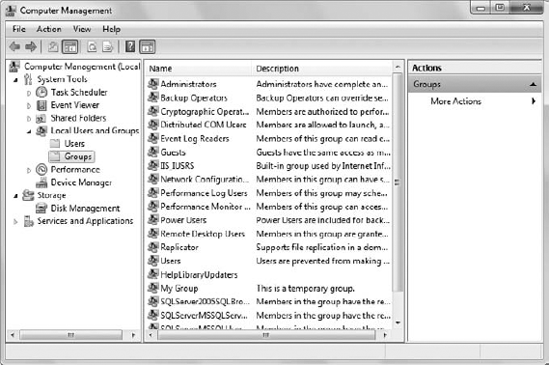
Open the Computer Management\System Tools\Groups folder as shown in Figure 4.
Right-click the Groups folder and choose New Group from the context menu. You'll see the New Group dialog box shown in Figure 5.
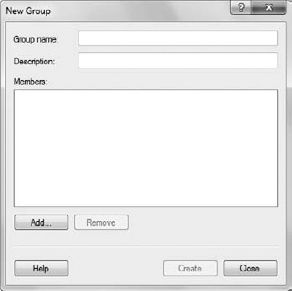
Type My Group in the Group Name field.
Type This is a temporary group. in the Description field.
Click
Create. You'll see the new group added to the Groups folder of the
Computer Management console. The group is now ready for use with the
example.
2.2. Creating the User Permission Modification Manifest
Windows 7 is particular about who can make system
changes, such as assigning users to groups. Even if you're part of the
Administrators group, you won't be able to make the change without
elevating your permissions to the Administrator account. There are a number of ways to accomplish
this task, but the easiest way is simply to add a .MANIFEST file to your application using the following steps:
Right-click the project entry in Solution Explorer and choose Add => Add New Item from the context menu. You'll see the Add New Item dialog box shown in Figure 6.
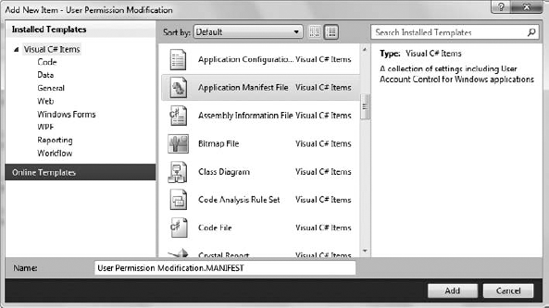
Highlight the Application Manifest File entry as shown in Figure 6.
Type User Permission Modification.MANIFEST in the Name field and click Add. Always use the name of the application, followed by .MANIFEST
when creating this file, or the run time won't recognize the manifest
requirements. Visual Studio adds the file to your project and automatically opens it for editing.
Locate the <requestedExecutionLevel level="asInvoker" uiAccess="false" /> entry in the file and change it to read:
<requestedExecutionLevel level="requireAdministrator" uiAccess="false" />
Highlight the manifest file entry in Solution Explorer.
Change
the Copy to Output Directory property to Copy if Newer. This change
ensures that the manifest file appears with the application when you
test it. Otherwise, you won't see any permission elevation and the
example will fail to work.
2.3. Writing the User Permission Modification Code
At this point, you've created an application shell,
added a group to use for the test, and configured a manifest file. The
actual code to assign a user to a group isn't hard. What you need to do
is find the user and then the group you want to work with. You then use a
simple method to add the user to the group, as shown in Listing 3.
Example 3. Modifying a user's permissions
private void btnAdd_Click(object sender, EventArgs e)
{
    // Create a directory object for the current machine.
    DirectoryEntry TheServer =
        new DirectoryEntry("WinNT://" + Environment.MachineName);

    // Locate the special group.
    DirectoryEntry TheGroup =
        TheServer.Children.Find("My Group", "Group");

    // Locate the user to add to the group.
    DirectoryEntry TheUser =
        TheServer.Children.Find("Guest", "User");

    // Add the user to the group.
    TheGroup.Invoke("Add", new Object[]{TheUser.Path.ToString()});

    // Display a success message.
    MessageBox.Show("User added to group successfully!");
}
|
The code begins by creating a DirectoryEntry object, TheServer, which points to the local machine. You need to supply a path such as WinNT://MyMachine to accomplish this task. The easiest way to create flexible code is to rely on the Environment.MachineName property for the name of the local machine.
At this point, you simply search for the group (TheGroup) and the user (TheUser), using the Find() method of TheServer.Children
property. The application makes an assignment among the test group, My
Group, and the Guest account, which shouldn't even be active on your
machine.
To add the user to the group, the example calls TheGroup.Invoke() with the Add method and the path to TheUser object. The user information path is passed in an Object
array. After you run the code, you see a success message box. However,
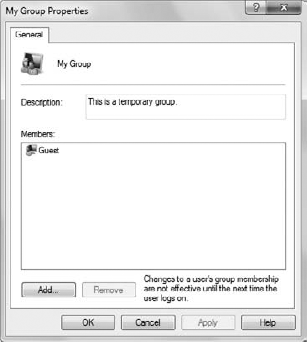
the real results appear in the My Group Properties dialog box shown in Figure 7 (double-click the My Group entry in the Groups folder of the Computer Management console to see the results).
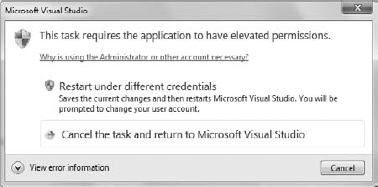
You need to know one final piece of information about this example. When you first start the debugger by choosing Debug => Start Debugging, you'll see the message box shown in Figure 8.
Click Restart Under Different Credentials. The system will then display
the usual UAC dialog box, where you click Yes. Visual Studio will
restart with the proper rights. Choose Debug => Start Debugging again and the application will run as normal, but with elevated rights.
NOTE
If you try to run the example a second
time, the code will fail. However, this time it fails because Guest is
already a member of My Group. To run the example again, delete Guest
from the Member list of My Group by highlighting its entry (shown in Figure 10-10) and clicking Remove.