3. Auditing User Actions
Windows 7 incorporates many forms of auditing. An
audit simply tracks some system event and may not even have anything to
do with the user specifically. For example, setting object access
auditing tracks all access, not just the user's access. A virus could
access an object, and auditing would make it possible to track the
access. Incorrect object access by an errant application is also
tracked. In short, auditing has all kinds of uses, not just reviewing
user activity. The following sections describe how to build the User
Audit example so you can see auditing in action.
3.1. Configuring the User Audit Example
The User Audit example shows the current settings for
any auditing on the system. The example begins with a Windows Forms
application that looks much like the example shown in Figure 10-4. In addition, you must add the following using statement to your code:
using System.Security.AccessControl;
Unlike user security settings, auditing settings are
quite sensitive, so you have to have administrator rights to view them.
With this in mind, you must also add a manifest file to your
application.
3.2. Configuring the Registry for Audit Monitoring
The system auditing settings appear in the default value of the HKEY_LOCAL_MACHINE\SECURITY\Policy\PolAdtEv
key of the registry. Microsoft is extremely paranoid about the auditing
settings, so it takes even more precautions than usual. In this case,
the registry actually blocks access to the settings, even to the
administrator. The .NET Framework does provide methods for working with
registry security, but it turns out that they don't work when the
administrator is blocked from access. Your only option at this point is
to manually set the required privileges using the following steps:
Locate RegEdit.EXE in your Windows folder (normally C:\Windows). Right-click the file and choose Run as Administrator from the context menu. You'll see the normal UAC warning dialog box. Click Yes. The system will start RegEdit as an administrator. Right-click the HKEY_LOCAL_MACHINE\SECURITY key and choose Permissions from the Context menu. You'll see the Permissions for Security dialog box shown in Figure 9. Notice that the Administrators group has almost no permission — only the SYSTEM account can access this registry key.
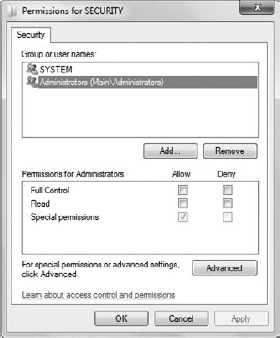
Check Full Control and click OK. You now have access to the HKEY_LOCAL_MACHINE\SECURITY\Policy\PolAdtEv key. Choose View => Refresh or press F5 to see the new keys you can access.
3.3. Writing the User Audit Code
This example shows how to read the audit settings
from the registry. However, by knowing the locations of the registry
settings, you can also write the audit settings. The audit settings are
found in a Byte array. Each byte entry can have one of four values:
Some of the auditing settings have multiple Byte
array entries, but the reason for the multiple entries isn't clear, and
Microsoft has chosen not to document the Windows 7 settings. With this
in mind, Table 1 shows the audit settings and the Byte
array decimal indexes associated with each entry. You need to monitor
only one of these bytes when reading the values, but you must set all of
them when changing a value.
NOTE
Microsoft has documented the audit settings in the past. In fact, you can find a Knowledge Base article on the topic at http://support.microsoft.com/kb/246120.
Unfortunately, this Knowledge Base article is incorrect for Windows 7,
and there doesn't appear to be any documentation for the updated
configuration.
Table 1. Registry Index Values for Audit Settings| AUDIT SETTING | BYTE ARRAY INDEXES (DECIMAL) | BYTE ARRAY INDEXES (HEXADECIMAL) |
|---|
| Audit Account Logon Events | 110, 112, 114, 116 | 6E, 70, 72, 74 | | Audit Account Management | 90, 92, 94, 96, 98, 100 | 5A, 5C, 5E, 60, 62, 64 | | Audit Directory Service Access | 102, 104, 106, 108 | 66, 68, 6A, 6B | | Audit Logon Events | 22, 24, 26, 28, 30, 32, 34, 36, 38 | 16, 18, 1A, 1C, 1E, 20, 22, 24, 26 | | Audit Object Access | 40, 42, 44, 46, 48, 50, 52, 54, 56, 58, 60, 62 | 28, 2A, 2C, 2E, 30, 32, 34, 36, 38, 3A, 3C, 3E | | Audit Policy Change | 78, 80, 82, 84, 86, 88 | 4E, 50, 52, 54, 56, 58 | | Audit Privilege Use | 64, 66, 68 | 40, 42, 44 | | Audit Process Tracking | 70, 72, 74, 76 | 46, 48, 4A, 4C | | Audit System Events | 12, 14, 16, 18, 20 | 0C, 0E, 10, 12, 14 |
Now that you know where the information is located
and what the byte values are, it's time to write some code to interact
with the audit settings. Listing 4 shows the code used for this example.
Example 4. Performing a system-level user audit
private void btnCheck_Click(object sender, EventArgs e)
{
    // Clear the previous results.
    lstSettings.Items.Clear();

    // Get the required key.
    RegistryKey Policies =
Registry.LocalMachine.OpenSubKey(@"Security\Policy\PolAdtEv");

    // Obtain the default value.
    Byte[] AuditValues = (Byte[])Policies.GetValue("");

    // Output the auditing values.
    // Check account logon auditing.
    switch (AuditValues[110])
    {
        case 0:
            lstSettings.Items.Add(
                "Audit Account Logon Events Disabled");
            break;
        case 1:
            lstSettings.Items.Add(
                "Audit Account Logon Events Success");
            break;
        case 2:
            lstSettings.Items.Add(
                "Audit Account Logon Events Failure");
            break;
        case 3:
            lstSettings.Items.Add(
                "Audit Account Logon Events Success and Failure");
            break;
    }

    ... Other Cases ...

    // Close the registry.
    Policies.Close();
}
|
The code begins by clearing any information from the list box. It then opens the appropriate registry key using the Registry.LocalMachine.OpenSubKey() method and places a reference to it in Policies. The default value isn't named, so you call GetValue() with a null string. The output is a Byte array named AuditValues.
Checking for each of the nine audit settings is a matter of looking at
the correct byte value at this point. The example code shows one switch statement used for the task. Remember to call Policies.Close() when the application ends.
3.4. Testing the User Audit Example
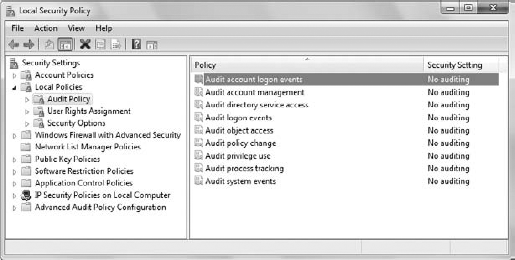
The audit policies checked by this example reside in
the Security Settings\Local Policies\Audit Policy folder of the Local
Security Policy console shown in Figure 10. You can find this console in the Administrative Tools folder of the Control Panel.
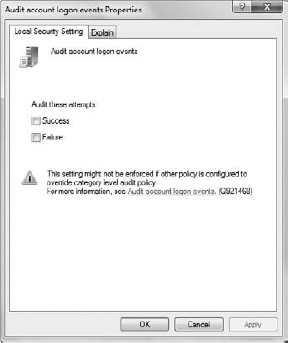
To change a setting, double-click its entry in the
Local Security Policy console. You'll see a policy Properties dialog box
similar to the one shown in Figure 11.
The Explain tab tells you about the audit policy and what it monitors
on your system. The dialog box has checkboxes that let you monitor
successful events, failures, or both. Check the options that you want to
try and click OK. Remember to return the settings to normal when you're
done working with the example, or your event log will be filled with
tons of unnecessary entries.
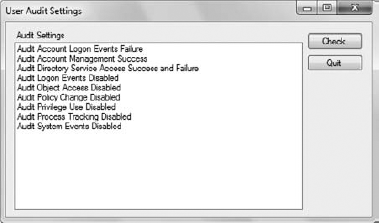
It's time to see how the application works. Because
of the need for administrator privileges, you'll see the usual messages
as you start the application. Click Check and you'll see the current
audit policy settings. Change any setting and click Check again to see
the change. Figure 12 shows typical output from this example.
|