Restoring with the Backup Utility
Restoring data is a straightforward procedure.
After opening the Backup Utility and clicking the Restore And Manage
Media tab as shown in Figure 1,
you will be able to select the backup set from which to restore. The
Backup Utility will then display the files and folders that the backup
set contains by examining the backup set’s catalog. You can then select
the specific files or folders you want to restore. As with the backup
selection, a blue check mark indicates that a file or folder will be
fully restored. A dimmed check mark on a folder means that some, but not
all, of its contents will be restored.
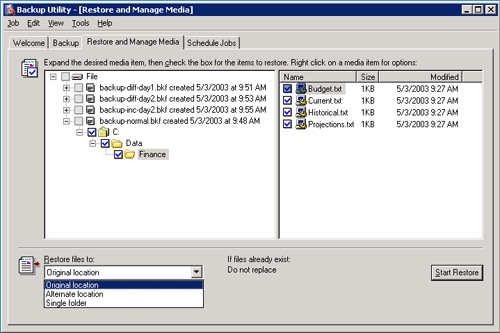
You are also asked to specify the restore location. For this option, you have three choices:
Original location
Files and folders will be restored to the location from which they were
backed up. The original folder structure will be maintained or, if
folders were deleted, re-created.
Alternate location
Files and folders will be restored to a folder you designate in the
Alternate Location box. The original folder structure is preserved and
created beneath that folder, where the designated alternate location is
equivalent to the root (volume) of the backed up data. So, for example,
if you backed up a folder C:\Data\Finance and you restored the folder to
C:\Restore, you would find the Finance folder in
C:\Restore\Data\Finance.
Single folder
Files are restored to the folder you designate, but the folder
structure is not maintained. All files are restored to a single folder.
After selecting the files to restore and the
restore location, click Start Restore. Click OK and the restore process
will begin. Confirm that no errors occurred.
Restore Options
The Backup Utility supports several options for
how files in the restore location are handled during a restore. Options
are specified in the Options dialog box, which is opened by clicking
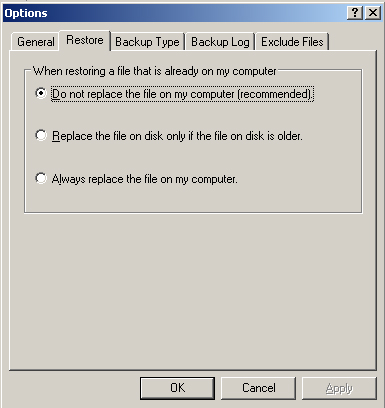
Options on the Tools menu. The following options are found on the
Restore tab of the Options dialog box shown in Figure 2:
Do Not Replace The File On My Computer.
This option, the default, causes the restore process to skip files that
are already in the target location. A common scenario leading to this
choice is one in which some, but not all, files have been deleted from
the restore location. This option will restore such missing files with
the backed-up files.
Replace The File On Disk Only If The File On Disk Is Older.
This option directs the restore process to overwrite existing files
unless those files are more recent than the files in the backup set. The
theory is that if a file in the target location is more recent than the
backed-up copy, it is possible that the newer file contains information
you do not want to overwrite.
Always Replace The File On My Computer.
Under this restore option, all files are overwritten by their backed-up
versions, regardless of whether the file is more recent than the
backup. You will lose data in files that were modified since the backup
date. Any files in the target location that are not in the backup set will remain, however.
After
selecting files to restore, restore options, and a restore destination,
click Start Restore and then confirm the restore. The Start Restore
dialog box appears.
Before confirming the restore, you can configure
how the restore operation will treat security settings on the backed-up
files by clicking Advanced in the Confirm Restore dialog box and
selecting the Restore Security option. If data was backed up from, and
is being restored to, an NTFS volume, the default setting will restore
permissions, audit settings, and ownership information. Deselecting this
option will restore the data without its security descriptors, and all
restored files will inherit the permissions of the target restore volume
or folder.
Practice: Restoring Data
In this practice, you will verify your backup and restore procedures by using a common method: restoring to a test location.
Exercise 1: Verifying Backup and Restore Procedures
To verify backup and restore procedures, many
administrators will perform a test restore of a backup set. So as not to
damage production data, that test restore is targeted not at the
original location of the data, but at another folder, which can then be
discarded following the test. In a production environment, your
verification should include restoring the backup to a “standby” server,
which would entail making sure that the backup device (that is, the tape
drive) is correctly installed on a server that can host data in the
event that the primary server fails. To do this, perform the following
steps:
1. | Log on to Server01 as Administrator.
|
2. | Open the Backup Utility.
|
3. | Click the Restore And Manage Media tab.
|
4. | Click the plus sign to expand the File node.
|
5. | Click the plus sign to expand Backup-normal.bkf.
|
6. | Click the check box to select C:.
|
7. | Select the C: node.
|
8. | Expand the C: and Data nodes. You will notice that your selection of the C: folder has selected its child folders and files.
|
9. | In the Restore Files To drop-down box, select Alternate Location.
|
10. | In the Alternate Location field, type C:\TestRestore.
|
11. | Click Start Restore.
|
12. | In the Confirm Restore dialog box, click OK.
Note If
a Check Backup File Location dialog box appears asking you to verify
the backup file location, verify that the path is correct and then click
OK. |
|
13. | When the restore job is complete, click Report and examine the log of the restore operation.
|
14. | In Windows Explorer, open the C:\TestRestore folder, and verify that the folder structure and files restored correctly.
|
15. | Repeat
steps 2 through 12, this time restoring the file backup-diff-day2.bkf.
When the restore job is finished, continue to step 16 to examine its
report.
|
16. | When
the restore job finishes, click Report to view the restore job log. If
you accidentally close the job status window, choose the Report command
from the Tools menu, select the most recent report, and click View.
|
17. |
| Q1: | Examine the report for the job you just restored. How many files were restored?
Why? | |
A1:
| None.
The answer lies in the restore options. |
|
18. | Choose
the Options command from the Tools menu, and click the Restore tab. Now
you can identify the problem. The default configuration of the Backup
Utility is that it does not replace files on the computer. Therefore,
the differential job, which contains files that were updated after the
normal backup, was not successfully restored.
|
19. | Choose Always Replace The File On My Computer.
|
20. | Repeat the restore operation of backup-diff-day2.bkf. The report should confirm that two files were restored.
|
21. | You
have now verified your backup and restore procedures, including the
need to modify restore options. Delete the C:\TestRestore folder. |