If you aren't already assigning security to
objects that your application creates, then you're missing out on a
valuable Windows feature. Basic Windows NT security is the cornerstone
of protection on every system that runs the Windows operating system.
Newer features, such as Role-Based Security (RBS), are add-ons to this
basic level of security. Think of role-based and other forms of security
as the alarm system and other advanced security features in modern
homes. Even though these advanced security features are welcome and
extremely important, they can't replace the basic locks in a home.
Likewise, you can't replace basic Windows NT security in your
application. The following sections show how to perform some basic
protection tasks using Windows NT security.
NOTE
The .NET Framework 4 supplies the new System.Security.AccessControl namespace that gives you access to Windows NT security features. You can read about it at http://msdn.microsoft.com/library/system.security.accesscontrol.aspx.
If you're using an older version of the .NET Framework, you must resort
to using Platform Invoke (P/Invoke) programming techniques to gain
access to Windows NT security. Using P/Invoke is somewhat cumbersome but
not impossible.
1. Checking User Permissions
The factors that describe a user's permissions vary
according to the user. A user will always have a SID and specific
characteristics, such as an impersonation level. In addition, user
permissions aren't always stored with the user token. Smart
administrators use groups to help describe user permissions. Granting
rights to groups (rather than individual users) saves time and effort
when rights change to meet a new requirement. The following sections
describe how to obtain information about user permissions.
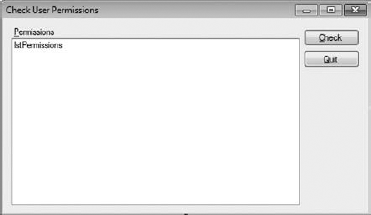
1.1. Configuring the User Permission Example
The User Permission example begins with the Windows
Forms template. You need a button to call the code used to display the
user's permissions, a label to mark the output, and a list box as shown
in Figure 1.
The application doesn't require any special references. However, you do need to add the following using statement:
using System.Security.Principal;
1.2. Writing the User Permission Code
Microsoft doesn't make it hard to obtain the user
permission entries. In fact, obtaining user permission settings is one
of the items that the .NET Framework has supported for a long time.
Microsoft does tweak the functionality, but the code in Listing 1 shows what you can typically expect to obtain as information from the .NET Framework without any special coding.
Example 1. Checking a user's permissions
private void btnCheck_Click(object sender, EventArgs e)
{
    // Get the current user.
    WindowsIdentity User = WindowsIdentity.GetCurrent();

    // Display the user's information.
    lstPermissions.Items.Add("Name: " + User.Name);
    lstPermissions.Items.Add("SID: " + User.User.Value);

    // Display the authentication information.
    lstPermissions.Items.Add(
        "Authenticated? " + User.IsAuthenticated.ToString());
    lstPermissions.Items.Add(
        "Guest? " + User.IsGuest.ToString());
    lstPermissions.Items.Add(
        "System Account? " + User.IsSystem.ToString());
    lstPermissions.Items.Add(
        "Authentication Type: " + User.AuthenticationType.ToString());
    lstPermissions.Items.Add(
        "Impersonation Level: " + User.ImpersonationLevel.ToString());
// Get the group membership.
    lstPermissions.Items.Add("");
    lstPermissions.Items.Add("Group Membership:");
    foreach (IdentityReference Group in User.Groups)
        lstPermissions.Items.Add("\t" +
            Group.Translate(typeof(NTAccount)));
}
|
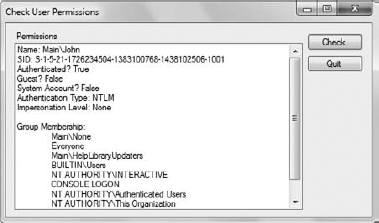
The example begins by creating a WindowsIdentity object, User, that points to the current user by using the GetCurrent() method. The WindowsIdentity
object doesn't provide any common constructor, but uses specialty
constructors to help you obtain the right user identity. For example,
you can just as easily obtain an anonymous account or impersonate
another user.
The code displays the user's login name (as
contrasted to the user's full name) and next the SID. Every user has a
unique SID, so you can use a SID to ensure that the user you're working
with is actually the user you want, even if there's a chance of having
users with similar login names on the network.
After the code displays basic identification, it
provides some authentication information. For example, you can determine
whether the user is logged in to the system (authenticated) and whether
the user is a guest. Your computer also has a number of system accounts
that aren't meant for use by users, and you can detect system accounts
as well. The three common system accounts are:
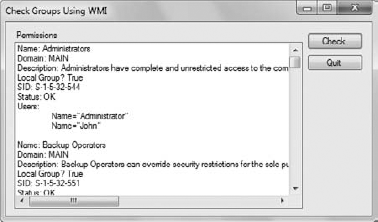
Discovering group membership is extremely important. As you can see, the WindowsIdentity object makes this task quite simple. Unfortunately, you can use the WindowsIdentity object only to discover group affiliation — you can't use it to change group or any other information for that matter. Figure 2 shows typical output from this example.
1.3. Using WMI for Permissions Example
Sometimes the .NET Framework will fall short in the
information department. Another way to obtain the security information
you need is to use Windows Management Instrumentation (WMI), as shown in
the User Permissions Using WMI example in Listing 10-2.
In this case, the example views user group affiliation from the group
perspective, rather than from the user perspective. To begin this
example, you create a Windows Forms application with controls similar to
those shown in Figure 10-4.
In order to use WMI, you must add a reference to the System.Management assembly. You must also add the following using statement:
using System.Management;
It's important to realize that WMI isn't a managed
interface — it relies on native code and Component Object Model (COM)
interfaces. You can use WMI directly at the command line using the WMIC
(Windows Management Interface Command line) utility. Because of the way
WMI is constructed, you might find that you have to create some
convoluted code in order to obtain the desired results. Listing 2 shows an example of a simple WMI application.
Example 2. WMI provides a secondary means of interacting with users and groups
private void btnCheck_Click(object sender, EventArgs e)
{
    // Create a query for the local group accounts.
    SelectQuery GroupQuery = new SelectQuery("Win32_Group");

    // Define the search object.
    ManagementObjectSearcher Searcher =
        new ManagementObjectSearcher(GroupQuery);

    // Look at each group.
    foreach (ManagementObject ThisGroup in Searcher.Get())
    {
        // Display the group's information.
        lstPermissions.Items.Add("Name: " +
            ThisGroup["Name"].ToString());
        lstPermissions.Items.Add("Domain: " +
            ThisGroup["Domain"].ToString());
        lstPermissions.Items.Add("Description: " +
            ThisGroup["Description"].ToString());
        lstPermissions.Items.Add("Local Group? " +
            ThisGroup["LocalAccount"].ToString());
        lstPermissions.Items.Add("SID: " +
            ThisGroup["SID"].ToString());
        lstPermissions.Items.Add("Status: " +
            ThisGroup["Status"].ToString());

        // Obtain a list of users for the group.
        SelectQuery UserQuery = new SelectQuery("Win32_GroupUser");
        ManagementObjectSearcher UserList =
            new ManagementObjectSearcher(UserQuery);

        // Display the list.
        lstPermissions.Items.Add("Users:");
        foreach (ManagementObject ThisUser in UserList.Get())
        {
            // Obtain the group information for each entry.
            String GroupPart = ThisUser["GroupComponent"].ToString();
// When the group information matches the current group, output
            // it to the listbox.
            if (GroupPart.Contains(ThisGroup["Name"].ToString()))
            {
                // Obtain the user information for the entry.
                String UserPart = ThisUser["PartComponent"].ToString();

                // Extract the user name and output it.
                lstPermissions.Items.Add("\t" +
                    UserPart.Substring(UserPart.IndexOf("Name=")));
            }
        }

        // Add a space.
        lstPermissions.Items.Add("");
    }
}
|
The .NET Framework provides a number of ways to create a WMI query. The easiest method is to create a SelectQuery object, such as GroupQuery, and supply it with a WMI class. In this case, the example begins with the Win32_Group class. You can find a listing of WMI classes at http://msdn.microsoft.com/library/aa394554.aspx.
Creating the query is only the first step. You must now execute the query using a ManagementObjectSearcher object, Searcher.
The .NET Framework will happily create any query you want, but the
query can fail if it's incorrect. The failure will occur when you
execute the query using the ManagementObjectSearcher object, so sometimes the errant code isn't where the debugger tells you it is.
The for loop is where the query actually executes. Calling Searcher.Get() obtains a single group entry and places it in the ManagementObject, ThisGroup. The ThisGroup object contains a wealth of helpful information, such as the group name, SID, and status.
At this point, you have a list of groups, but not of
users who are members of the groups. In order to obtain the list of
users, you must create another query for the Win32_GroupUser class. The output of this query is actually an object array consisting of two strings, as shown here:
{\\MAIN\root\cimv2:Win32_GroupUser.GroupComponent=
"\\\\MAIN\\root\\cimv2:Win32_Group.Domain=\"MAIN\",
Name=\"Administrators\"",
PartComponent="\\\\MAIN\\root\\cimv2:Win32_UserAccount.Domain=\"Main\",
Name=\"Administrator\""}
The two
strings are the GroupComponent and the PartComponent. The GroupComponent contains the complete path to the group information, which is Administrators in this example. Likewise, the PartComponent
contains the complete path to the user associated with the group, which
is Administrator in this example. The two-part nature of this query
complicates the code a bit, but you can easily locate the users
associated with a particular group using a for loop and then comparing the group name to the name in the GroupComponent (represented by GroupPart).
NOTE
The UAC has an effect on WMI. In some cases, you
obtain less data and other classes become inaccessible. For example, you
won't obtain a complete list of user accounts when the WMI output is
filtered by the UAC because the UAC hides sensitive accounts from view.
The article at http://msdn.microsoft.com/library/aa826699.aspx provides details on what you can expect when an account is hobbled by UAC filtering.
Once the code has located a user associated with the current group, it outputs the information from PartComponent. Because the output contains a complete path, you use the Substring() method to extract just the information needed. Figure 3 shows typical output from this example.