Window networks depend upon a reliable
TCP/IP infrastructure. A properly designed and managed TCP/IP network
helps to ensure a successful Windows Server 2008 R2 deployment, while a
poorly designed network almost guarantees that problems are going to
occur during and after your deployment. Spend time to make sure that
your network is healthy before rolling out Windows Server 2008 R2. If
you already have a well-managed and reliable IP network, give yourself a
pat on the back. This is not always an easy objective to accomplish.
Introduction to TCP/IP
Most of today’s networks, including the Internet,
rely heavily on the TCP/IP protocol. The TCP/IP protocol stack has been
around since the early days of computer networks and remains the de facto
standard of enterprises today. Before setting up or managing a Windows
network, you need to have a good understanding of how TCP/IP works. In
this section, we will cover some of the basics of TCP/IP and how they
apply to Windows. If you are already an experienced network
administrator, now might be a good time to review and refresh your IP
knowledge.
IP addresses
IP addresses are unique binary numbers assigned to
hosts on an IP network. Think of IP addressing in the same way as you
think of the addresses of houses in your neighborhood. Each house
requires a unique street address. When someone needs to visit your home,
they direct their vehicle to your address. The same applies in the
world of TCP/IP networks. Every computer and device attached to the
network requires a unique IP address. Data that needs to reach a certain
computer on the network is sent to its IP address.
As mentioned, IP addresses are binary numbers;
however, most people prefer to read IP addresses in decimal format for
ease of use. It is important that you as a network administrator
understand this concept to properly troubleshoot and manage IP networks.
IP address classes
IP addresses are distributed into five classes: Class
A, Class B, Class C, Class D, and Class E. All IP addresses belong to a
class based upon their decimal value of the first octet. Classes A, B,
and C are the ones you will see used on corporate networks. Class D IPs
are reserved multicast addresses
that cannot be assigned to a single computer but used to send and
receive multicast traffic. Class E addresses are reserved for use by the
Internet Engineering Task Force (IETF). The IP classes and their
corresponding range of IP addresses are listed in Table 1.
Table 1. IP Address Classes
| Class | Range |
|---|
| A | 1.0.0.1–127.255.255.255 |
| B | 128.0.0.1–191.255.255.255 |
| C | 192.0.0.1–223.255.255.255 |
| D | 224.0.0.1–239.255.255.255 |
| E | 240.0.0.1–255.255.255.255 |
IP subnetting
A subnet mask is another group of dotted decimal
numbers, representing a binary number that distinguishes which part of
the IP address represents the network. The subnet mask is used to allow
computers to determine whether the addresses of other computers they
wish to communicate with are on the local network or on a remote
network. If the computer resides on a remote network, the communication
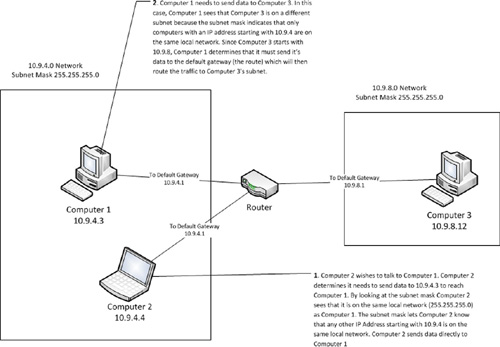
request is sent to the default gateway. Figure 1 explains how subnet masks work.
The
three main IP address classes have default subnet masks. The standard
subnet masks for each class, including number of supported hosts on each
network are listed in Table 2.
Table 2. Standard Subnet Masks
| | Subnet Mask | Number of Supported Hosts per Network |
|---|
| Class A | 255.0.0.0 | Over 16 million |
| Class B | 255.255.0.0 | Over 16 thousand |
| Class C | 255.255.255.0 | 254 |
The default subnet mask is not practical in most
network configurations. For example, let us say that you owned a Class B
network of 159.247.0.0. Using the default mask, you could have over
16,000 computers on one nonroutable network segment. What if you had a
remote office connected via a WAN link?
Would you need to acquire another Class B network range for that
office? First, this would be a major waste of your IP addresses and
second, good luck on getting someone to give you that many. Luckily, you
can create custom subnet masks to split up your IP addresses. By simply
changing the subnet mask from 255.255.0.0 to 255.255.255.0, you have
instantly given yourself 254 unique routable networks that can support
254 hosts each. Creating a custom subnet mask is as simple as adding
some binary ones to replace zeros in the mask. But what if you need to
support 400 computers in a remote network? What does the mask look like
then? This is where it gets a little tricky. You will need to convert
the dotted decimal to its binary equivalent and perform a simple
calculation. Let us take a look at this process.
Decide
how many subnets or networks you need to support. This is pretty easy
to calculate. Figure out how many networks you have that are separated
by a router.
Decide
how many hosts you need on each network. You need to plan for the
number of computers and other IP devices that you will want to support
at each network location. Remember that you may need IP addresses for
network switches, printers, and other IP-enabled devices on top of the
number of computers that you need to support each network. You should
plan for growth here as well. Give yourself at least 10% growth room for
a given network.
Calculate
the subnet mask. You now have enough information to calculate the
proper custom subnet mask. Perform the following to calculate your
subnet mask.
Convert
the standard subnet mask to binary. If we are using an IP network of
160.240.0.0, then the mask would be 255.255.0.0. The binary conversion
is 11111111.11111111.00000000.00000000. Notice that it takes eight
binary numbers to make up the number between each decimal. This is why
each number between the decimal is referred to as an octet.
Add one to the number of networks (subnets) you need. Assume that you need five networks. Add one to it to get six.
Convert
the decimal number to binary. You can do this manually or the
calculator in Windows works great for this. In our example, we convert
the decimal number six to binary, which is 110.
Calculate
the bits required for the mask. This is equal to the bits required to
create the binary number. Since 110 is three individual numbers, 3 bits
are required.
Add
the bits to the standard subnet mask resulting in a new binary subnet
mask of 11111111.11111111.11100000.00000000. Now convert this binary
back to decimal resulting in 255.255.224.0. You now have the subnet mask
to use on each network segment.
Now that you have learned how to create a custom
subnet mask, you should be aware that you can use a special subnet
calculator to perform these steps for you. However, it is important that
you understand how subnetting works if you plan on supporting Windows
networks.
Public- versus private-IP addresses
IP networks expanded and grew much larger than the
original creators of the protocol ever intended. IP blocks or classes
were originally developed with a limited number of available addresses.
With the emergence of global interconnected networks and the Internet,
many organizations found themselves in an IP address shortage crisis.
This is where private-IP addresses come into play. Private-IPs
constitute a set of three IP address ranges, one from each of the three
primary classes that are not routable on the Internet (see Table 3).
The result of not making them Internet routable is that anyone can use
them on their networks. If the private-IP addresses need to connect to
the Internet, a Network Address Translator (NAT) device must be used to
translate the private-IP to a public-IP. This technology allows
organizations to purchase a limited number of public-IP addresses and
use private-IP addresses on computers connected to their internal
networks. The private-IP addressed computers can then use the NAT
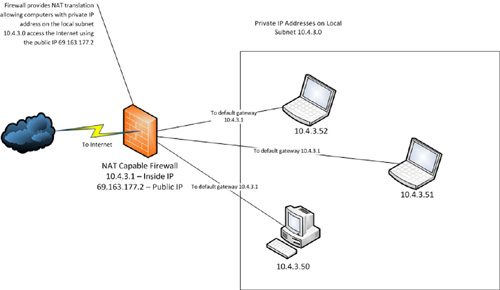
device, which is assigned a public-IP, to communicate on the Internet. A
simple private-IP addressed network is depicted in Figure 2. The use of private-IPs and NAT not only decreases the usage of public-IP addresses,
but also makes networks more secure by hiding computers from the global
Internet. Private-IP addressing is a technology that continues to be
available in IPv6.
Table 3. Private–IP Ranges
| | IP Range |
|---|
| Class A | 10.0.0.0–10.255.255.255 |
| Class B | 172.16.0.0–172.31.255.266 |
| Class C | 192.168.0.0–192.168.255.255 |
Introduction to IPv6
IPv6 is the next generation IP network protocol
developed to replace the aging IPv4. As mentioned earlier, the designers
of IPv4 never expected that billions of IP addresses would be needed to
support the global networks we have today. Even with the increased use
of private-IP ranges and technologies, such as NAT, the number of
available public-IP addresses continues to decline. It has become very
clear that future IP networks will require a lot more addresses than
that are available in IPv4. This is where IPv6 comes in. IPv6 moves from
32-bit (4 octets) IP addresses to 128-bit IP addresses. This increases
the number of available addresses to such a large number that every
person on earth could have roughly 39614081257132168796771975168
addresses. Yes, that is a lot of IP addresses. The intent of the
Internet Engineering Task Force (IETF), the governing body of IP
networking, was not just to create some insanely large number
just to ensure that we do not run out, but for easier management and
assignment of IP ranges. IPv6 allows large blocks to be assigned,
providing more efficient routing and easier administration of those IP
ranges.
Though IPv6 is clearly the future of IP networks, the
adoption rate has been very low to date. Major changes to enterprise
networks, such as changing IP addresses, are never cheap or quickly
implemented. Chances are that IPv6-based networks will emerge and grow
over the next few years, but IPv4 will not be going away in the near
future.
As a Windows administrator, the important thing to
understand is that Windows Server 2008 R2 fully supports IPv6, and can
efficiently communicate on both IPv4- and IPv6-based networks.
IPv4 to IPv6 transition technologies
To help organizations move to IPv6, there are several
standards-based technologies that have been created to allow IPv6
applications function over an IPv4 network. Windows Server 2008 R2
includes support for some of these technologies, including Teredo, 6to4,
IP-HTTPS, and ISATAP. A brief explanation of each is provided below:
Teredo
—Teredo is a standards-based protocol that provides IPv6 connections for
IPv4-based computers that are behind an IPv4-based NAT. Teredo is a key
technology allowing organizations to make IPv6 connections without
changing IP addresses of computers on their internal private subnets.
6to4
—6to4 is a standards-based protocol that allows computers with
public-IPv4 addresses to make IPv6-based connections over the IPv4-based
Internet. It is a key technology allowing organizations to begin
transitioning to IPv6 while the Internet at large continues to be based
on IPv4.
IP-HTTPS
—IP-HTTPS is a Microsoft technology that allows Windows 7 and Windows
Server 2008 R2 computers behind a firewall to establish IPv6
connectivity over an IPv4 network by creating an IPv4-based tunnel in
which IPv6 packets can travel.
ISATAP —ISATAP is a standards-based technology that provides IPv6 connectivity across an IPv4-based internal network.
Designing IP networks
The same requirement applies to building IP-based networks. You need to
spend ample time planning prior to building your network
infrastructure. Be sure to document your game plan so that you will not
forget the critical tasks. Remember that your Windows network is not
worth much if your workstations and servers cannot communicate. As part
of your design, you need to understand and document what network
services and applications you plan to support. You need to know how they
communicate, what protocols they use, and how much bandwidth they
require. You will also want to consider the following while developing
your plan:
Number of physical locations and logical networks
Number of networks’ devices you plan to support
Expected growth of your network
Availability and redundancy requirements
Bandwidth needs
Routing options
Network switch needs
VLANs
Network locations that will host servers
VPNs and Remote Access technologies
Internet access and firewall locations
These are just a few of the topics that you
will need to spend time designing and documenting prior to deployment of
an IP infrastructure. The end design should match up with your Windows
Server 2008 R2 deployment plan. The IP infrastructure must be designed
to support the various requirements of network applications provided by
Windows Servers. In the end-user’s eyes, if the network is down, so are
the services it supports.