4. Parameterized Commands
In the previous example (which
used the SqlDataSource to retrieve a list of products), the complete
query was hard-coded. Often, you won't have this flexibility. Instead,
you'll want to retrieve a subset of data, such as all the products in a
given category or all the employees in a specific city.
The record editor that you
considered earlier offers an ideal example. Once you select a product,
you want to execute another command to get the full details for that
product. (You might just as easily execute another command to get
records that are related to this product.) To make this work, you need
two data sources. You've already created the first SqlDataSource, which
fetches limited information about every product. Here's the second
SqlDataSource, which gets more extensive information about a single
product (the following query is split over several lines to fit the
printed page):
<asp:SqlDataSource ID="sourceProductDetails" runat="server"
  ProviderName="System.Data.SqlClient"
  ConnectionString="<%$ ConnectionStrings:Northwind %>"
  SelectCommand="SELECT * FROM Products WHERE ProductID=@ProductID"
/>
But this example has a
problem. It defines a parameter (@ProductID) that identifies the ID of
the product you want to retrieve. How do you fill in this piece of
information? It turns out you need to add a <SelectParameters>
section to the SqlDataSource tag. Inside this section, you must define
each parameter that's referenced by your SelectCommand and tell the
SqlDataSource where to find the value it should use. You do that by mapping the parameter to a value in a control.
Here's the corrected command:
<asp:SqlDataSource ID="sourceProductDetails" runat="server"
  ProviderName="System.Data.SqlClient"
  ConnectionString="<%$ ConnectionStrings:Northwind %>"
  SelectCommand="SELECT * FROM Products WHERE ProductID=@ProductID">
  <SelectParameters>
    <asp:ControlParameter ControlID="lstProduct" Name="ProductID"
     PropertyName="SelectedValue" />
  </SelectParameters>
</asp:SqlDataSource>
You
always indicate parameters with an @ symbol, as in @City. You can define
as many parameters as you want, but you must map each one to a value
using a separate element in the SelectParameters collection. In this
example, the value for the @ProductID parameter comes from the
lstProduct.SelectedValue property. In other words, you are binding a
value that's currently in a control to place it into a database command.
(You could also use the SelectedText property to get the currently
displayed text, which is the ProductName in this example.)
Now all you need to do is bind
the SqlDataSource to the remaining controls where you want to display
information. This is where the example takes a slightly different turn.
In the previous version of the record editor, you took the information
and used a combination of values to fill in details in a label and a
list control. This type of approach doesn't work well with data source
controls. First, you can bind only a single data field to most simple
controls such as lists. Second, each bound control makes a separate
request to the SqlDataSource, triggering a separate database query. This
means if you bind a dozen controls, you'll perform the same query a
dozen times, with terrible performance. You can alleviate this problem
with data source caching, but it indicates you aren't designing your application in a way that lends itself well to the data source control model.
The solution is to use one of
the rich data controls, such as the GridView, DetailsView, or FormView.
These controls have the smarts to show multiple fields at once, in a
highly flexible layout.
The DetailsView is a rich data
control that's designed to show multiple fields in a data source. As
long as its AutoGenerateRows is True (the default), it creates a
separate row for each field, with the field caption and value. Figure 2 shows the result.
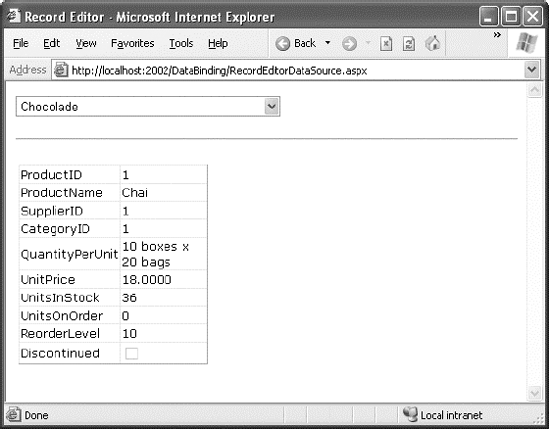
Here's the basic DetailsView tag that makes this possible:
<asp:DetailsView ID="detailsProduct" runat="server"
  DataSourceID="sourceProductDetails" />
As you can see, the only
property you need to set is DataSourceID. That binds the DetailsView to
the SqlDataSource you created earlier. This SqlDataSource gets the full
product information for a single row, based on the selection in the list
control. Best of all, this whole example still hasn't required a line
of code.
4.1. Other Types of Parameters
In the previous example, the
@ProductID parameter in the second SqlDataSource is configured based on
the selection in a drop-down list. This type of parameter, which links
to a property in another control, is called a control parameter.
But parameter values aren't necessarily drawn from other controls. You
can map a parameter to any of the parameter types defined in Table 15-1.
Table 1. Parameter Types
| Source | Control Tag | Description |
|---|
| Control property | <asp:ControlParameter> | A property from another control on the page. |
| Query string value | <asp:QueryStringParameter> | A value from the current query string. |
| Session state value | <asp:SessionParameter> | A value stored in the current user's session. |
| Cookie value | <asp:CookieParameter> | A value from any cookie attached to the current request. |
| Profile value | <asp:ProfileParameter> | A value from the current user's profile |
| Routed URL value | <asp:RouteParameter> | A
value from a routed URL. Routed URLs are an advanced technique that
lets you map any URL to a different page (so a request like http://www.mysite.com/products/112 redirects to a page like www.mysite.com/productdetails.aspx?id=112, for example). To learn more about URL routing, refer to the Visual Studio Help or Pro ASP.NET 4 in VB 2010 (Apress). |
| A form variable | <asp:FormParameter> | A
value posted to the page from an input control. Usually, you'll use a
control property instead, but you might need to grab a value straight
from the Forms collection if you've disabled view state for the
corresponding control. |
For example, you could
split the earlier example into two pages. In the first page, define a
list control that shows all the available products:
<asp:SqlDataSource ID="sourceProducts" runat="server"
  ProviderName="System.Data.SqlClient"
  ConnectionString="<%$ ConnectionStrings:Northwind %>"
  SelectCommand="SELECT ProductName, ProductID FROM Products"
/>
<asp:DropDownList ID="lstProduct" runat="server" AutoPostBack="True"
  DataSourceID="sourceProducts" DataTextField="ProductName"
  DataValueField="ProductID" />
Now, you'll need a little
extra code to copy the selected product to the query string and redirect
the page. Here's a button that does just that:
Protected Sub cmdGo_Click(ByVal sender As Object, _
  ByVal e As EventArgs) Handles cmdGo.Click

    If lstProduct.SelectedIndex <> −1 Then
        Response.Redirect( _
          "QueryParameter2.aspx?prodID=" & lstProduct.SelectedValue)
    End If
End Sub
Finally, the second page can bind the DetailsView according to the ProductID value that's supplied in the query string:
<asp:SqlDataSource ID="sourceProductDetails" runat="server"
  ProviderName="System.Data.SqlClient"
  ConnectionString="<%$ ConnectionStrings:Northwind %>"
  SelectCommand="SELECT * FROM Products WHERE ProductID=@ProductID">
  <SelectParameters>
    <asp:QueryStringParameter Name="ProductID" QueryStringField="prodID" />
  </SelectParameters>
</asp:SqlDataSource>

<asp:DetailsView ID="detailsProduct" runat="server"
  DataSourceID="sourceProductDetails" />
4.2. Setting Parameter Values in Code
Sometimes you'll need to set a parameter with a value that isn't represented by any of the parameter classes in Table 1.
Or, you might want to manually modify a parameter value before using
it. In both of these scenarios, you need to use code to set the
parameter value just before the database operation takes place.
For example, consider the page shown in Figure 3.
It includes two data-bound controls. The first is a list of all the
customers in the database. Here's the markup that defines the list and
its data source:
<asp:SqlDataSource ID="sourceCustomers" runat="server"
  ProviderName="System.Data.SqlClient"
  ConnectionString="<%$ ConnectionStrings:Northwind %>"
  SelectCommand="SELECT CustomerID, ContactName FROM Customers"
/>
  <asp:DropDownList ID="lstCustomers" runat="server"
  DataSourceID="sourceCustomers" DataTextField="ContactName"
  DataValueField="CustomerID" AutoPostBack="True">
</asp:DropDownList>
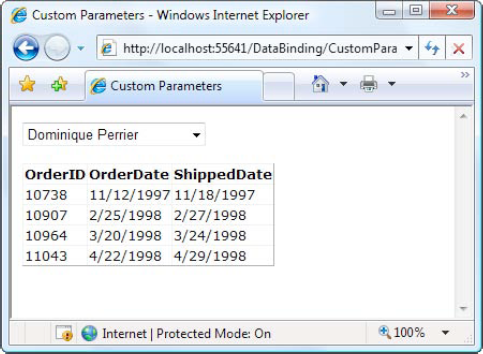
When the user picks a
customer from the list, the page is posted back (because AutoPostBack is
set to True) and the matching orders are shown in a GridView
underneath, using a second data source. This data source pulls the
CustomerID for the currently selected customer from the drop-down list
using a ControlParameter:
<asp:SqlDataSource ID="sourceOrders" runat="server"
 ProviderName="System.Data.SqlClient"
 ConnectionString="<%$ ConnectionStrings:Northwind %>"
 SelectCommand="SELECT OrderID,OrderDate,ShippedDate FROM Orders WHERE CustomerID=@CustomerID">
  <SelectParameters>
    <asp:ControlParameter Name="CustomerID"
     ControlID="lstCustomers" PropertyName="SelectedValue" />
  </SelectParameters>
</asp:SqlDataSource>

<asp:GridView ID="gridOrders" runat="server" DataSourceID="sourceOrders">
</asp:GridView>
Now, imagine you want to limit
the order list so it only shows orders made in the last week. This is
easy enough to accomplish with a Where clause that examines the
OrderDate field. But there's a catch. It doesn't make sense to hard-code
the OrderDate value in the query itself, because the range is set based
on the current date. And there's no parameter that provides exactly the
information you need. The easiest way to solve this problem is to add a
new parameter—one that you'll be responsible for setting yourself:
<asp:SqlDataSource ID="sourceOrders" runat="server"
 ProviderName="System.Data.SqlClient"
 ConnectionString="<%$ ConnectionStrings:Northwind %>"
SelectCommand="SELECT OrderID,OrderDate,ShippedDate FROM Orders WHERE CustomerID=@CustomerID AND OrderDate>=@EarliestOrderDate"
 OnSelecting="sourceOrders_Selecting">
  <SelectParameters>
    <asp:ControlParameter Name="CustomerID"
     ControlID="lstCustomers" PropertyName="SelectedValue" />
    <asp:Parameter Name="EarliestOrderDate" DefaultValue="1900/01/01" />
  </SelectParameters>
</asp:SqlDataSource>
Although you can modify the value of any parameter, if you aren't planning to pull the value out of any of the places listed in Table 15-1,
it makes sense to use an ordinary Parameter object, as represented by
the <asp:Parameter> element. You can set the data type (if
required) and the default value (as demonstrated in this example).
Now that you've created the
parameter, you need to set its value before the command takes place. The
SqlDataSource has a number of events that are perfect for setting
parameter values. You can fill in parameters for a select operation by
reacting to the Selecting event. Similarly, you can use the Updating,
Deleting, and Inserting events when updating, deleting, or inserting a
record. In these event handlers, you can access the command that's about
to be executed, using the Command property of the custom EventArgs
object (for example, SqlDataSourceSelectingEventArgs.Command). You can
then modify its parameter values by hand. The SqlDataSource also
provides similarly named Selected, Updated, Deleted, and Inserted
events, but these take place after the operation has been completed, so
it's too late to change the parameter value.
Here's the code that's needed
to set the parameter value to a date that's seven days in the past,
ensuring you see one week's worth of records:
Protected Sub sourceOrders_Selecting(ByVal sender As Object, _
  ByVal e As SqlDataSourceSelectingEventArgs) Handles sourceOrders.Selecting

    e.Command.Parameters("@EarliestOrderDate").Value = _
      DateTime.Today.AddDays(-7)
End Sub
NOTE
You'll
have to tweak this code slightly if you're using it with the standard
Northwind database. The data in the Northwind database is historical,
and most orders bear dates around 1997. As a result, the previous code
won't actually retrieve any records. But if you use the AddYears()
method instead of AddDays(), you can easily move back 13 years or more,
to the place you need to be.