All local computer accounts should have
passwords. If an account is created without a password, anyone can log
on to the account from the console, and there is no protection for the
account. However, a local account without a password cannot be used to
remotely access a computer.
The sections that follow discuss how to create and work
with local user accounts. Every workstation computer has local computer
accounts, regardless of whether the computer is a member of a workgroup
or a domain.
Creating Local User Accounts in a Workgroup
For a computer that is a member of a workgroup, you can create a local user account on a computer by following these steps:
-
In Control Panel, click Add Or Remove User Accounts under the User Accounts heading. This displays the Manage Accounts page. As Figure 1
shows, the Manage Accounts page lists all configurable user accounts on
the local computer by account type with configuration details. If an
account has a password, it is listed as being password protected. If an
account is disabled, it is listed as being off.
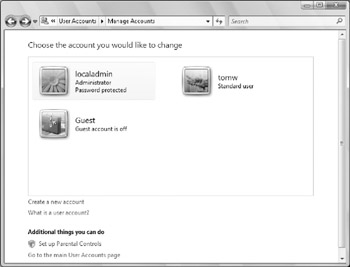
Figure 1: In a workgroup, use the Manage Accounts page in Control Panel to add or remove local user accounts.
-
Click Create A New Account. This displays the Create New Account page.
-
Type the name of the local account. This name is displayed on the Welcome screen and Start menu.
-
Set the type of account as either Standard User
or Administrator. To give the user full permissions on the local
computer, select Administrator.
Granting Access to an Existing Domain Account to Allow Local Logon
If a user needs to be able to log on locally to a
computer and has an existing domain account, you can grant the user
permission to log on locally by completing the following steps:
-
In Control Panel, click User Accounts. On the
User Accounts page, click the Give Other Users Access To This Computer
link. This displays the User Accounts dialog box. As Figure 2
shows, the User Accounts dialog box lists all configurable user
accounts on the local computer by account type with group membership
details.
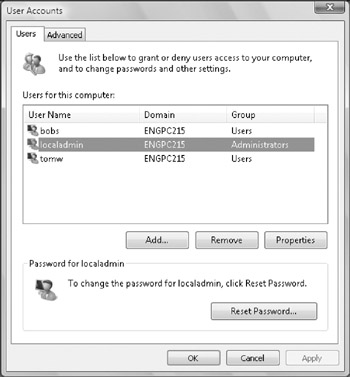
Figure 2: Use the User Accounts dialog box to manage local user accounts.
-
Click Add. This starts the Add New User wizard.
-
You are creating a local computer account for a
user with an existing domain account. Type the user's domain account
name and domain in the fields provided.
-
Using the options provided, select the type of user account.
-
A Standard User account is created as a member of
the local User's group. To give the user the permissions of a normal
user, select Standard User.
-
An Administrator account is created as a member
of the local Administrator's group. To give the user full permissions
on the local computer, select Administrator.
-
An Other account is created as a member of the
specific group you choose. To give the user the permissions of a
specific group, select Other and then select the desired group.
-
Click Finish. If you need to set other
permissions or add the user to other local groups, you'll need to
follow the steps specified in the "Managing Local User and Group
Accounts" section of this chapter.
Changing Local User Account Types
The User Accounts utility provides an easy way to
change account types for local users. You can quickly set one of the
default account types. For more advanced control, however, you'll need
to use Local Users And Groups to assign group membership individually.
(See the "Adding and Removing Local Group Members" section of this chapter.)
In a workgroup, you can change the account type for a local computer user by completing the following steps:
-
In Control Panel, click Add Or Remove User Accounts under the User Accounts heading. This displays the Manage Accounts page.
-
Click the account you want to change and then click Change The Account Type.
-
On the Change The Account Type page, set the
level of access for the user as either Standard User or Administrator
and then click Change The Account Type.
In a domain, you can change the account type for a local computer user by completing the following steps:
-
In Control Panel, click User Accounts. On the
User Accounts page, click the Change Account Type link. This displays
the User Accounts dialog box.
-
On the Users tab, click the user account you want to work with and then click Properties.
-
In the Properties dialog box, select the Group Membership tab.
-
Select the type of account as Standard User or Administrator. Or select Other and then select the desired other group.
-
Click OK twice.
Enabling and Disabling User Account Control
Every
computer has a built-in local administrator account. This built-in
account is not protected by User Account Control (UAC) and using this
account for administration can put your computer at risk. To safeguard
computers in environments where you use a local administrator account
for administration, you should create a new local administrator account
and use this account for administration.
UAC can be enabled or disabled for any individual user
account. If you disable UAC for a user account, you lose the additional
security protections UAC offers and put the computer at risk. To enable
or disable UAC for a particular user account, follow these steps:
-
In Control Panel, click User Accounts. On the User Accounts page, click the Turn User Account Control On Or Off link.
-
You can now enable or disable UAC for the
currently logged on user account. Disable UAC by clearing the Use User
Account Control (UAC) To Help Protect Your Computer check box. Enable
UAC by selecting the Use User Account Control (UAC) To Help Protect
Your Computer check box.
-
Click OK. The computer must be restarted for the
change to take effect. When prompted to restart the computer, click
Restart Now or Restart Later as appropriate.
Creating Passwords for Local User Accounts
In a workgroup configuration, local user accounts
are created without passwords by default. This means that, by default,
users can log on simply by clicking their account name on the Welcome
screen, or clicking OK on the Classic Log On To Windows screen. To
improve security, all local accounts should have passwords.
For the easiest management of local accounts, you
should log on to each account that should have a password and then use
the User Accounts utility to assign a password to the account. If you
are logged on as the user when you create a password, you don't have to
worry about losing encrypted data. If you create a password without
logging on as the user, the user will lose access to his or her
encrypted files, encrypted e-mail, and stored passwords. This occurs
because the user's master key, which is needed to access his or her
personal encryption certificate and unlock this data, is encrypted with
a hash that is based on an empty password. So when you create a
password, the hash doesn't match, and there's no way to unlock the
encrypted data. The only way to resolve this is to restore the original
settings by removing the password from the account. The user should
then be able to access his or her encrypted files. Again, this issue is
only related to local user accounts for computers and not to domain
user accounts.
| Tip |
Only the User Accounts utility allows you to
assign a password hint, which can be helpful in recovering a forgotten
or lost password. Another technique for recovering a password is a
password reset disk. Before assigning passwords, it is important to
note that these are the only techniques you should use to recover
passwords for local user accounts unless you want to risk data loss.
Why? Although you can create, reset, or remove a password from a user
account, doing so deletes any personal certificates and stored
passwords associated with this account. As a result, the user will no
longer be able to access his or her encrypted files or private e-mail
messages that have been encrypted with his or her personal key. In
addition, he or she will lose stored passwords for Web sites and
network resources. It is also important to note that this is only an
issue for local user accounts. Administrators can change or reset
passwords for domain user accounts without affecting access to
encrypted data.
|
You can create a password for a local user account by completing the following steps:
-
Log on as the user whose password you want to
create. In Control Panel, click Add Or Remove User Accounts under the
User Accounts heading. This displays the Manage Accounts page.
-
All user accounts available on the machine are
shown, and you'll need to click the account you want to work with. To
prevent possible data loss, this should be the same as the account
under which you are currently logged on. Any account that has a current
password is listed as Password Protected. Any account without this
label doesn't have a password.
-
Click Create A Password. Type a password and then confirm it, as illustrated in Figure 3.
Afterward, type a unique password hint. The password hint is a word or
phrase that can be used to obtain the password if it is lost. This hint
is visible to anyone who uses the computer.
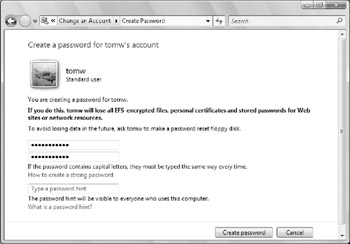
Figure 3: Create a password with a password hint.
-
Click Change Password.
Recovering Local User Account Passwords
As
discussed previously, in order to preserve access to any encrypted data
and stored passwords that a user might have, it is preferable to try
recovering a user password than to change or remove the password.
Windows Vista provides two ways to recover user passwords:
-
Password hint Hints can be accessed on the Welcome
screen. Ordinarily, the Welcome screen is displayed when the computer
is started and no one is logged on. If someone is logged on to the
workstation, ask him or her to log off. Click the user's name to
display the Password prompt and then click the blue arrow mark button
to display the password hint. Hopefully, the password hint will help
the user remember the password. If it doesn't, you'll need to use the
password reset disk.
-
Password reset disk Password reset disks can be
created for any local user account with a password. They enable anyone
to change the password of the related local account without needing to
know the old password. Because anyone with access to these disks can
change account passwords, you should store password reset disks in a
secure location. If users are allowed to create their own password
reset disks, be sure they know how important the disks are.
| Note |
Passwords for domain users and those for local
users are managed differently. Administrators manage passwords for
domain user accounts and can reset forgotten passwords using the Active
Directory Users And Computers console.
|
In domains and workgroups, passwords for local computer
accounts can be reset using a password reset disk. You can create a
password reset disk for the current user by completing these steps:
-
Press Ctrl+Alt+Del and then click the Change A Password option.
-
Click Create A Password Reset Disk to start the Forgotten Password Wizard.
-
In the Forgotten Password Wizard, read the introductory message and then click Next.
-
Insert a blank, formatted disk into drive A and then click Next.
-
Type the password for the current account in the text box provided and then click Next.
-
After the wizard creates the password reset disk, remove the disk and then click Finish.
Be sure to store the password reset disk in a secure
location because any user with access to the disk can use it to create
a new password for the account. If a user is unable to log in because
he or she has forgotten the password, you can use the password reset
disk that you created to reset the password and log in to the account
using this new password.
You can reset a password by following these steps:
-
On the Log On screen, click the arrow button
without entering a password and then click OK. The Reset Password
option should be displayed. If the user has already entered the wrong
password, the Reset Password option might already be displayed.
-
Click Reset Password. This starts the Reset Password Wizard.
-
In the Reset Password Wizard, read the introductory message and then click Next.
-
Insert the password disk into drive A and then click Next.
-
Follow the prompts to complete the password reset process.
Controlling Logon: Welcome Screens and Classic Logons
By default, Windows Vista displays a Welcome
screen when computers are part of a workgroup and a Logon screen when
computers are part of a domain. The difference between the Welcome
screen and the Logon screen is an important one.
In a workgroup, the Welcome screen is displayed when no
one is logged on or when the screen saver is activated and you attempt
to log back in. With the Welcome screen, you will see a list of
accounts on the computer. To log on with one of those accounts, you
click the account and type a password if required. Contrary to what
many people think, the Welcome screen doesn't display all the accounts
that have been created on the computer. Some accounts, such as
Administrator, are hidden from view automatically.
The Welcome screen is convenient because it displays a
list of available accounts and enables you to log on by clicking on an
account name. To enhance security in a workgroup by not giving a list
of accounts, you can use the Logon screen instead of the Welcome
screen. In a domain, the Logon screen is displayed automatically when
no one is logged on or when the screen saver is activated and you
attempt to log back in. The Logon screen requires users to type a logon
name rather than selecting from a list of available accounts.
The Logon screen has several features that you can
control. By default, the name of the last user to log on is displayed
in the User Name field of the Log On To Windows dialog box. Hiding the
user name of the last user to log on can improve security by requiring
users to know a valid account name for the computer. To do this, start
the Local Security Policy tool in the Administrative Tools menu or type
secpol.msc at an elevated command prompt. Then
under Local Policies\Security Options, double-click Interactive Logon:
Do Not Display Last User Name. Click Enabled and then click OK.
You can configure whether the Welcome screen is used by
way of the Always Use Group Policy setting in Group Policy. You have
the following options:
-
Enable the policy to use the Logon screen rather than the Welcome screen.
-
Disable the policy to use the Welcome screen.
-
Use Not Configured to use the default configuration (the Welcome screen).
In a domain environment, you can use Active
Directory–based Group Policy to apply the desired security
configuration to a particular set of computers. You can also configure
this setting on a per computer basis using local security policy. To
configure a workgroup computer to use the Logon screen rather than the
Welcome screen, you'll use the Group Policy Object Editor, which is a
snap-in for the MMC. You can add this snap-in to an empty console and
configure a computer to use the Logon screen by following these steps:
-
Click Start, type mmc and then press Enter. This opens an empty MMC console.
-
Select Add/Remove Snap-In on the File menu.
-
In the Add Or Remove Snap-In dialog box, select Group Policy Object under Available Snap-Ins. Then click Add.
-
By default, the Group Policy Object Editor works
with the local computer's Group Policy Object, so all you need to do is
click Finish to accept this as the default.
-
Click OK.
-
In the Group Policy Object snap-in, expand Local
Computer Policy, Computer Configuration, Administrative Templates,
System, Logon. (See Figure 4.)
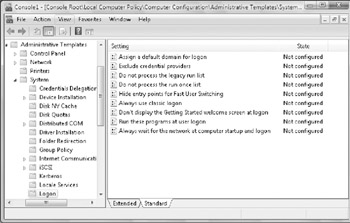
Figure 4: Enable the Always Use Classic Logon setting to use the Logon screen rather than the Welcome screen.
-
Double-click Always Use Classic Logon.
-
Select Enabled and then click OK.
By
default, you cannot bypass the requirement to press Ctrl+Alt+Del to
access the Log On To Windows dialog box. You can eliminate this
requirement, but it is a poor security practice. In the Local Security
Policy tool, expand Local Policies\Security Options and then
double-click Interactive Logon: Do Not Require Ctrl+Alt+Del. Click
Enabled and then click OK.
Removing Accounts and Denying Local Access to Workstations
Domain administrators are automatically granted
access to local resources on workstations. Other users aren't granted
access to resources on local workstations other than to the computers
to which they are permitted to log on. As workstations are moved around
the enterprise, you might find that previous owners of a workstation
still have access to its resources or that users who were granted
temporary access to a workstation were never removed from the access
list.
In a domain, you can control the workstations to which
users can log on using the account properties in Active Directory Users
And Computers. Double-click the account to display the Properties
dialog box. On the Account tab, click the Log On To button.
In a workgroup, you can remove a user's local account and effectively deny logon by completing these steps:
-
Log on as a user with local administrator
privileges. In Control Panel, click Add Or Remove User Accounts under
the User Accounts heading. This displays the Manage Accounts page.
-
Click the account you want to remove.
-
Click Delete The Account.
-
Before deleting the account, you have the
opportunity save the contents of the user's desktop and Documents
folder to a folder on the current user's desktop. To save the user's
documents, click Keep Files. To delete the files, click Delete Files.
-
Confirm the account deletion by clicking Delete
Account. Keep in mind that in a domain, unless there are further
restrictions with regard to logon workstations, a user might still be
able to gain access to the workstation by logging on with a domain
account.
|