Every system administrator should be familiar
with file and data management policies, which affect the amount of data
a user can store on systems, how offline files are used, and whether
the System Restore feature is enabled.
Configuring Disk Quota Policies
Policies that control disk quotas are applied at
the system level. You access these policies through Computer
Configuration\Administrative Templates\System\Disk Quotas. The
available policies are summarized in Table 1.
Table 1: Disk Quota Policies
|
Policy Name
|
Description
|
|
Apply Policy To Removable Media
|
Determines whether to extend quota policies to
NTFS volumes on removable media. If you do not enable this policy,
quota limits only apply to fixed media drives.
|
|
Default Quota Limit And Warning Level
|
Sets a default quota limit and warning level for
all users. This setting overrides other settings and only affects new
users of a volume.
|
|
Enable Disk Quotas
|
Turns disk quotas on or off for all NTFS volumes of the computer and prevents users from changing the setting.
|
|
Enforce Disk Quota Limit
|
Specifies whether quota limits are enforced. If
quotas are enforced, users are denied disk space if they exceed the
quota. This overrides settings on the Quota tab on the NTFS volume.
|
|
Log Event When Quota Limit Exceeded
|
Determines whether an event is logged when users reach their limit and prevents users from changing their logging options.
|
|
Log Event When Quota Warning Level Exceeded
|
Determines whether an event is logged when users reach the warning level.
|
Whenever
you work with quota limits, you'll want to use a standard set of
policies on all systems. Typically, you won't want to enable all the
policies. Instead, selectively enable policies and then use the
standard NTFS features to control quotas on various volumes. If you
want to enable quota limits, use the following technique:
-
Access Group Policy for the system, site, domain,
or OU you want to work with. Next, access the Disk Quotas node through
Computer Configuration\Administrative Templates\System\Disk Quotas.
-
Double-click Enable Disk Quotas. On the Setting
tab, select Enabled and then click Next Setting. This displays the
Enforce Disk Quota Limit Properties dialog box.
-
If you want to enforce disk quotas on all NTFS
volumes residing on this computer, select Enabled. Otherwise, select
Disabled and then set specific limits on a per volume basis. Click OK.
-
Double-click Default Quota Limit And Warning Level. The Default Quota Limit And Warning Level Properties dialog box, shown in Figure 1, appears. Select Enabled.
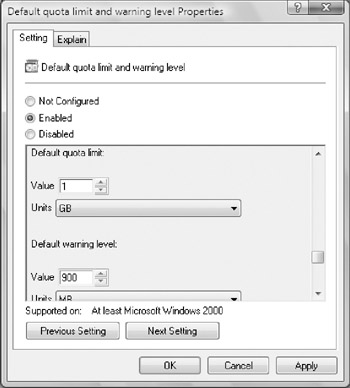
Figure 1: Use the Default Quota Limit And Warning Level Properties dialog box to establish disk quota values.
-
Under Default Quota Limit, set a default limit
that is applied to new users when they first write to the quota-enabled
volume. The limit does not apply to current users and doesn't affect
current limits. On a corporate share, such as a share used by all
members of a team, a good limit is between 1 gigabyte (GB) and 3 GB. Of
course, this depends on the size of the data files the users routinely
work with. Graphic designers and data engineers, for example, might
need much more disk space.
-
Scroll down in the subwindow provided on the
Setting tab to set a warning limit as well. A good warning limit is
about 90 percent of the default quota limit, meaning that if you set
the default quota limit to 1 GB, you'd set the warning limit to 900 MB.
Click OK.
-
Double-click Log Event When Quota Limit Exceeded.
The Log Event When Quota Limit Exceeded Properties dialog box appears.
Select Enabled so that limit events are recorded in the application
log. Click OK.
-
Double-click Log Event When Quota Warning
Exceeded. The Log Event When Quota Warning Exceeded Properties dialog
box appears. Select Enabled so that warning events are recorded in the
application log. Click OK.
-
Double-click Apply Policy To Removable Media. The
Apply Policy To Removable Media Properties dialog box appears. Select
Disabled so that the quota limits only apply to fixed media volumes on
the computer.
-
Click OK.
Configuring System Restore Policies
System Restore is designed to save the state of
system volumes and enable users to restore a system in the event of a
problem. It is a helpful feature for the average user, but it can use a
tremendous amount of disk space.
In the Group Policy console, you'll find the System
Restore policies under Computer Configuration\Administrative
Templates\System\System Restore. Through System Restore policies, you
can override and disable management of this feature. The following
policies are available:
-
Turn Off System Restore If you enable this policy,
System Restore is turned off and can't be managed using the System
utility or the System Restore Wizard. If you disable this policy,
System Restore is enforced and cannot be turned off.
-
Turn Off Configuration If you enable this policy,
you prevent configuration of the System Restore feature. Users can't
access the Settings dialog box but can still turn off System Restore.
If you disable this policy, users can access the Settings dialog box
but can't manipulate it, and they can still turn off System Restore.
To configure System Restore policies, follow these steps:
-
Access Group Policy for the system, site, domain,
or OU you want to work with. Next, access the System Restore node by
expanding Computer Configuration\Administrative Templates\System\System
Restore.
-
To enable or disable System Restore, double-click
Turn Off System Restore. On the Setting tab, select either Enabled or
Disabled as appropriate. Click OK.
-
To enable or disable configuration of System
Restore, double-click Turn Off Configuration. On the Setting tab,
select either Enabled or Disabled as appropriate. Click OK.
Configuring Offline File Policies
Offline file policies are set at both the
computer and the user level, and there are identically named policies
at each level. If you work with identically named policies at both
levels, keep in mind that computer policies override user policies and
that these policies may be applied at different times.
The primary policies you'll want to use are summarized in Table 2.
As the table shows, most offline policies affect access,
synchronization, caching, and encryption. You'll find Offline File
policies under Computer Configuration \Administrative
Templates\Network\Offline Files and User Configuration \Administrative
Templates\Network\Offline Files.
Table 2: Offline File Policies
|
Policy Type
|
Policy Name
|
Description
|
|
Computer
|
Allow Or Disallow Use Of The Offline Files Feature
|
Forces enabling or disabling of the Offline Files
feature and prevents overriding by users. Enables administrative
control of Offline File settings for a system.
|
|
Computer
|
At Logoff, Delete Local Copy Of User's Offline Files
|
At logoff, cleans up the offline file cache on the local computer.
|
|
Computer
|
Configure Slow-Link Mode
|
Controls how slow links are used. Enabled: slow
link values for each shared folder used with Offline Files are
configured. Disabled: offline files will not use slow link mode.
|
|
Computer
|
Default Cache Size
|
Limits size of automatically cached offline files
and prevents users from changing related options. Enabled: you can set
a cache size. Disabled: the limit is 10 percent of drive space.
|
|
Computer
|
Encrypt The Offline Files Cache
|
Determines whether offline files are encrypted to improve security.
|
|
Computer
|
Files Not Cached
|
Lists types of files, by file extension, that cannot be used offline.
|
|
Computer
|
Subfolders Always Available Offline
|
Makes subfolders available offline when a parent folder is available offline.
|
|
Computer
|
Turn On Economical Application Of Administratively Assigned Offline Files
|
Determines how administratively assigned files
and folders are synced at logon. Enabled: only new files and folders
are synced at logon. Disabled: all files and folders are synced at
logon.
|
|
Computer\User
|
Action On Server Disconnect
|
Specifies how the system responds when a server
becomes unavailable. The Work Offline action ensures offline files are
available.
|
|
Computer\User
|
Administratively Assigned Offline Files
|
Using Universal Naming Convention (UNC) path, specifies files and folders that are always available offline.
|
|
Computer\User
|
Event Logging Level
|
Ensures offline file events are logged in the application log.
|
|
Computer\User
|
Prevent Use Of Offline Files Folder
|
Prevents users from accessing the Offline Files folder. Users copies of cached files, but they can work offline.
|
|
Computer\User
|
Prohibit "Make Available Offline" For These Files And Folders
|
Prohibits users from making specific files and folders available offline. Enter UNC paths to resources.
|
|
Computer\User
|
Prohibit User Configuration Of Offline Files
|
Prevents users from enabling, disabling, and configuring Offline Files. This locks down the default settings for Offline Files.
|
|
Computer\User
|
Remove "Make Available Offline"
|
Prevents users from making files available offline.
|
|
Computer\User
|
Synchronize All Offline Files Before Logging Off
|
Forces full synchronization before users log off and prevents them from changing synchronization timing.
|
|
Computer\User
|
Synchronize All Offline Files When Logging On
|
Forces full synchronization when users log on and prevents them from changing synchronization timing.
|
|
Computer\User
|
Synchronize Offline Files Before Suspend
|
Forces synchronization before a computer goes into standby or hibernate mode. You can specify quick or full synchronization.
|
|
User
|
Do Not Automatically Make Redirected Folders Available Offline
|
By default, if Folder Redirection is configured,
these folders are available offline automatically. Enabled: automatic
redirection turned off. Users can, however, enable offline use of the
redirected folders.
|
Setting Offline File Configuration Policies
Offline
file configuration can be easily controlled through policy. You can
allow users to specify which files and folders should be available
offline, prevent them from configuring offline file features on their
own, and allow them to work offline but not access other cached
resources. Follow these steps to set offline file configuration
policies:
-
Access Group Policy for the system, site, domain,
or OU you want to work with. Most offline file policies can be
configured in either computer or user policy (with user policies having
precedence by default) by using the Offline Files node. You can access
the policies for offline files either by expanding Computer
Configuration\Administrative Templates\Network\Offline Files or User
Configuration\Administrative Templates\Network\Offline Files unless
specifically noted otherwise.
-
To control the availability of offline files, in
Computer Configuration\Administrative Templates\Network\Offline Files,
double-click Allow Or Disallow Use Of The Offline Files Feature. On the
Setting tab, select either Enabled or Disabled as appropriate. Click
OK. Users can now select specific files and folders that they want to
have available when working offline. To prevent this user selection of
files but assign specific offline files to be used, you'll need to
prohibit this feature and administratively assign offline files.
-
To prevent users from changing offline file
configuration settings, double-click Prohibit User Configuration Of
Offline Files. On the Setting tab, select Enabled. Once this policy is
set, users can't configure offline file options.
-
To prevent users from accessing the offline files
folder but still allow them to work offline, double-click Prevent Use
Of Offline Files Folder. On the Setting tab, select Enabled. Once you
select this option, users cannot view or open copies of cached files.
They can, however, save current work and continue to use active files
when offline.
Administratively Controlling Offline Files and Folders
You can administratively control which files and
folders are available for offline use. Typically, you'll want to do
this on file servers or other systems sharing resources on the network.
You can use several different techniques to administratively control
which resources are available offline.
You can prevent users from making files available
offline and, instead, assign specific offline resources by following
these steps:
-
Access Group Policy for the system you want to
work with. Next, access the Offline Files node by expanding Computer
Configuration\Administrative Templates\Network\Offline Files or User
Configuration\Administrative Templates\Network\Offline Files.
-
To prevent users from making files available
offline, double-click Remove "Make Available Offline." On the Setting
tab, select Enabled. Click OK. Once this policy is enforced, users are
unable to specify files that should be used offline.
-
To assign resources that are automatically
available offline, double-click Administratively Assigned Offline
Files. On the Setting tab, select Enabled. Next, click Show. Then, in
the Show Contents dialog box, specify resources according to their UNC
path, such as \\corpserver\data. Figure 2 shows a list of resources that have been added to the Show Contents list.
| Caution |
You
should carefully consider which resources are automatically made
available offline. The more resources you assign through this
technique, the more network traffic is generated to maintain offline
file caches.
|
You can make specific files automatically available, and prevent others from being used offline, by following these steps:
-
Access Group Policy for the system that you want
to work with. Next, access the Offline Files node by expanding Computer
Configuration\Administrative Templates\Network\Offline Files or User
Configuration\Administrative Templates\Network\Offline Files.
-
To assign resources that are available offline
automatically, double-click Administratively Assigned Offline Files. On
the Setting tab, select Enabled. Click Show and then, in the Show
Contents dialog box, specify resources according to their UNC path,
such as \\corpserver\data.
-
To specify resources that users shouldn't be able
to make available offline, double click Prohibit "Make Available
Offline" For These Files And Folders. On the Setting tab, select
Enabled. Click Show and then, in the Show Contents dialog box, specify
resources according to their UNC path, such as \\corpserver\data. This
setting doesn't prevent automatic caching of resources assigned through
step 2.
-
Click OK until all open dialog boxes are closed.
Setting Offline File Synchronization Policies
Offline file synchronization is normally
controlled using the Synchronization Manager, accessed by selecting
Start, All Programs or Programs, Accessories, Synchronize. However, you
can set specific synchronization timing and techniques through
policies. Normally, resources are either fully synchronized (meaning
that all files are checked to ensure they are complete and current) or
quickly synchronized (meaning files are checked to ensure they are
complete, but file contents are not examined for currency).
Several events can trigger automatic synchronization,
such as logon, logoff, standby, and hibernate. Again, the
Synchronization Manager normally determines which events are used.
Using policies, you can override this behavior. In most circumstances,
you'll want to synchronize files only when a user logs on. The
advantage to synchronizing when users log on is that they'll always
have the freshest copies of files. The disadvantage is that the logon
process might take longer. The notable exception for synchronizing at
logon is for laptop users. Here, you might want to synchronize at
logoff to ensure that users have the freshest copy of files when they
go home and use their laptop offline.
To configure synchronization policies, follow these steps:
-
Access Group Policy for the system you want to
work with. Next, access the Offline Files node by expanding Computer
Configuration\Administrative Templates\Network\Offline Files.
-
The policies that control synchronization are
Synchronize All Offline Files When Logging On, Synchronize All Offline
Files Before Logging Off, and Synchronize Offline Files Before Suspend.
Double-click the policy related to the synchronization technique that
you want to use for this computer. On the Setting tab, select Enabled.
For the Synchronize Offline Files Before Suspend policy, ensure that
the appropriate Action is selected; choose either Full or Quick.
| Tip |
A full synchronization ensures the latest version
of the user's offline files are stored prior to the suspend operation.
A quick synchronize ensures all the offline files are available but not
necessarily in the most current version.
|
-
Click OK.
Setting Offline File Cache Policies
Careful configuration of the offline file cache
is essential to managing the system and network overhead generated by
offline file usage. You can specify a maximum file cache size, whether
the cache is encrypted for security, and which file types should never
be cached. To configure policies for the offline file cache, follow
these steps:
-
Access Group Policy for the system you want to
work with. Next, access the Offline Files node by expanding Computer
Configuration\Administrative Templates\Network\Offline Files or User
Configuration\Administrative Templates\Network\Offline Files.
-
To set the maximum cache size, double-click
Default Cache Size. On the Setting tab, select Enabled. Afterward, use
the Default Cache Size Properties dialog box, shown in Figure 3,
to set the default cache size. The value entered is the percentage of
disk space used times 10,000, meaning that if you enter 15,000, the
cache can use up to 15 percent of the free space on the system drive.
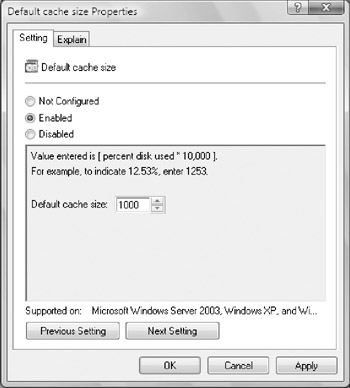
Figure 3: Set a default cache size for offline files in the Default Cache Size Properties dialog box.
| Note |
If
you don't configure the Default Cache Size policy or if you disable it,
the cache size limit is 10 percent of the free space on the system
drive.
|
-
To specify file types that are not cached,
double-click Files Not Cached and then select Enabled. Next, in the
Extensions field, type a semicolon-separated list of file extensions to
exclude. Each extension must be preceded by an asterisk and a period.
You could enter *.wbk; *.tmp; *.lnk; *.ndx to block caching of many
temporary types of files.
-
To encrypt the cache, double-click Encrypt The
Offline Files Cache and then select Enabled. Once enabled, all existing
and new files in the cache are encrypted. The user can see his or her
own files, but others user will not be able to use them.
|