If you’ve seen any 3D game in the past ten
years then you’ve seen texturing in action. Texture mapping is simply
the process of applying an image to a surface to add realism.
When
exploring virtual worlds, the more realistic the environment the more
it draws you in; textures are a big part of that experience. Simple
spheres become living worlds ready to explore or a single rectangle
becomes a road ready for racing, all thanks to textures. Because of the
details that textures can add to your scene, it helps to minimize the
amount of geometry you have to create. Take, for instance, a brick
wall. You could create all the geometry to model each brick in the wall
or you could take a single quad and apply a brick texture to it. You
get the result you want either way, but the textured version is
computationally cheaper, takes less time to create, and tends to look
better. Game programming is all about making things look the best you
can and getting away with it using the cheapest possible method.
In
most games, textures take up a majority of the memory and asset budget.
As video RAM has been increasing so has the want to fill it with larger
and more complex textures. Video cards have grown from 32 megabytes of
memory for first-generation 3D cards to most cards on the market now
having upwards of 256 megabytes available, and game developers are
having no problem taking advantage of it.
1. Texture Coordinates
Textures
are mapped to objects using texture coordinates. Very much like vertex
coordinates detail where a vertex should be positioned in world space,
texture coordinates describe where a texture should be positioned on an
object.
Texture coordinates have two
components designated U and V. The U component maps horizontally while
V maps vertically. Together, these two components can describe any area
within the texture being mapped. Figure 1 shows how texture coordinates are laid out.
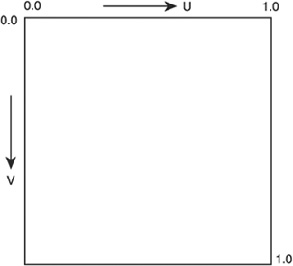
Texture
coordinates are clamped to a fixed set of values ranging from 0.0f to
1.0f, regardless of the size of the texture, allowing all textures to
be represented in the same way. Since texture coordinates range from
0.0f to 1.0f, it may help to think of them in percentages of a texture.
Mapping a texture to a square using (0.0f, 0.0f) for the upper-left
corner and (1.0f, 1.0f ) in the bottom-right will use 100% of the
texture in both the U and V directions.
2. Adding Support for Texture Mapping
Supporting texture mapping in your application isn’t difficult but does require a few changes:
The vertex format needs to be updated to support storing texture coordinates.
The texture needs to be loaded and sent to the shader.
The shader needs to be changed to allow the texture map to be used.
2.1 The Vertex Format
Texture
coordinates are designated on the vertex level within your scene. To
support texture mapping, you need to change the vertex structure and
input layout and update the vertices for each object. Previously you
were working with a vertex format that included only position and a
color. To support texture mapping, you’ll need to add texture
coordinates to the structure.
// Vertex Structure
struct VertexPosUVStruct
{
    D3DXVECTOR3 Pos;    // Position
    D3DXVECTOR2 Tex;    // Texture Coordinates
};
The new structure contains a position and D3DXVECTOR2 to hold the texture coordinates. The vertex color was removed to keep the example simple since it won’t be needed.
Besides updating the vertex structure, the input layout also needs to be altered.
// The vertex input layout now including texture coordinates
D3D10_INPUT_ELEMENT_DESC layout[] = {
    { "POSITION", 0, DXGI_FORMAT_R32G32B32_FLOAT, 0, 0,
    D3D10_INPUT_PER_VERTEX_DATA, 0 },
    { "TEXCOORD", 0, DXGI_FORMAT_R32G32_FLOAT, 0, 12,
    D3D10_INPUT_PER_VERTEX_ DATA, 0 },
};
The
last step required to allow support for texture coordinates is the
updating of the vertices themselves. Following the format defined in
the vertex structure, the position is placed first with the vertex
coordinates following.
// Create vertex buffer for the quad
VertexPosUVStruct vertices[] =
{
    { D3DXVECTOR3(-0.5f, -0.5f, 0.0f), D3DXVECTOR2(0.0f, 1.0f)},
    { D3DXVECTOR3(-0.5f, 0.5f, 0.0f), D3DXVECTOR2(0.0f, 0.0f)},
    { D3DXVECTOR3(0.5f, -0.5f, 0.0f), D3DXVECTOR2(1.0f, 1.0f)},
    { D3DXVECTOR3(0.5f, 0.5f, 0.0f), D3DXVECTOR2(1.0f, 0.0f)},
};
An updated InitModel function is shown next with new added support for texture mapping.
/*******************************************************************
* InitModel
* Initializes a ModelObject struct with the data to draw a single
* quad
* Inputs - ModelObject *modelObject - the modelObject struct to fill
* Outputs - bool - true if successful

*******************************************************************/
bool InitModel(ModelObject *modelObject)
{
    // Create the effect
    HRESULT hr = D3DX10CreateEffectFromFile(L"./texturing.fx",
        NULL,
        NULL,
        "fx_4_0",
        D3D10_SHADER_ENABLE_STRICTNESS,
        0,
        pD3DDevice,
        NULL,
        NULL,
        &modelObject->pEffect,
        NULL);

    if (FAILED(hr))
    {
        return false;
    }

    // Obtain the technique
    modelObject->pTechnique = modelObject->pEffect-
    >GetTechniqueByName("Render");

    // Bind the texture variable
    pBaseTextureVariable = modelObject->pEffect-
    >GetVariableByName("baseTexture")
        ->AsShaderResource();

    // The vertex input layout
    D3D10_INPUT_ELEMENT_DESC layout[] = {
    { "POSITION", 0, DXGI_FORMAT_R32G32B32_FLOAT, 0, 0,
    D3D10_INPUT_PER_VERTEX_DATA, 0 },
    { "TEXCOORD", 0, DXGI_FORMAT_R32G32_FLOAT, 0, 12,
    D3D10_INPUT_PER_VERTEX_DATA, 0 },
    };

    // Calculate the number of elements in the layout array
    UINT numElements = (sizeof(layout) / sizeof(layout[0]));

    // Create the vertex input layout
    D3D10_PASS_DESC PassDesc;
    modelObject->pTechnique->GetPassByIndex(0)->GetDesc(&PassDesc);

hr = pD3DDevice->CreateInputLayout(layout,
    numElements,
    PassDesc.pIAInputSignature,
    PassDesc.IAInputSignatureSize,
    &modelObject->pVertexLayout);

if(FAILED(hr))
{
    return false;
}

// Create vertex buffer for the quad
VertexPosUVStruct vertices[] =
{
    { D3DXVECTOR3(-0.5f, -0.5f, 0.0f), D3DXVECTOR2(0.0f, 1.0f)},
    { D3DXVECTOR3(-0.5f, 0.5f, 0.0f), D3DXVECTOR2(0.0f, 0.0f)},
    { D3DXVECTOR3(0.5f, -0.5f, 0.0f), D3DXVECTOR2(1.0f, 1.0f)},
    { D3DXVECTOR3(0.5f, 0.5f, 0.0f), D3DXVECTOR2(1.0f, 0.0f)},
};

// Calculate the number of vertices in the array
modelObject->numVertices = sizeof(vertices) / sizeof(VertexPosUVStruct);

D3D10_BUFFER_DESC bd;
bd.Usage = D3D10_USAGE_DEFAULT;
bd.ByteWidth = sizeof(VertexPosUVStruct) * modelObject->numVertices;
bd.BindFlags = D3D10_BIND_VERTEX_BUFFER;
bd.CPUAccessFlags = 0;
bd.MiscFlags = 0;

D3D10_SUBRESOURCE_DATA InitData;
InitData.pSysMem = vertices;

// Do the creation of the actual vertex buffer
hr = pD3DDevice->CreateBuffer(&bd, &InitData, &modelObject->pVertexBuffer);
if(FAILED(hr))
{
    return false;
}
    return true;
}