There
shouldn’t be any question that IIS is significantly more secure than
its predecessors. Several key enhancements such as a reduced attack
surface, minimum install by default, and enhanced application isolation
deliver a robust and secure web platform. IIS also is enabled by default
to present only static information (that is, to use applications or
other dynamic content, you must manually enable them).
However, Microsoft products
are also the most popular products to try to hack. For this reason, it’s
important to secure the web server as much as possible. The more
barriers there are, the less inclined a hacker would be to try to gain
unauthorized access. Each component on the web server must be secure;
the server is only as secure as its weakest point.
Windows Server 2008 R2 Security
Windows
Server 2008 R2 security actually begins during the planning and
designing phases so that every conceivable security aspect is addressed.
This can entail physical, logical (Windows Server 2008 R2,
applications, and so on), and communications security.
When you’re securing the
Windows Server 2008 R2 system with the Web Server role, it’s important
to use NTFS on the disk subsystem and apply the latest service pack and
security patches. Using NTFS is critical because it can have appropriate
permissions set on files, folders, and shares. Also, keeping up to date
with service packs and patches ensures that Windows Server 2008 R2 is
operating with the greatest amount of protection.
Application security on
the Windows Server 2008 R2 system with the Web Server role should be
carefully reviewed, especially if it’s a custom-built application. If
the application is developed by a vendor, make sure that you have an
application that is certified to run on Windows Server 2008 R2 and that
the latest service packs and patches have been applied and tested.
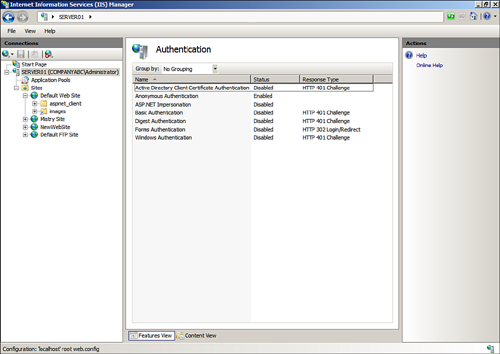
IIS Authentication
Authentication is a process
that verifies that users are who they say they are. IIS supports a
multitude of authentication methods, including the following:
Anonymous Authentication— Users can establish a connection to the website without providing credentials.
Active Directory Client Certificate Authentication— Users can establish a connection by using their Active Directory client certificate for authentication.
ASP.NET Impersonation— Users can utilize an impersonation context other than the ASP.NET account.
Windows Authentication—
This authentication method can be integrated with Active Directory. As
users log on, the hash value of the password is sent across the wire
instead of the actual password.
Digest Authentication—
Similar to Integrated Windows authentication, a hash value of the
password is transmitted. Digest authentication requires a Windows Server
domain controller to validate the hash value.
Basic Authentication—
Basic authentication sends the username and password over the wire in
clear text format. This authentication method offers little security to
protect against unauthorized access.
Forms Authentication—
Users are redirected to a page where they enter their credentials.
After they have been authenticated, they are redirected back to the page
they originally requested.
These authentication methods can be enabled under the Authentication feature page, as illustrated in Figure 1. You can view this window by clicking the Edit button located on the Directory Security tab of a website properties page.
Auditing Web Services
Windows Server 2008 R2 auditing
can be applied to web and FTP sites to document attempts to log on
(successful and unsuccessful), to gain unauthorized access to service
accounts, to modify or delete files, and to execute restricted commands.
These events can be viewed through Event Viewer. It’s also important to
monitor IIS logs in conjunction with audited events to determine how,
when, and if external users were trying to gain unauthorized access.
Using SSL Certificates
Secure Sockets Layer
(SSL) encryption preserves user and content integrity as well as
confidentiality so that communications from a client and the web server,
containing sensitive data such as passwords or credit card information,
are protected. SSL is based on the public key security protocol that
protects communication by encrypting data before being transmitted.
Previous versions of IIS could use
SSL, and IIS 7.5 is no different. The exception to this, though, is now
it is possible to secure FTP sites by implementing SSL for FTP when
using the FTP Server included with version 7.5.
SSL
certificates serve three primary purposes, although they are typically
used to encrypt connections. These purposes include the following:
SSL server authentication—
This allows a client to validate a server’s identity. SSL-enabled
client software can use a Public Key Infrastructure (PKI) to check
whether a server’s certificate is valid. It can also check whether the
certificate has been issued by a trusted certificate authority (CA).
SSL client authentication—
This allows a server to validate a client’s identity. SSL can validate
that a client’s certificate is valid as well as check whether the
certificate is from a trusted CA.
Encrypting SSL connections—
The most common application of SSL is encrypting all traffic on a given
connection. This provides a high degree of confidentiality and
security.
From an IIS perspective, SSL can
be applied to an entire website, directories, or specific files within
the website. SSL configuration can be done through Internet Information
Services (IIS) Manager.
The high-level steps for
utilizing certificates and SSL consist of the following: The first step
is to obtain a certificate. The second step is to create an HTTPS
binding for a specific site that needs to be encrypted. The final step
is to configure SSL settings for a site, application, or physical
directory.
To use SSL on a
website, a certificate must first be requested and then installed. The
request can be created to obtain a certificate either from an external,
trusted CA or from an internal PKI. The types of server requests
available in Internet Information Services include the following:
Create Certificate Request—
This option is typically used for creating a certificate request, which
will be submitted to a third-party public CA. The certificate’s
distinguished name properties, cryptographic service provider, and
bit-length information are entered into a file and then submitted to a
public CA for approval.
Tip
When creating the
certificate request to a public CA, it is recommended to use 1024 (the
default) or higher as the bit length. Keep in mind that higher bit
lengths enforce stronger security; however, a greater length can
decrease performance.
Create Domain Certificate Request—
A domain certificate request is used when providing a request to an
internal certificate authority. Typically, the internal certificate
authority would be an enterprise certificate authority associated with
the company’s Active Directory domain. This approach reduces the cost of
purchasing third-party certificates and also simplifies the certificate
deployment.
Create Self-Signed Certificate Request—
The final option available when creating a certificate request is to
use a self-signed certificate. Typically, this method is only used for maintaining certificates for a testing environment because the certificates are not from a trusted CA.
This example illustrates
the procedures to create a domain-based certificate request. To complete
this task, this example requires an internal certificate authority
running within your domain.
To create a domain-based certificate request, do the following:
1. | Launch Internet Information Services (IIS) Manager.
|
2. | In the Connections pane, highlight the IIS server that will request an Internet Server Certificate.
|
3. | In the Feature view, double-click the Server Certificates element.
|
4. | In the Actions pane, select Create Domain Certificate Request.
|
5. | On the Distinguished Name Properties page, specify the required information for the certificate, as displayed in Figure 2.
The common name is typically the fully qualified domain name (FQDN) of
the URL users will use to connect to the website (for example, www.companyabc.com). Click Next to continue.

|
6. | Because
this is a domain-based certificate request, the next page presented is
the Online Certificate Authority. Specify the online certificate
authority that will accept the request by selecting the CA from a list.
In addition, a friendly name is also required. Click Finish to finalize
the request.
|
After the create
certificate process has been completed, either the administrator of the
CA must approve the request or it can be automatically approved based on
the autoenrollment feature of the domain-based CA. The CA in this
example automatically fulfilled the request; therefore, the certificate
resides on the Server Certificates page and can be viewed by
selecting it and clicking View Task in the Actions pane. Otherwise, an
additional procedure is required to install the certificate.
Because the certificate is
already installed, the next step in the process is to bind the Internet
Server Certificate for the desired website and enable SSL. To do this,
follow these steps:
1. | Open the IIS Manager snap-in and select the website for which the binding will be created.
|
2. | In the Actions Pane, select Bindings to launch the Site Binding utility.
|
3. | In the Web Site Bindings dialog box, click Add.
|
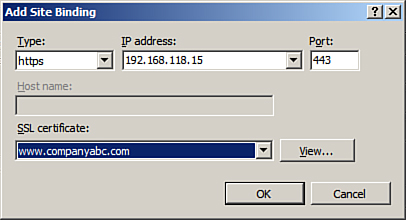
4. | In
the Add Site Binding dialog box, select the HTTPS option from the Type
drop-down menu, assign an IP address, and verify the port is 443, as
shown in Figure 3.
|
5. | Select
a certificate, such as the one that was created in the previous
section. You can view the certificate selected by clicking the View
button. Click OK to return to the Site Bindings dialog box.
|
6. | Click Close in the Site Bindings dialog box to finalize the binding process.
|
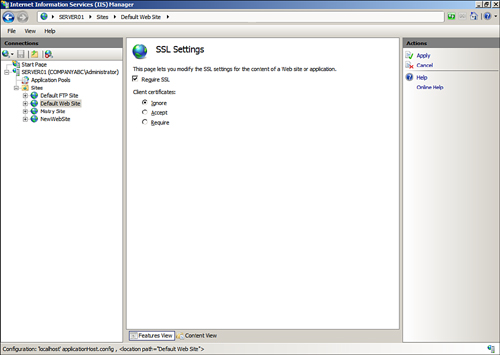
The final process when
configuring a site to utilize SSL is to configure the SSL settings for
the site application or the physical directory. To configure SSL
settings on the new website that was created in the previous steps, do
the following:
1. | In IIS Manager, navigate to the desired site for which you will configure SSL settings.
|
2. | Double-Click the SSL Settings icon in Features view.
|
3. | On
the SSL Settings page, enable the Require SSL option. Alternatively,
select the Require 128-bit SSL option to force 128-bit encryption.
|
4. | The
final setting is to configure whether to accept, ignore, or require
client certificates. Choose the appropriate Client Certificates option,
and click Apply in the Actions pane to save the changes, as shown in Figure 4.
|
Administering IIS 7.5 Administrator and User Security
Several built-in
administrator roles exist for managing Internet Information Services
(IIS) 7.5. This is a new approach to IIS administration as users can be
assigned to these administrative roles to conduct specific
administrative tasks on the web server, website, or
web application. There are three IIS administrative roles: Web Server
Administrator, Web Site Administrator, and Web Application
Administrator. Each role dictates the settings that can be configured. Table 1 lists each IIS administrative role and permissions associated with it.
Table 1. Server-Level Roles
| IIS Administrative Role | Configuration Tasks |
|---|
| Web Server Administrator | Complete and unrestricted access to the web server, including all sites and applications |
| | Web server |
| | Application pools |
| | Websites |
| | Virtual directories |
| | Physical directories in the websites and web applications |
| | Web server security |
| Web Site Administrator | Full control over the web to which they have been delegated |
| | Web application within the delegation |
| | Virtual directories within the delegation |
| | Physical directory within the delegation |
| Web Application Administrator | Configure web application settings to which they have been delegated |
| | Virtual directories within the web application delegation |
| | Physical directory within the web application delegation |
| | Files in the virtual and physical directory within the web application delegation |
Creating an IIS 7.5 User Account
There
might be situations when you need to provide a non-Windows user IIS 7.5
management capabilities. You need to create an IIS 7.5 user account;
therefore, this non-Windows user has management privileges to delegate
features and IIS functionality. Follow these steps to create an IIS 7.5
user account:
1. | In Internet Information Services (IIS) Manager, navigate to the Connections pane and select the IIS server.
|
2. | Select the IIS Manager Users feature icon, which is located in the central details pane.
|
3. | On the IIS Manager Users feature page, click the Add User task, which is located in the Actions pane.
|
4. | In the Add User dialog box, enter the new user account name and password, and then click OK.
|
Note
When entering a password,
the password policy will be governed by the local Windows Server 2008 R2
group policy. Therefore, the password will need to be strong to meet
the default complexity password policy.
For ongoing user
account management, after the user account is created, use the
additional tasks on the Actions pane to change the password, disable, or
remove the account.
Assigning Permissions to an IIS 7.5 User Account
The next step in the user
creation process is to assign the appropriate permissions to the newly
created user account. This process allows the user to configure
delegated features for a specific website or application. Follow these
steps to authorize a user account to connect to a site or an
application:
1. | In
Internet Information Services (IIS) Manager, navigate to the
Connections pane, expand the IIS server, and then expand the Sites node.
|
2. | Specify
the site to which the user account will be granted authorization, and
then select the IIS Manager Permissions feature icon, which is located
in the Central Details pane.
|
3. | On the IIS Manager Permissions feature page, click the Allow User task, which is located in the Actions pane.
|
4. | In
the Allow User dialog box, first select the IIS Manager option, then
enter the account that was created in the previous steps, and then click
OK.
|
Note
If the IIS Manager option is
not available in the Allow User dialog box, the management service is
not set to accept connections from IIS users. To do so, use the
Management Service page to enable remote connections and select the
identify option, Windows Credentials or IIS Manager Credentials.
Configuring Feature Delegation
Follow these steps to configure feature delegation for a newly created website:
1. | In Internet Information Services (IIS) Manager, navigate to the Connections pane and select the IIS server.
|
2. | Select the Feature Delegation feature icon, which is located in the Central Details pane.
|
3. | On
the Features Delegation page, select the Custom Web Site Delegation
task from the Actions pane. Alternatively, select the Customer Web
Application Delegation if you want to delegate an application.
|
4. | Select the site to be delegated from the Sites drop-down menu on the Custom Website page.
|
5. | Select
the appropriate feature in the list and then set the desired feature
delegation from the Actions pane. The delegations include: Read/Write,
Read Only, Not Delegated, and Reset to Inherited.
|
Note
There might be circumstances when
there is a need to reset delegation or restore the defaults. When
necessary, click the Reset All Delegation or Default Delegation in the
Actions pane.
Using IIS Logging
IIS logging should be viewed
as a necessity rather than an optional feature of IIS because it helps
to ensure IIS security and is also extremely useful for maintenance and
troubleshooting. For example, in the event of a system compromise, logs
can be used and a forensic review performed on the intimate details
contained in them. This information can then be used to review
maintenance procedures and identify problems in the system. Equally
important, many organizations now require logging because of regulatory
compliance so it seems logging is here to stay.
IIS text-based logging,
such as the W3C Extended Log File Format, Microsoft IIS Log File Format,
and NCSA Common Log File Format, is controlled by Http.sys, which is a
kernel-mode process. This is a significant change from previous versions
where logging was a user-mode process. The only other log file format
that comes close to previous versions is ODBC as it is implemented using
a user mode worker process.
Another bonus about logging is
its ability to be implemented at the server, site, web application,
file, and directory level. For organizations wanting to configure IIS
7.5 logging for a specific website, follow these procedures:
1. | Launch Internet Information Services (IIS) Manager.
|
2. | In the Connections pane, select the desired website for which you want to configure logging.
|
3. | Double-click the Logging feature in the Actions pane.
|
4. | On the Logging page, select the desired logging format to be utilized.
|
5. | Specify
the location of the log file by typing a log path into the Directory
text box. Alternatively, click the Browse button and select a directory
to store the files.
|
6. | In
the Log File Rollover section, select the method to create the new log
file. The options include specifying an Hourly, Daily, Weekly, or
Monthly schedule, entering a maximum file size (in bytes), or selecting
the option that puts a stop to the creation of new log files.
|
7. | The final option requires you to determine whether to use local time for file naming and rollover.
|
8. | After all the log file settings have been inputted, select Apply in the Actions pane to commit the changes.
|
Note
It is possible to either enable
or disable a log file for a specific site by selecting Enable or Disable
in the Actions pane of the Logging feature page. To enable logging for
IIS 7.5, the HTTP Logging Module must be installed.