Edit and resize images in a matter of
seconds using this quick and easy tool
Preview is yet another unsung app in OS X.
It’s been a constant in the operating system ever since the release of Public
Beta in 2000, yet so few people really harness its full power, or even remember
what it can do, even on the most basic level.
As well as giving you the ability to
quickly view PDFs and images, Preview is an excellent editor and can help you
resize an image in a matter of seconds. These are the two key features we will
focus on in this tutorial. Using Preview negates the need for a somewhat
lengthy import, edit, and export procedure in iPhoto, Aperture, or Photoshop.
If you simply want to pull images from the SD card port on your Mac, from the
web, or from anywhere else, and have them in an email before you can say iLife,
then this is the way to do it. It’s also worth making a note of the keyboard
shortcuts on display here, as they will shave vital seconds off of the process.
The great thing about Preview is that it’s the default image viewer on your
Mac, so you can just double-click any image and it will spring to life. Also,
it’s wonderfully fast. For us at least, it’s the first port of call for simple
image editing before those pics get added to emails, blog posts, iBooks, and
even tweets. Take a look at this tutorial and we’re sure you’ll give this OS X
stalwart a bit more to do the next time it springs into action.
What you need
An image
Your Mac
1. Quickest crop ever
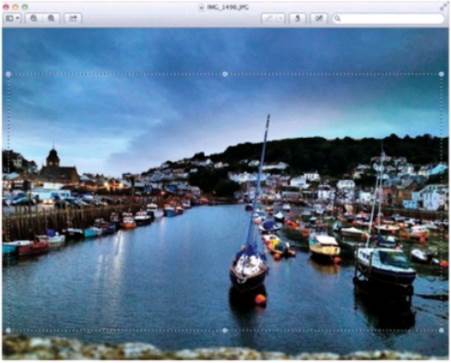
Quickest
crop ever
Double-click an image and Preview will open
and display it. Use the rectangle marquee tool to quickly drag a rectangle
shape (your crop area). If it’s not quite right first time round, drag out each
side. Hit Command + K and the image is cropped to the area you selected. To
undo, hit Command + Z.
2. Save, use, forge on
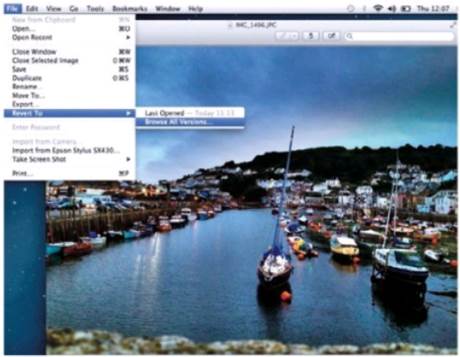
Save,
use, forge on
With the crop in effect, you can save the
image with Command + S. This will overwrite the original picture. If at any
stage you want to go back to the first uncropped image, you can do so using
Versions in Mountain Lion. Select File > Revert to, then Browse all
Versions. Choose a previous iteration of the edit.
3. Check your size
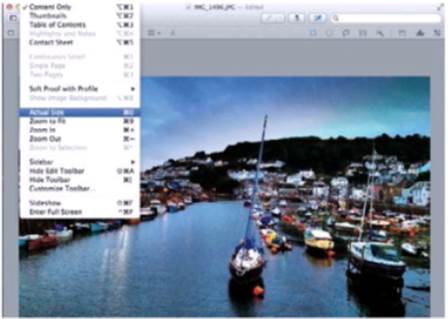
Check
your size
Before resizing an image, check how big
your original is. Preview displays the full image rather than going straight in
at native resolution. Get the bigger picture via the View menu by selecting
Actual Size, or use the handy Command + 0 shortcut. This will instantly show
you just how big (or small)
4. Adjust it

Adjust
it
To change the size of the image, use the
Tools menu and select Adjust Size. Once you have clicked on the menu option, a
drop-down menu will appear that lets you change the size in a number of
different ways. By having an idea of the true size, you’ll know what is
required of the resizing job at hand.
5. Pick a value
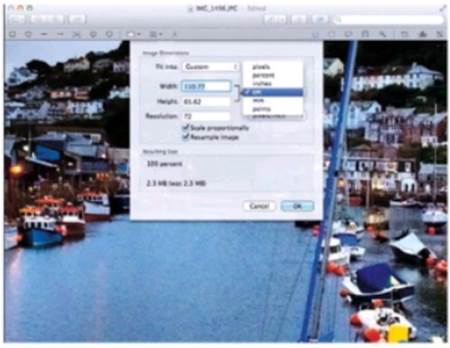
Pick
a value
With the resize options available to you,
use the drop-down menu that’s attributed to the size values. The simplest
option is the percentage value but the others all have specific merits. Pixels
can be used to create perfect images for web posts, millimeters for page
layout, and centimeters or inches for printing.
6. Pick a Percentage
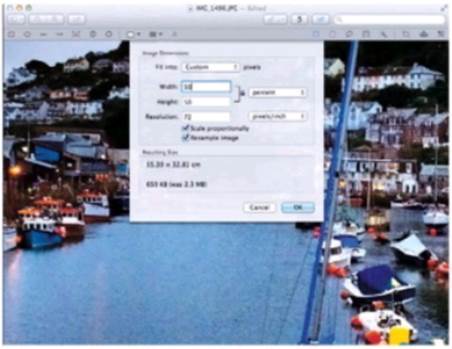
Pick
a Percentage
Here, we’ve reduced the file size by 50%.
Make sure the value below this is correct. The default resolution in most cases
is 72 pixels per inch, which is fine for looking at on a (non-Retina) Mac and
the web, but not for printing or publishing. If the last two options relate to
your image, up the pixels/inch to 300.
7. Time for an edit
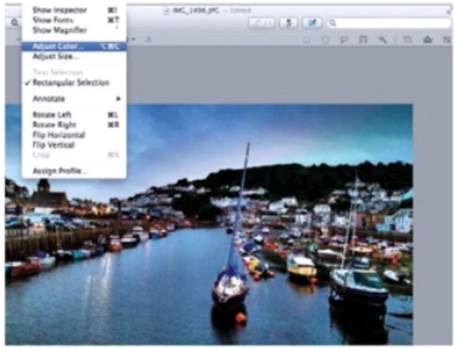
Time
for an edit
Quickly edit an image via Tools > Adjust
Colors. You can gain quicker access using the shortcut shown on the menu. Once
selected, you’ll see the tool window that’s also used in iMovie. It’s also
similar to the advanced controls in iPhoto. From there, you can make precise
adjustments to your image.
8. Stunning sliders
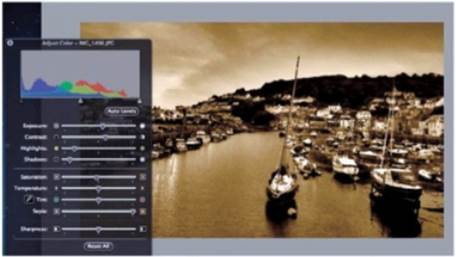
Stunning
sliders
Use the sliders in the Edit tool window to
make changes to Exposure. Contrast, Highlights. Shadows, and Saturation. Use
the Saturation slider to pull color out; use the Sepia slider to create an
antique effect. Hit save, and you can send, share, or upload it. Hit Reset All
at the bottom to go back to the start.