Table 1 outlines the primary redundancy methods used for each role.
Table 1. Redundancy Methods for Each Exchange Role
| Role | Primary Function | Redundancy Method |
|---|
| Client Access | Provides end-user connectivity into Exchange | Install Microsoft Network Load Balancing (NLB) across multiple Client Access servers. |
| Transport | Sends and receives email to and from external systems and other Transport servers | Add
multiple Transport servers and configure DNS and the connectors to use
more than one server. NLB is also an option, though it may be
unnecessary in many cases. |
| Mailbox | Hosts the data stored by Exchange in various databases | Implement database availability groups (DAGs) to replicate passive copies of the databases across multiple Mailbox servers. |
In this section,
we will look at the availability options for each of these roles and
walk you through the process of implementing these methods.
1. Load-Balance Client Access Servers
The methodology used
for load-balancing Client Access servers and making them redundant is to
use the Microsoft NLB service. After installing and configuring the NLB
service on your Client Access servers, you create a new client access
array. Each node in the client access array runs the NLB service, and a
virtual identity is used to present all the servers as a single server
to clients. You can have up to 32 Client Access servers in the array.
For example, in your site you
may have three Client Access servers called CONTOSO-CAS01,
CONTOSO-CAS02, and CONTOSO-CAS03. If these three servers are in a client
access array, the virtual name may be CLIENTACCESS.CONTOSO.COM. Instead of connecting individually to CONTOSO-CAS01, CONTOSO-CAS02, or CONTOSO-CAS03, the clients would connect to CLIENTACCESS.CONTOSO.COM and the NLB service would determine which of the three Client Access servers service the connection.
When creating a client access array, use these steps:
Configure the client access array in Exchange.
|
You can install a client
access array on a server that shares the Client Access and Hub Transport
roles. However, I don't recommend that you load-balance the Hub
Transport ports when doing so. If your Client Access server (CAS) is
also hosting the Mailbox role and is a member of a DAG, you cannot join
the CAS to a client access array.
|
|
1.1. Install the Network Load Balancing Feature
The first step to
creating a client access array is to install the NLB service on the
Client Access servers that you want in the array. To install NLB, use
the following steps:
Log in at a Client Access server that will be in the client access array.
Open a command prompt by choosing Start =< All Programs => Accessories => Command Prompt.
Run the following command:
ServerManagerCmd -I NLB
Repeat steps 1–3 on each of the Client Access servers that will be a member of the client access array.
1.2. Create the NLB Cluster
After NLB is installed, you
can create the NLB cluster and add the Client Access servers to it.
Before creating the cluster, decide on the hostname and the virtual IP
address that will be used. You also need to determine what cluster
operation mode you will use.
You have two options for
the cluster operation mode: unicast or multicast. The difference is that
unicast mode replaces the Media Access Control (MAC) address of the
network with the cluster's MAC address, whereas multicast mode adds an
additional multicast MAC address to the card. If you choose unicast
mode, ensure that there are at least two network cards so that the
Client Access servers in the NLB can still communicate with each other.
If you use multicast mode, ensure that your network infrastructure
allows multicast.
1.2.1. Create the Cluster with the First Node
Use the following steps to
create the NLB cluster and add the first node. In this example, I'm
using a single network card in the Client Access servers, so I will use
multicast mode for the cluster.
Log in at one of the Client Access servers that will be in the client access array.
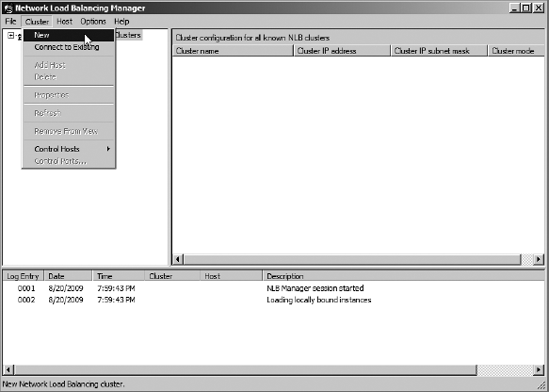
Launch the Network Load Balancing Manager tool by choosing Start => All Programs => Administrative Tools => Network Load Balancing Manager.
In the NLB Manager tool, choose Cluster => New, as shown in Figure 1. This will launch the New Cluster wizard.
On
the Connect screen of the New Cluster wizard, type the name of one of
the Client Access servers that will be in the client access array. For
the sake of simplicity, you can just type in the name of the Client
Access server that you are currently connected to. Click the Connect
button.
The list of
interfaces will be populated with the network interfaces that are
currently installed on the server. Select the interface that will host
the clustered services. If you have multiple network adapters, use the
adapter that you want to send and receive Client Access traffic with.
Click Next to continue.
On
the Host Parameters screen, select the priority for the host. The host
with the lowest priority processes the cluster network traffic that is
not covered by a port rule in the cluster configuration. Ensure that
Default State is set to Started and click Next.
On
the Cluster IP Addresses screen, click the Add button to add the
virtual IP address of the cluster. In the Add IP Address dialog box,
type the IP address and the subnet mask and click OK (Figure 2).
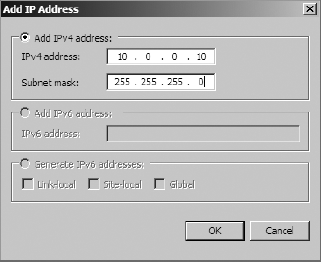
When back in the New Cluster wizard, click Next to continue.
On
the Cluster Parameters screen, type the fully qualified domain name of
the cluster in the Full Internet Name field. For example, this could be casarray.contoso.com.
In the Cluster Operation Mode portion of the screen, select Multicast and click Next.
On the Port Rules screen, select the port rule with the Start port of 0 and the End port of 65535 and click the Edit button.
In the Add/Edit Port Rule dialog box, change the Port Range From value to 1024
and click OK. This modifies the load-balanced port range to include the
dynamic ports that can be assigned by the RPC endpoint mapper.
While
still on the Port Rules screen, click the Add button to add another
port rule. In the Add/Edit Port Rule dialog box, set both the From and
To values to 135.
Also, select TCP as the protocol. This ensures that the RPC endpoint
mapper port is load balanced as well. This configuration is shown in Figure 3.

Click the OK button to add the port rule.
Repeat
step 10 for additional ports that you want to be accessed using the NLB
cluster. For example, adding ports 80 and 443 would ensure that the web
services running on the CAS are load balanced. You can add the ports
for POP and IMAP connections as well, if you want to load-balance those
services.
After
you have added all the ports that you want to load-balance, click the
Finish button to create the NLB cluster with the first node added.
|
The server may be
temporarily disconnected from the network while the Network Load Balance
settings are being applied. Connectivity should return within a few
seconds.
|
|
1.2.2. Add Additional Nodes to the Cluster
Now that the NLB cluster
exists, you can add additional Client Access server nodes to the
cluster. Use the following steps to add more nodes:
Launch the NLB Manager tool by choosing Start => All Programs => Administrative Tools => Network Load Balancing Manager.
In NLB Manager, choose Cluster => Connect To Existing.
In the Connect To Existing dialog box, type the name of one of the nodes that is already in the cluster.
The
list of clusters will be displayed. Select the NLB cluster that you
create for the client access array and click the Finish button.
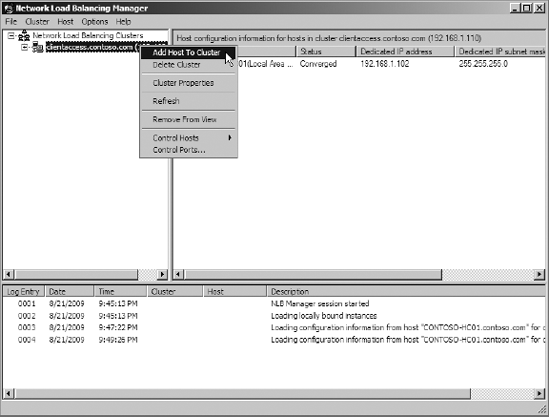
When
back in NLB Manager, select the cluster in the tree in the right pane.
Right-click on the cluster and select Add Host To Cluster from the menu (Figure 4).
On
the Connect screen of the Add Host To Cluster wizard, type the name of
one of the Client Access servers that you are adding. Click the Connect
button.
The list of
interfaces will be populated with the network interfaces that are
currently installed on the server. Select the interface that will host
the clustered services. If you have multiple network adapters, use the
adapter that you want to send and receive client access traffic with.
Click Next to continue.
On
the Host Parameters screen, select the priority for the host. The host
with the lowest priority processes the cluster network traffic that is
not covered by a port rule in the cluster configuration. Ensure that
Default State is set to Started and click Next.
On
the Port Rules screen, review the port rules that are currently
configured in the NLB cluster. These port rules should be the same rules
that you created when you created the cluster in the previous section.
Click Finish to close the wizard.
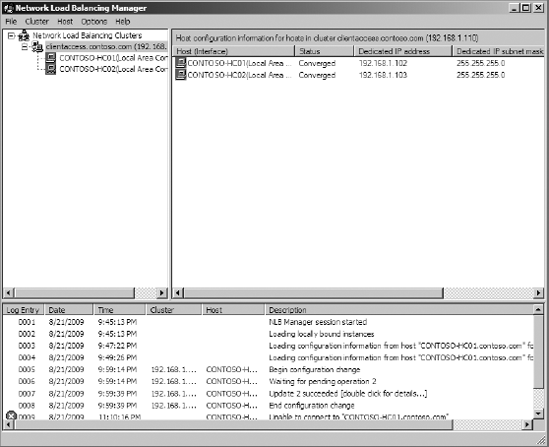
You
will be returned to NLB Manager, but it may take a moment before the
new node is added to the cluster. When the nodes are added successfully
to the NLB cluster, the icons turn green and the status will be set to
Converged on both nodes, as shown in Figure 5.
1.3. Configure the Client Access Array in Exchange
After the NLB cluster is up
and running, you will need to create the client access array object for
Exchange. When you create the object, you can assign it to an Active
Directory site. All of the Client Access servers in the site will be
listed as members of the array. Each new mailbox database that you
create will be tied to this array using the RpcClientAccessServer
attribute on the mailbox database. When users in that database connect
to their mailbox, they will use the Client Access server specified in
that attribute.
To create the client access array, run the New-ClientAccessArray cmdlet in the EMS and specify the parameters listed in Table 2.
Table 2. EMS Parameters for Creating the Client Access Array
| Parameter | Description |
|---|
| FQDN | The fully qualified domain name of the NLB cluster; example: clientaccess.contoso.com |
| Site | The name of the Active Directory site that the client access array is in |
The following example command creates a client access array object in Exchange and assigns it to the Baltimore site:
New-ClientAccessArray -FQDN clientaccess.contoso.com -Site
Baltimore
If you have mailbox
databases that existed before the client access array was created, they
are probably pointing to the existing Client Access server directly
before the NLB cluster was created. You will need to ensure that the RpcClientAccessServer
attribute on those mailbox databases is up-to-date if you want users to
access their mailboxes using the client access array. Run the following
EMS command for each mailbox database in the site that was created
before the client access array was created:
Set-MailboxDatabase [DBName] -RpcClientAccessServer
[CASArrayFQDN]
For example, the following command changes the mailbox database DB02 to point to the client access array that we just created:
Set-MailboxDatabase DB02 -RpcClientAccessServer
clientaccess.contoso.com