2. Test the Performance Limitations in a Lab
When sizing your
Exchange servers, most of the effort you are putting into the
calculations for server hardware and user load are theoretical until you
apply some real load to the system. It's always a good idea to
stress-test your server configuration before placing it in your
production environment. This section shows you how to stress-test the
Mailbox servers and the client workload in your environment.
2.1. Stress-Test the Databases
When sizing Mailbox servers, one
of the most important things is ensuring that your databases and
storage can handle your anticipated user load. You will want to perform
this testing before you deploy your servers in production to ensure that
they are adequately sized.
The Exchange Jetstress tool
is designed to perform this type of testing on Exchange databases.
Jetstress is not installed with Exchange. You will need to download the
tool from the Exchange Server 2010 TechCenter and install it separately.
This section will walk you through installing and using Jetstress
before deploying your servers in production.
2.1.1. Install Jetstress
You can install Jetstress on
your existing Exchange servers, but the preferred method is to install
it and test your system before you install Exchange. Therefore, part of
the installation procedures includes copying database files from your
Exchange installation media. Use the following steps to install
Jetstress:
Download Jetstress from the Exchange Server 2010 TechCenter at the following URL:
http://technet.microsoft.com/en-us/exchange/2010
Double-click on the Jetstress.msi file that you downloaded. This will launch the Jetstress installation wizard.
In the Welcome screen of the installation wizard, click Next.
At the End-User License Agreement screen, click the option I Accept The Terms In The License Agreement and click Next.
On
the Select Installation Folder screen, ensure that you are satisfied
with the default location of the Jetstress files. If you anticipate that
another person will be logging into the server with a different account
and using Jetstress, then click the Everyone option and click Next.
At the Confirm Installation screen, click Next to start the installation.
After Jetstress is installed, you will see the Installation Complete screen. Click Close to close the wizard.
Copy the following files from your Exchange installation media or folder to the location where Jetstress was installed:
ESE.DLL
ESEPERF.DLL
ESEPERF.INI
ESEPERF.HXX
You can do this by opening a
command prompt and running the following commands, assuming that you
kept the default location of Jetstress and assuming that your Exchange
media is in drive D:
copy d:\Setup\ServerRoles\Common\perf\amd64\eseperf.dll
"c:\Program Files\Exchange JetStress"

copy d:\Setup\ServerRoles\Common\perf\amd64\eseperf.hxx
"c:\Program Files\Exchange JetStress"

copy d:\Setup\ServerRoles\Common\perf\amd64\eseperf.ini
"c:\Program Files\Exchange JetStress"

copy d:\Setup\ServerRoles\Common\ese.dll
"c:\Program Files\Exchange JetStress"
2.1.2. Run Jetstress
You can use the
following steps to perform a basic disk throughput test using the
storage configuration on your Mailbox server. In this example, we're
going to test the performance of disk subsystem throughput:
Launch Jetstress by clicking Start => All Programs => Microsoft Exchange => Exchange Jetstress.
At the Jetstress Welcome screen, click Start New Test.
Jetstress
will run some checks to make sure that it is installed properly. After
the Jetstress checks run, on the Checking Test System screen, click the
Next button.
On
the Open Configuration screen, select Create A New Test Configuration
and enter the location of the XML file that you want to store your test
configuration in. Click Next to continue.
On
the Define Test Scenario screen, you can choose to either test the disk
subsystem in terms of the performance of the database, or you can test a
specific planned mailbox I/O profile.
The
latter option will simulate I/O in the pattern that you anticipate from
your users and tell you if your server can handle it.
Select the Test Disk Subsystem Throughput option and click Next.
At the Select Capacity And Throughput screen, enter the capacity of the storage that you want to simulate.
For
example, if you anticipate that your database will grow to 500 GB and
if you test 50% capacity, Jetstress will test the database at 250 GB.
You
can also adjust the percentage of the Input/Output Per Second (IOPS)
throughput. It is recommended that you leave these values at the default
setting of 100 and click Next.
On the Select Test Type screen, select the type of test you want to perform and click Next.
In this example, we're going to perform a performance test.
On
the Define Test Run screen, type the location that you want to store
the test results in. Also adjust the length of time that you want to run
the test for. When you set this to a number higher than 6 hours, a
stress test is run. Click Next.
At
the Define Database Configuration screen, enter the number of databases
that you want to test with. Also select the number of copies of each
database.
In
the table that lists the databases, you will need to enter the location
of the database file and transaction log files for each database. After
you enter this information, click Next.
On
the Select Database Source screen, select whether you want to create
new databases or attach the test to existing databases. Click Next to
continue.
On the Review & Execute Test screen, review the options that you've picked for the Jetstress test and click Execute Test.
2.2. Simulate Client Workload
You can simulate client
workload using the Exchange Load Generator (LoadGen) application. The
Load Generator is not installed by default, so you will need to download
it from the Exchange Server 2010 TechCenter and install it separately
from Exchange.
With the Load Generator, you
can benchmark and validate your Exchange configuration before it is
deployed in production and users start using it. A variety of client
simulation options give you a good idea of how your servers will perform
against your anticipated load.
2.2.1. Install LoadGen
You can use the following steps to install the Load Generator tool on your Exchange servers before putting them into production:
Download LoadGen from the Exchange Server 2010 TechCenter at the following URL:
http://technet.microsoft.com/en-us/exchange/2010
Double-click on the downloaded file LoadGen.msi to start the installation wizard.
On the Welcome screen of the installation wizard, click Next.
On the End-User License Agreement screen, click the option I Accept The Terms In The License Agreement and click Next.
At the Select Installation Folder screen, enter the location of where you want to install LoadGen and click the Next button.
On the Confirm Installation screen, click Next to begin the installation.
After LoadGen installs, you will see the Installation Complete screen. Click Close to close the installation wizard.
When prompted to reboot, click Yes and allow the Exchange server to reboot.
2.2.2. Use LoadGen
Use the following steps to launch the Load Generator and perform some basic user simulation testing:
Launch the LoadGen tool by clicking Start => All Programs => Microsoft Exchange => Exchange Load Generator 2010.
At the Welcome screen of the Load Generator tool, click Start A New Test.
On the Start A New Test screen, click the option Create A New Test Configuration and click Continue.
If
you have an existing test configuration that you want to use, you can
choose the Use The Following Saved Configuration File option and browse
for the existing configuration that you want to use instead.
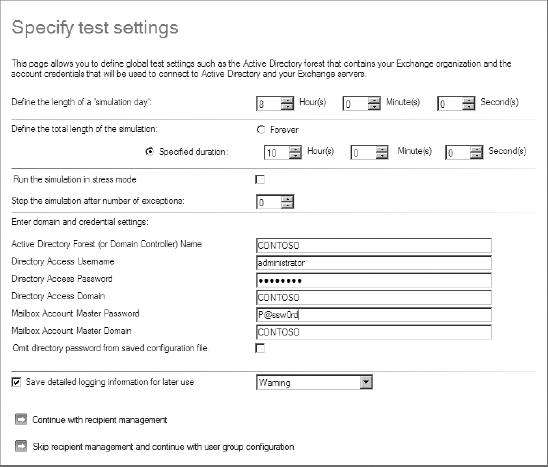
On
the Specify Test Settings screen, you can adjust the settings that you
want the test to simulate the load with. You can accept the default
settings for the simulation time period or you can adjust them as
necessary.
In
the section Enter The Domain And Credential Settings, enter the name
and password that you want to use for connecting to Active Directory
(Directory Access Password) and the password you want to use for logging
into the test accounts (Master Account Master Password). Then click
Continue With Recipient Management.
An example of the configuration of the test settings is shown in Figure 5.
On the User Settings screen, enter the number of users that you want to test with each database and click Continue.
On
the Advanced Recipient Settings screen, define the distribution list
settings, contact settings, and external recipient settings that you
want to use in the test. Click Continue after you are finished.
On
the next screen, the test recipients will be created on the databases
that you specified. This may take a few minutes to complete depending on
how many recipients you decided to test with.
On
the Specify Test User Groups screen, specify the load parameters that
you want to simulate in the test. Click the plus sign to add a user
group to the list. When you add a user group, you will need to configure
the method they will be using to access mail (Client Type), the profile
of the user (how heavily they use email), and the size of their
mailboxes. Add as many different test groups as you would like and click
Continue when you are finished.
The
Remote Configurations screen gives you the option of adding remote load
generators. If you don't want to use remote load generators, then leave
this screen at the default values and click Continue.
On
the Configuration Summary screen, verify the settings that you want to
use and click Start Initialization Followed By Simulation.
The test will be initialized and the simulation will run for the time you specified.