6. Implementing Software Restriction Policies
To implement software restriction policies, you must complete the following tasks:
1. | Set the default security level.
|
2. | Create rules.
|
3. | Designate file types.
|
Changing
the default security level affects all files on the computers that have
software restriction policies applied to them. In the details pane of a
GPO console, the current default security level is indicated by a black
circle with a check mark in it. Upon installation, the default security
level of software restriction policies on all files on your system is
set to Unrestricted.
To set the default security level of software restriction policies, complete the following steps:
1. | Access the Group Policy Object Editor console for a GPO.
|
2. | In
the Group Policy Object Editor console, click Computer Configuration,
double-click Windows Settings, double-click Security Settings, and then
double-click Software Restriction Policies.
|
3. | In the details pane, double-click Security Levels.
Note If
you don’t see Security Levels and the details pane displays the
message, “No Software Restriction Policies Defined,” you will need to
define new software restriction policies. Right-click the Software
Restriction Policies node, and select New Software Restriction Policies. |
|
4. | Right-click one of the following:
Disallowed,
which does not allow the software to run, regardless of the access
rights of the user who is logged on to the computer Unrestricted, which allows software to run with the full rights of the user who is logged on to the computer
|
5. | Click Properties.
|
6. | In the Disallowed or Unrestricted Properties dialog box (depending on your choice), click Set As Default.
|
6.1 Creating Rules
Rules
identify and control the running of software and override the default
security level. As mentioned previously, you can create four types of
rules: hash rules, certificate rules, path rules, and Internet zone
rules.
6.2 Creating a Hash Rule
Create
a hash rule to prevent a virus, Trojan horse, or other file from
running on your computer. If you want others in your organization to
use a hash rule to prevent a virus from running, calculate the hash of
the virus using software restriction policies and e-mail the hash value
to others. Do not e-mail the virus. You can also prevent a virus from
running on your computer by creating a path rule to prevent execution
of e-mail attachments.
To create a hash rule, complete the following steps:
1. | Access the Group Policy Object Editor console for a GPO.
|
2. | In
the Group Policy Object Editor console, click Computer Configuration,
double-click Windows Settings, double-click Security Settings, and then
double-click Software Restriction Policies.
|
3. | Right-click Additional Rules, and then click New Hash Rule.
|
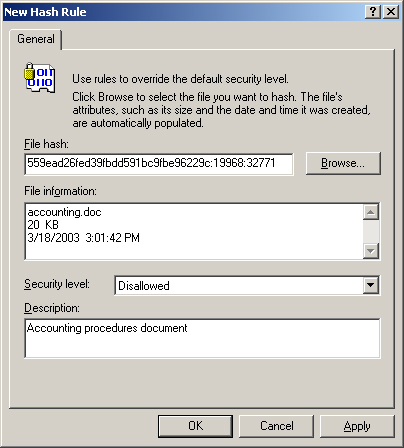
4. | In the New Hash Rule dialog box, shown in Figure 1, browse to a file or paste a precalculated hash in the File Hash box.
|
5. | In the Security Level list, select one of the following:
Disallowed,
which does not allow the software to run, regardless of the access
rights of the user who is logged on to the computer Unrestricted, which allows software to run with the full rights of the user who is logged on to the computer
|
6. | Type a description for this rule in the Description box, and then click OK.
|