System Restore enables you to restore the
computer to a previously saved state, so you can “roll back” your
computer to the way it was working before your cat jumped on the
keyboard, or before you installed that stupid program or device driver
that crashed your system. Here’s how it works.
Performing a system restore does not affect
personal files, such as documents, Internet favorites, or email. It
simply reverses system-configuration changes and removes installed files
to return the system to a stored state. System Restore automatically
monitors your system for changes. Periodically, easily identifiable
restoration points are created. Plus, you can create your own
restoration points manually.
Unlike Windows XP, which requires you to
start the system in Safe Mode before you can run System Restore,
Windows 7 offers System Restore on its System Recovery Options menu .
Configuring System Restore
Before you can use can use the System Restore
option, you need to have configured System Restore and saved at least
one restore point. System Restore has two control interfaces. One is the
System Protection tab of the System Properties dialog box. Open it by
clicking the System Protection task in the Tasks list of the System
applet in the Control Panel. (It’s protected by User Account Control.)
The other control interface is the System Restore utility itself,
accessed through Start, All Programs, Accessories, System Tools, System
Restore.
Note
Each time you modify and
save a document such as in Microsoft Word, the Volume Shadow Copy
Service (VSS) saves a copy of the previous version. This is referred to
as a shadow copy. You can restore previous versions by right-clicking a
document in Windows Explorer, selecting Properties, and clicking the
Previous Versions tab. However, you may have to first enable VSS through
the Services (services.msc) utility. |
System Restore is enabled or disabled for all drives in the computer via the System Protection tab (see Figure 1) of the System Properties dialog box. It is enabled by default for the system drive.
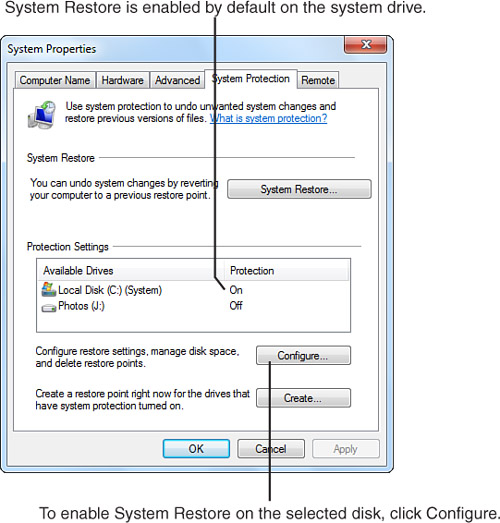
Click the Configure button to open the System
Protection dialog box for the selected hard disk. In the Restore
Settings section, the Restore System Settings and Previous Versions of
Files option is selected by default if System Protection is currently
enabled. You can change the default to Only Restore Previous Versions of
Files. This configuration disables System Restore, enabling you to only
use the Shadow Copy function of Windows 7 to restore single documents
to a previous version. The Turn Off System Protection option deletes all
restore points for that disk. You cannot restore the disk until you
turn on System Protection again and create at least one restore point
for that disk.
Tip
Unless you’re very low on
hard disk space or have another reason to disable System Protection,
leave the Restore System Settings and Previous Versions of Files default
option selected. |
The
System Restore drive configuration in Windows 7 permits you to adjust
how much of the hard disk (or partition) can be used for System Restore
files. This option is also available in Windows XP but not in Windows
Vista. Although the slider bar in the Disk Space Usage section of the
System Protection dialog box allows you to use the entire disk capacity,
by default System Restore uses up to 5% of a disk’s capacity or a
maximum of 10GB on hard disks over 64GB, and uses a maximum of 3% of
disk space on drives or partitions less than 64GB in size. We can only
speculate that the slider enables allocating so much file space for
Volume Shadow Copy storage to permit users to override defaults on
drives where there’s lots of file volatility and they wish to keep many
previous versions, or where shadow copies themselves are quite large.
You can also delete all restore points for the
selected hard disk from within the System Protection dialog box by
clicking the Delete button. The number of restore points retained by
System Restore depends on the amount of drive space allocated to System
Restore, as well as the rate and significance of changes to the system.
Creating Restore Points
Windows 7 creates restore points automatically whenever any one of several specific events occurs:
When a program is installed using InstallShield or Windows Installer
Automatic updates via Windows Update
Any restore operation
Every seven days if no other restore points were created within that time period
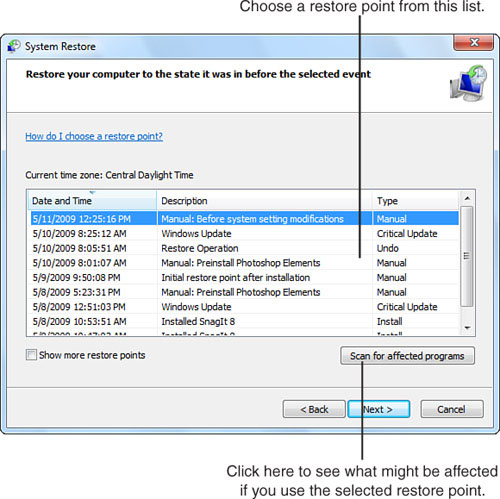
As Figure 2 shows, these factors can result in a lot of restore points being created in a short amount of time.
Keep in mind that not all program installations
use InstallShield or Windows Installer. Thus, you should always manually
create a restore point before you install applications.
To manually create a restore point, open the
System Protection tab in the Systems Properties dialog box and click
Create (refer to Figure 25.3).
Enter a descriptive name for the restore point and click Create. The
date and time are added automatically. A progress bar appears while the
restore is being created; click Close when prompted to complete the
process.
Creating a restore point at any restore
operation enables you to reverse a restoration. Thus, if after a
successful restoration you are not pleased with the outcome, you can
reverse the restoration. The system automatically removes any failed or
incomplete restoration operations.
System Restore does not replace the
uninstallation process for removing an application. System Restore
monitors and protects only against changes to the OS; it does not track
the addition of new files to the system. Use the Programs and Features
applet in Control Panel or a vendor-provided uninstall routine to remove
applications.
Restoring Your System to an Earlier Time
You
can restore your system to an earlier time by running System Restore
from the System Recovery Options menu when you boot from the Windows 7
DVD or by running System Restore from the System
Protection tab or the System Tools menu. From the opening menu, click
Next to continue.
Select a restore point from the list in the System Restore window (refer to Figure 25.4).
By default, only the last 5 days’ worth of restore points are listed.
To select an older restore point, click the Show More Restore Points
check box. To view a list of all program, driver, and patch changes that
might be affected when returning to a certain restore point, click the
Scan for Affected Programs button. Click Close to return to the list of
restore points. After selecting a restore point, click Next to continue.
If you have more than one drive with System
Restore enabled, select which drive(s) to restore. The system drive is
always selected. Click Next to continue, if applicable, and then click
Finish. Click Yes to confirm that you want to restore your system. A
progress bar appears while System Restore prepares your system, and then
your system restarts.
At the end of the process, a dialog box
appears, indicating that your system has been restored to the date and
time of the restore point you selected.