4. Share a Printer
As soon as you share a printer, anyone on your local network can print to it.
Sharing
a printer is, for the most part, just like sharing a folder. The
difference is that security and permissions aren't particularly
important. What's more, Windows Vista sometimes lets you connect to a
remote printer even if it isn't shared, and Vista even often connects
shared printers automatically.
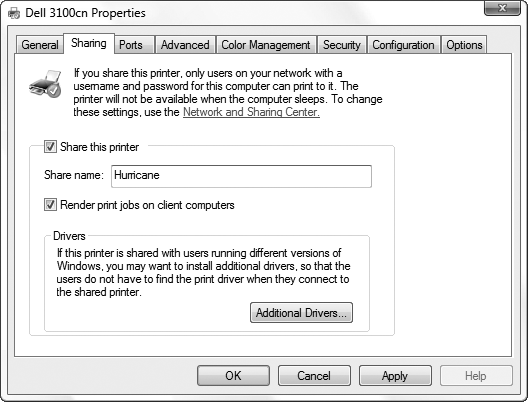
Here's how to do it by hand. In Control Panel, open the Printers folder. Right-click the printer you want to share, and select Sharing. Turn on the Share this printer option (see Figure 5) and click OK.
Before
other PCs on your network can print, they must be set up. Again, Vista
sometimes does this automatically, but if not, here's how to do it by
hand:
Open Windows Explorer and navigate to the Network folder.
Double-click
the PC to which the printer is physically connected. (If the printer is
a network printer and not connected to any PC, see "Section 8.4.5," next.)
In the PC's Network folder, open the Printers folder.
Double-click the printer to install the driver on your PC.
Open the Printers folder in Control Panel to see whether the new printer has shown up. Right-click the printer, select Properties, and under the General tab, click Print Test Page to try it out.
If
you have a lot of PCs on your network (or a lot of printers) and you're
not sure where each one is connected, there's another way to set up a
remote printer:
Open the Printers folder in Control Panel, and click the Add a printer button on the toolbar.
In the Add Printer window, click Add a network, wireless or Bluetooth printer.
Wait while Windows searches for "available printers."
When the printer you want appears in the list, highlight it, click Next, and then follow the prompts to complete the wizard.
If your printer never shows up, click The printer that I want isn't listed. On this next page, you can type the UNC path by hand, or you can select Browse for a printer
to show the old tool used in earlier versions of Windows. The browse
window is a nonstandard collapsible tree, from which you'll need to
navigate to the remote printer you wish to install. Navigation is a
little different here than in Explorer; instead of the usual plus signs,
you'll have to double-click branches to expand them. When you've found
the printer, highlight it and click Next.
If the printer still doesn't show up, go back to the PC to which it's connected and troubleshoot the problem there.
It's
important to realize that some printers can't be shared over a network,
which is usually a limitation of the printer's driver, and an
intentional one at that. |
|
Note
that the host computer, the one to which the printer is physically
attached, must be turned on and connected to the network in order to
allow other computers to print. You can overcome this limitation by
using a print server device, which connects most types of printers
directly to your network.
5. Use a Print Server Without Software
A
print server lets you plug most types of printers directly into your
network, something otherwise only high-end network printers can do.
A
print server gets you two things. One, anyone on your network can print
without requiring that a specific PC be turned on and connected; this
is particularly useful on a wireless network, where nobody wants to have
to feed a printer cable to a PC each time someone needs to print.
Second, adding a print server means you can put the printer anywhere; it
no longer has to be right next to a PC.
Problem
is, most print servers come with software you're supposed to install on
every PC. This can be a pain, and the software is often buggy.
The good news is that most of the time, you don't need the software at all, provided you do the setup by hand:
First, connect your print server to your printer and turn everything on.
Next,
connect your print server to your network. If it's a wireless print
server, you may need to hook it up to your PC first to enter the SSID
and encryption information; consult the documentation for details.
Determine your print server's IP address.
The address might be a static default address, which would be mentioned in the documentation.
Otherwise,
your router's DHCP system will automatically assign it an IP address.
To find out, open your router setup page, and view the DHCP Client
Table. Here, you'll see the IP address your print server is currently using.
Open a web browser, type the print server's IP address into the address bar, and press Enter.
On
the print server setup page, turn off DHCP and specify a static IP
address. Make sure you pick an address no PC on your network is likely
to use; for instance, if your PCs are currently at 192.168.1.101, 192.168.1.102, and so on, choose something out-of-the-way like 192.168.1.177
for your print server, and then save the settings. Check the print
server's documentation if you need further help with this step.
Next, add the printer to a PC. Open the Printers folder in Control Panel, and then click the Add a printer button on the toolbar.
In the Add Printer window, click Add a network, wireless or Bluetooth printer.
Don't wait for Windows to search for available printers; instead, click The printer that I want isn't listed right away.
On the next page, select Add a printer using a TCP/IP address or hostname and click Next.
In the Hostname or IP address field, type the static IP address of your print server you chose in step 5. Windows fills in the Port name automatically as you type; click Next when you're done.
If you see the Additional Port Information Required page, select Standard for the Device Type, then Generic Network Card, and then click Next.
Next, Windows will attempt to talk to the printer, but it will likely need your help in choosing the manufacturer and model.
Click Next and then finish the wizard when you're done.
Nearly
all print servers work this way, but you may find that some units
(likely the one you just bought) have trouble remembering their
settings. Obviously, a print server that forgets its static IP address
won't be much use with an operating system like Vista that requires a
consistent IP address for reliable printing. If this happens to you,
check the manufacturer's web site for a firmware upgrade that may fix
the problem, and then try again.
6. Stop Sharing Scheduled Tasks
As
explained earlier in this section, you can access the shared printers
and folders—as well as the Scheduled Tasks folder—of any other computer
in your network. The problem is that sharing Scheduled Tasks slows
network browsing considerably. Follow these steps on every PC in your
workgroup to stop sharing Scheduled Tasks and increase your network
performance considerably:
Open the Registry Editor .
Expand the branches to HKEY_LOCAL_MACHINE\SOFTWARE\Microsoft\Windows\CurrentVersion\Explorer\RemoteComputer\NameSpace.
Under the NameSpace key, you'll see at least two keys named for Class IDs. The (default) value inside each key will tell you what the key is for.
Find the key for "Scheduled Tasks" (it will be {D6277990-4C6A-11CF-8D87-00AA0060F5BF}), and delete it.
Close the Registry Editor when you're done.
The
change will take effect immediately, and you'll notice that Windows is
now much more responsive when browsing shared folders.