Installing and Configuring RBS
Administrators can use the
following procedure to install and configure the BLOB externalization in
SharePoint 2010 using RBS and the RBS FILESTREAM provider. Each step in
the following procedure is explained in detail:
1. | Enable FILESTREAM on SQL Server.
| 2. | Prepare the database, and create a BLOB store.
| 3. | Install the RBS client.
| 4. | Enable RBS using Windows PowerShell.
|
Enable FILESTREAM on SQL Server
Administrators must
enable and configure FILESTREAM on the computer running SQL Server 2008
(RTM/R2) that hosts the SharePoint Server 2010 databases:
1. | Click Start, All Programs, Microsoft SQL Server 2008 R2, Configuration Tools, SQL Server Configuration Manager.
| 2. | In
the left panel of SQL Server Configuration Manger, click SQL Server
Services, which will list all the SQL Server 2008-related services on
the right-side panel.
| 3. | Locate the instance of SQL Server on which you want to enable FILESTREAM, right-click the instance, and then click Properties.
| 4. | In
the SQL Server Properties dialog box, click the FILESTREAM tab and
select the Enable FILESTREAM for Transact-SQL Access check box, which
will enable the rest of the options.
| 5. | Select all the check boxes, and then click Apply.
| 6. | Click Start, All Programs, Microsoft SQL Server 2008 R2, SQL Server Management Studio.
| 7. | Connect to the desired SQL Server database engine instance.
| 8. | In SQL Server Management Studio, click New Query to display the Query Editor.
| 9. | In Query Editor, enter the following Transact-SQL code:
EXEC sp_configure filestream_access_level, 2; RECONFIGURE
| 10. | Click Execute.
|
Prepare the Database and Create a BLOB Store
The following steps show how to prepare the database and create a BLOB store:
1. | Click Start, All Programs, Microsoft SQL Server 2008 R2, SQL Server Management Studio.
| 2. | Connect to the desired SQL Server database engine instance and expand that instance.
| 3. | Expand
the databases, select the content database for which a BLOB store will
be created, click New Query, and then execute the following commands:
use [ContentDatabaseName]
if not exists (select * from sys.symmetric_keys where name = N'##MS_DatabaseMasterKey##')create master key encryption by password = N'Admin Key Password !2#4'

use [ContentDatabaseName]
if not exists (select groupname from sysfilegroups where groupname=N'RBSFilestreamProvider')alter database [ContentDatabaseName] add filegroup RBSFilestreamProvider contains filestream

use [ContentDatabaseName]
alter database [ContentDatabaseName] add file (name = RBSFilestreamFile, filename = 'c:\RemoteBlobStore') to filegroup RBSFilestreamProvider
|
Install RBS
The following steps show how to install RBS:
1. | Download RBS 2008 R2 with the FILESTREAM provider (RBS_X64.msi) from http://go.microsoft.com/fwlink/?LinkID=165839&clcid=0x409 on the database server, all the web frontends, and all the application servers.
| 2. | On the database server, run the following commands from the location of the RBS_X64.msi file using the command prompt:
msiexec /qn /lvx* rbs_install_log.txt /i RBS_X64.msi TRUSTSERVERCERTIFICATE=true FILEGROUP=PRIMARY DBNAME="ContentDatabaseName" DBINSTANCE="DatabaseInstanceName" FILESTREAMFILEGROUP=RBSFilestreamProvider FILESTREAMSTORENAME=FilestreamProvider_1

msiexec /qn /lvx* rbs_install_log.txt /i RBS_X64.msi DBNAME=" ContentDatabaseName " DBINSTANCE=" DatabaseInstanceName " ADDLOCAL="Client,Docs,Maintainer,ServerScript,FilestreamClient, FilestreamServer"
This should be run against each content database that should support RBS.
| 3. | On
all the web frontends and all the application servers, run the
following command from the location of the RBS_X64.msi file using the
command prompt:
msiexec /qn /lvx* rbs_install_log.txt /i RBS_X64.msi DBNAME=" ContentDatabaseName " DBINSTANCE=" DatabaseInstanceName " ADDLOCAL="Client,Docs,Maintainer,ServerScript,FilestreamClient, FilestreamServer"
These commands kick off an msiexec service that run in a silent mode,
not providing any feedback about their success or failure.
Administrators can monitor the service in the Task Manager to ensure
that they are finished.
| 4. | Administrators
can confirm the RBS installation by looking for the text Product: SQL
Remote Blob Storage—Configuration Completed Successfully in the RBS log
file. The previous installation commands create a log file named
rbs_install_log.txt in the same location as the RBS_X64.msi file. The
installation also creates several tables in the specified content
database with names that are preceded by mssqlrbs. Administrators can
also look for these tables to confirm the installation.
|
Note
SQL Server 2008 released RBS
2008, which was the first version of RBS API. This version is not
supported with SharePoint 2010. The version referred to here as RBS 2008
R2 was enhanced to work with SharePoint 2010, ships with the FILESTREAM
provider, and can be installed on both SQL Server 2008 and SQL Server
2008 R2.
Enable RBS Using Windows PowerShell
The following steps show how to enable RBS using Windows PowerShell:
1. | Click Start, All Programs, Microsoft SharePoint 2010 Products, SharePoint 2010 Management Shell.
| 2. | At the Windows PowerShell command prompt (PS C:\>), type each of the following commands and press Enter after each one:
$cdb = Get-SPContentDatabase ContentDatabaseName
$blobstoragesettings = $cdb.RemoteBlobStorageSettings
$blobstoragesettings.Enable()
$blobstoragesettings.SetActiveProviderName($blobstoragesettings.GetProviderNames()[0])
The Enable commandlet enables the usage of RSB for a certain
content database. When RBS is enabled, BLOBs get stored in the active
BLOB store. When the active BLOB store is disabled through the Disable commandlet, the BLOBs get stored back in the content database.
The GetProviderNames commandlet can be used to list all the
registered providers in the farm, and the names are retrieved from the
configuration database.
The SetActiveProviderName commandlet is used to activate a
certain provider for a certain content database. A farm can have
multiple RBS providers, but only one of them can be active at a time for
a given content database.
Another useful commandlet that was not used previously is the MinimumBlobStorageSize
commandlet. This commandlet can be used to set a size threshold. For
example, an administrator can decide to store files smaller than 1MB in
the content database and larger ones in the BLOB store.
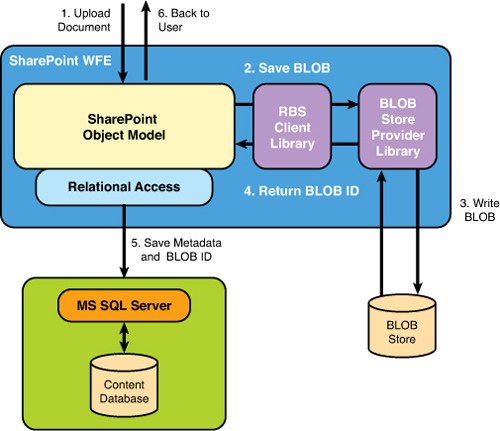
| 3. | Now,
all the uploaded documents should go to the BLOB store
(c:\RemoteBlobStore) rather than being saved in the specified content
database. Figure 3
illustrates the upload operation workflow in SharePoint 2010 after enabling RBS.
|
Migrating and Moving BLOBs Between BLOB Stores
SharePoint 2010 ships with a powerful PowerShell commandlet named Migrate
that can be used by administrators to move BLOBs from their current
locations to the current active RBS provider store. This implies that
administrators can use the commandlet to move data from SQL Server to
another remote BLOB store, and vice versa. Moving BLOBs from a content
database is a typical requirement after installing and configuring RBS
on already running SharePoint systems.
It is also worth mentioning that the Migrate
commandlet performs a deep copy of the BLOBs one BLOB at a time, and
there is no downtime required for moving all the BLOBs. The migration
process also can be paused and resumed at any time, which means that at a
point, part of the BLOBs can be in SQL Server, and the other part can
reside in another BLOB store.
This commandlet can even be
used to move BLOBs from one BLOB store to another one by moving them
back to SQL Server and then migrating them to another store.
Migrating BLOBs from a Content Database to the Current Active Provider Store
The following steps show how to migrate BLOBs from a content database to the current active provider store:
1. | Click Start, All Programs, Microsoft SharePoint 2010 Products, SharePoint 2010 Management Shell.
| 2. | At the Windows PowerShell command prompt (PS C:\>), type each of the following commands and press Enter after each one:
$cdb = Get-SPContentDatabase ContentDatabaseName
$blobstoragesettings = $cdb.RemoteBlobStorageSettings
$blobstoragesettings.Migrate()
|
Migrating BLOBs from the Current Active Provider Store Back to the Content Database
The following steps show how to migrate the current active provider store back to a content database:
1. | Click Start, All Programs, Microsoft SharePoint 2010 Products, SharePoint 2010 Management Shell.
| 2. | At the Windows PowerShell command prompt (PS C:\>), type each of the following commands and press Enter after each one:
$cdb = Get-SPContentDatabase ContentDatabaseName
$blobstoragesettings = $cdb.RemoteBlobStorageSettings
$blobstoragesettings.Disable()
$blobstoragesettings.Migrate()
|
|