Administrators should always keep an eye on the performance
and storage of SharePoint backend databases. In response to the data
they gather from the vast range of monitoring tools, administrators
should also know how to manage SharePoint content databases, how to
manually add a content database to a web application, and how to move a
site collection between content databases. Some of these tasks can be
completed directly from central administration; others can be done only
via PowerShell or the deprecated STSADM command-line utility. These
different tasks and techniques will be explained in detail in this
section.
Adding a Content Database
Creating a new content
database does not mean that any new content will be stored in it
because a site collection cannot span content databases. However, by
creating a new content database and following some extra steps,
administrators can instruct SharePoint where to create new site
collections.
Adding a Content Database Using Central Administration
Administrators can use the following procedure to create a new content database and attach it to the specified web application:
1. | Click Start, All Programs, Microsoft SharePoint 2010 Products, SharePoint 2010 Central Administration.
|
2. | On the SharePoint central administration website, click Application Management.
|
3. | In the Databases section, click Manage Content Databases.
|
4. | On the Manage Content Databases page, as shown in Figure 1, click Add a Content Database.
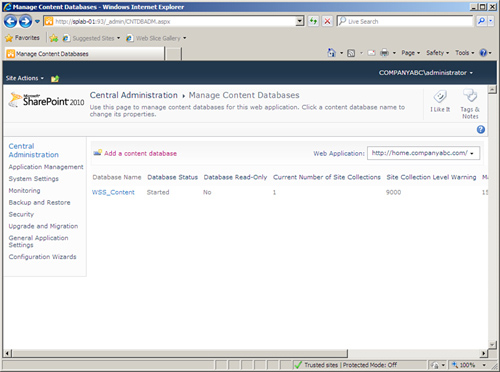
|
5. | On the Add Content Database page, as shown in Figure 2, do the following:
- A. Select a web application for the new database.
- B. Select a database server to host the new database.
- C. Specify
the authentication method that the new database will use, and supply an
account name and password, if they are necessary.
- D. Specify
both the total number of top-level sites that can be created in the
database and the number at which a warning will be issued.

|
6. | Click OK.
|
Adding a Content Database Using Windows PowerShell
Administrators can use the
following procedure to create a new content database and attach it to
the specified web application using Windows PowerShell:
1. | Click Start, All Programs, Microsoft SharePoint 2010 Products, SharePoint 2010 Management Shell.
|
2. | At the Windows PowerShell command prompt (PS C:\>), type the following command, and then press Enter:
New-SPContentDatabase -Name <String> -WebApplication <SPWebApplication-PipeBind>
The -Name parameter specifies the name of the content database to be created. The -WebApplication parameter specifies the web application to which the new database is to be attached.
|
Creating a Site Collection in a Specific Content Database
To force SharePoint to
create new site collections in a specific content database, the target
database should be the only one with the Ready status; all the other
databases associated with the web application should be set Offline.
Taking a database offline
means that from this point on, no new site collection will be created
in that database. However, the database is still usable; users can still
upload and download content, view web pages, and process workflows, and
new subsites under an existing site collection can still be created in
it. If a one-to-one site collection to content database association is
needed, taking the hosting database offline is a method to accomplish
this.
Note
Administrators should not
leave the content databases in Offline mode for a long time; they should
set the databases back to Ready after creating the new site collection
because some timer jobs do not function properly when the database is in
Offline mode.
Another approach to creating a
site collection in a specific content database is to set the maximum
number of sites in the target database to a large number. SharePoint
will then choose this content database.
Setting a Content Database Offline Using Central Administration
Administrators can use the following procedure to set a content database offline using central administration:
1. | Click Start, All Programs, Microsoft SharePoint 2010 Products, SharePoint 2010 Central Administration.
|
2. | On the SharePoint central administration website, click Application Management.
|
3. | In the Databases section, click Manage Content Databases.
|
4. | On
the Manage Content Databases page, select a web application by clicking
the Web Applications drop-down list and choosing a web application.
|
5. | Click the database name in the list of the available database names.
|
6. | On the Manage Content Databases Settings page, as shown in Figure 3, change the database status to offline.
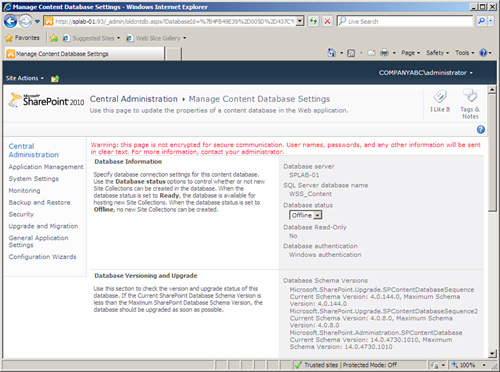
|
Creating a Site Collection in a Specific Content Database Using Windows PowerShell
To directly use the content database for a new collection using PowerShell, administrators can use the following procedure:
1. | Click Start, All Programs, Microsoft SharePoint 2010 Products, SharePoint 2010 Management Shell.
|
2. | At the Windows PowerShell command prompt (PS C:\>), type the following command, and then press Enter:
New-SPSite -Url <String> -OwnerAlias <String> [-ContentDatabase
   <SPContentDatabasePipeBind>]
|
Note
As explained, administrators
need to first add a content database and then force the creation of new
site collections into it. This makes it a bit confusing afterward for
administrators to determine where each site collection lives.
Fortunately, SharePoint provides an easy way to figure out which site
collection goes with what content database by selecting a site
collection from the Site Collection List in central administration
rather than relying on naming conventions when creating content
databases.
Moving Site Collections Between Content Databases
There
might be some situations when a site collection hosted within a content
database is unexpectedly growing, and the database is approaching the
100GB limit recommended by Microsoft. At such times, administrators
should manually move the growing site collections from the larger
content database to another smaller one.
Determining the Size of the Source Site Collection Using Windows PowerShell
Administrators should
always double-check that the destination hard disk can comfortably store
the site collection data by determining the size of the site collection
that is to be moved. The following procedure can be used to determine
the size of a site collection:
1. | Click Start, All Programs, Microsoft SharePoint 2010 Products, SharePoint 2010 Management Shell.
|
2. | At the Windows PowerShell command prompt (PS C:\>), type the following command, and then press Enter:
Get-SPSiteAdministration –Identity http://ServerName/Sites/SiteName| ft Url,DiskUsed
Replace http://ServerName/Sites/SiteName with the name of the site collection.
|
Moving Site Collections Between Content Databases Using Windows PowerShell
Administrators can use the Windows PowerShell command Move-SPSite to move site collections between content databases:
1. | Click Start, All Programs, Microsoft SharePoint 2010 Products, SharePoint 2010 Management Shell.
|
2. | At the Windows PowerShell command prompt (PS C:\>), type the following command, and then press Enter:
Move-SPSite <http://ServerName/Sites/SiteName> -DestinationDatabase
   <DestinationContentDb>
Replace http://ServerName/Sites/SiteName with the name of the site collection, and replace <DestinationContentDb> with the name of the destination content database.
|