1. Working with Blend Modes
Blend modes
allow you to control how pixels on one layer interact with those on the
layer or layers below it. Blend modes are common throughout the
Creative Suite. In addition to being available in Photoshop,
Illustrator, and Fireworks, they are also present in Flash Professional,
InDesign, Premiere Pro, After Effects, and now Catalyst. The exact list
of blend modes varies from one product to the next.
Catalyst does not have
nearly as many blend modes as Photoshop, but all of the most commonly
used modes are available. Blend modes are available in a drop-down list
on the Properties panel when a shape is selected. With almost all
shapes, it is the last or next-to-last option on the panel.
When you have an object on a
layer whose pixels overlap those of an object on a lower layer, the
upper object normally obscures the lower. You can make the lower object
appear by decreasing the opacity of the upper object, but this merely
allows you to see through the top object. Many times, what you actually
need is to blend the top pixels with the lower pixels (see Figure 1).
|
The blend modes available
in Catalyst are the same as those found in Flash Professional, as those
are the modes supported by Flash Player.
|
|
The most-used and most
useful blend modes are Multiply and Screen. When you blend with
Multiply, you are mixing the darkest pixels of the upper layer with the
darkest pixels of the layers below. Therefore, if you take a black shape
and attempt to blend with Multiply nothing appears to happen, as you
have only very dark pixels.
Conversely, a white object
will seem to disappear, as there are no dark pixels available, so only
the dark pixels below — which would be any pixel, as everything is
darker than white — will show through. However, take a shape with any
other color fill, and you will see the blending. Multiply therefore
makes the shapes darker through the blend.
NOTE
Color values on
computers are expressed numerically. The Multiply blend mode is so named
because you are performing multiplication: The color values of the top
layer are multiplied by the values of the lower layers. The same is true
with the Difference, Add, and Subtract modes: Each result in the
mathematical operation is described by its name.
Screen is the opposite of
Multiply. The lightest pixels of the top layer blend with the light
pixels of the layer or layers below. Thus, a black shape blended with
Screen seems to disappear as there are no light pixels, while nothing
seems to happen with a white shape. Any colors in between will blend,
with the result being something lighter than before.
Table 1 lists all of the blend modes available in Catalyst.
Table 1. The Catalyst Blend Modes
| Mode | Result |
|---|
| Normal | No blending occurs. |
| Layer | No blending occurs; in practice, Normal and Layer do the same thing. |
| Multiply | Dark
pixels from the layer being blended mix with the darker pixels in the
lower layers. No part of the blended layers gets lighter when using
Multiply. |
| Screen | Light
pixels from the layer being blended mix with the lighter pixels in the
lower layers. The mode actually multiplies the inverse values of the
colors to result in a lightening of the image. No part of the blended
layers will get darker when using Screen. |
| Darken | Each of the pixels with the blended layer is compared to the pixel directly beneath, and the darker of the two remains. |
| Lighten | The opposite of Darker; the lighter of each set of pixels is retained. |
| Difference | Difference
divides the color values of the blended layer from those of the layers
below. Large differences between the colors result in lighter colors,
while small differences result in dark colors. Any pixels with the same
value become black. The mode generally results in something that
resembles a negative from film, although a true negative effect is
available with the Invert mode (see below). |
| Add | The
color values of the pixels of the blending layer are added to those of
the layers below. The effect is often very similar and at times
indistinguishable from Lighten. |
| Subtract | The
color values of the pixels are subtracted from one another. The result
is usually similar to Difference, but some variations in the resulting
colors are evident. |
| Invert | Each of the lower layer's pixels is inversed, resulting in a film negative effect. |
| Alpha | The
blended layer's alpha value, which defines its transparency value, is
used to determine its appearance. Flex developers using ActionScript 3
can use this blend mode to create interesting effects, but as you do not
have direct access to ActionScript in Catalyst, it is of little use
other than to preset it for the developer. The result in Catalyst will
always be that the object being blended becomes invisible. |
| Erase | Like
Alpha, this has little use in Catalyst. ActionScript 3 developers can
use this blend mode to erase the pixels of the background layer, but in
Catalyst it has the same effect as Alpha: the object being blended
becomes transparent. |
| Overlay | Each
pixel is adjusted based on the color value of the lower layer. If the
lower layer is lighter than 50 percent gray, the pixels are screened. If
the lower layer is darker than 50 percent gray, the pixels are
multiplied. |
| Hard Light | Hard light multiplies the dark colors and screens the light colors, very much like Overlay. |
2. Add Wireframe Components
When
creating a Flex application, you have complete freedom to create
buttons, lists, scrollbars, and other common application components to
look how you want. For example, you can
design your own scrollbars in Illustrator and make that scrollbar look
any way that you want.
There are times that you may
want to use standard components instead of drawing your own. You may
have a client or boss who simply wants the application to look like
those to which she is accustomed. The primary idea behind Catalyst is
that you will begin your project in Photoshop or Illustrator, which
implies that all of the design is done there and further implies that
you are creating custom components. Neither Photoshop nor Illustrator
contains any tools that allow you to add a standard browser button or
scrollbar or other common component.
NOTE
The exception is Fireworks, which does contain a library of standard Web page and Flex components.
Fortunately,
Catalyst contains these items. The Wireframe Components panel contains
ten of the most common user interface components from the Flex
framework, so adding them to your project is as simple as clicking and
dragging.
Table 2 lists the Wireframe components included with Catalyst and briefly describes each.
Table 2. Wireframe Components
| Component | Description |
|---|
| Button | Basic button to add interactivity to your project. |
| Checkbox | Check boxes are usually presented in groups to allow users to select zero or more options. |
| Data List | Data
lists are basically the Flex equivalent of a table, although they
provide a considerable amount of additional functionality, including
hover and select effects, automatic sorting, and more. |
| Horizontal Scrollbar | A scrollbar for wide content. |
| Horizontal Slider | Slider controls allow users to modify a value by dragging the slider. |
| Radio Button | Radio buttons provide a set of mutually exclusive options. |
| Text Input | A single-line text input field to capture user-generated data. |
| Toggle Button | Toggle
buttons function in the same way as regular buttons, but have a
selected state to provide feedback as to whether or not they have been
clicked. |
| Vertical Scrollbar | A scrollbar for tall content. |
| Vertical Slider | This provides the same functionality as the horizontal slider, but vertically. |
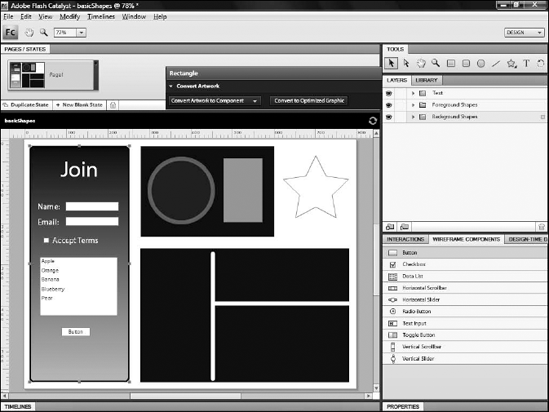
As you add wireframe components to your application (see Figure 2),
keep in mind that you are only building a design comp. Much of the
functionality of these components is not designed to work directly out
of Catalyst. You will be able to allow Buttons to go to external Web
sites or change states within an application.
You can add sample data to a data grid, but you will add most of the functionality of the components later in Flash Builder.
NOTE
Some of the
components have customizable parts. For example, you can modify the
appearance of the various pieces that make up a horizontal scrollbar.