Next up is the popover for setting the stroke width.
This one is pretty similar to the one for font size. We'll give the user
a slider to drag back and forth for setting the width, as well as a
preview. This time, the preview will draw a few lines and curves in a UIBezierPath just like the ones the user can make, clearly showing the result of the user's selection.
1. Paving the Way
Start by creating yet another UIViewController subclass, using the New File Assistant. Just like FontSizeController, this one should not be a subclass of UITableViewController, but it should have an .xib file and be targeted for iPad. Name it StrokeWidthController. After Xcode creates it, open StrokeWidthController.h and give it the following content:
//  StrokeWidthController.h
#import <UIKit/UIKit.h>
@class StrokeDemoView;
@interface StrokeWidthController : UIViewController {
  IBOutlet UISlider *slider;
  IBOutlet UILabel *label;
  IBOutlet StrokeDemoView *strokeDemoView;
  CGFloat strokeWidth;
}
@property (assign, nonatomic) CGFloat strokeWidth;
- (void)takeIntValueFrom:(id)sender;
@end
This class is pretty similar to FontSizeController.
The main differences are that here, we're keeping track of a simple
floating-point value for the width, and we're also referencing a new
class we're about to create, called StrokeDemoView, which we'll use to display the preview of the selected stroke width.
Before we create the GUI, we also need to create the StrokeDemoView class. Using the New File Assistant once again, make a new UIView subclass and name it StrokeDemoView.
Just creating the class in our project is all we need to do in order to
make Interface Builder know about the class and let us use it in the
GUI. We'll go back and fill in the actual content later.
2. Creating the GUI
To begin, open StrokeWidthController.xib in Interface Builder. Once again, you'll see that the UIView
it contains is meant to take up an entire screen, which isn't what we
want here either. Use the attribute inspector to set the view's Status
Bar to Unspecified, and then use the size inspector to make its size 320
by 320.
Now use the Library to find the three classes that are needed for our GUI: UISlider, UILabel, and StrokeDemoView. Drag each of them to the view, laying them out as shown in Figure 1.
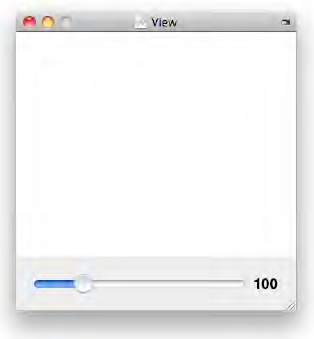
You can't really tell from the figure, but the large, white rectangle filling most of the view is an instance of StrokeDemoView. For best results with our preview-drawing code, make this view 320 by 257, since the StrokeDemoView
is going to have hard-coded locations for the lines and curves it
draws. Here, I've once again given the entire view a light-gray
background, to make the control area stand out from the preview a bit.
Use the attribute inspector to give the slider a reasonable range by
setting its minimum value to 1 and its maximum value to 20.
Make all the connections
described in the header file, by control-dragging from File's Owner to
each of the GUI components and making the connection, then
control-dragging from the slider back to File's Owner and selecting the takeIntValueFrom: action. Now the basic GUI configuration is complete, so let's return to Xcode and make it work!
3. Previewing the Stroke Width with a Custom View
Now we're going to define the StrokeDemoView class. This class will be pretty simple. It defines a property called strokeWidth, which determines how it draws its path. Our controller will set this each time the user moves the slider. StrokeDemoView.h looks like this:
//  StrokeDemoView.h
#import <UIKit/UIKit.h>
@interface StrokeDemoView : UIView {
  CGFloat strokeWidth;
  UIBezierPath *drawPath;
}
@property (assign, nonatomic) CGFloat strokeWidth;
@end
The implementation is also pretty simple. It defines the path to draw when it's initialized, and implements the setStrokeWidth: method in order to mark itself as "dirty" by calling [self setNeedsDisplay], so the view is scheduled for redrawing. The drawRect: method simply draws the path. Here's the whole thing:
//  StrokeDemoView.m
#import "StrokeDemoView.h"
@implementation StrokeDemoView
@synthesize strokeWidth;
- (void)setStrokeWidth:(CGFloat)f {
  strokeWidth = f;
  drawPath.lineWidth = f;
  [self setNeedsDisplay];
}
- (id)initWithCoder:(NSCoder *)aDecoder {
  if ((self = [super initWithCoder:aDecoder])) {
    drawPath = [[UIBezierPath bezierPathWithRect:CGRectMake(10, 10, 145, 100)] retain];
    [drawPath appendPath:
      [UIBezierPath bezierPathWithOvalInRect:CGRectMake(165, 10, 145, 100)]];

    [drawPath moveToPoint:CGPointMake(10, 120)];
    [drawPath addLineToPoint:CGPointMake(310, 120)];

    [drawPath moveToPoint:CGPointMake(110, 140)];
    [drawPath addLineToPoint:CGPointMake(310, 200)];

    [drawPath moveToPoint:CGPointMake(100, 180)];
    [drawPath addLineToPoint:CGPointMake(310, 140)];

    [drawPath moveToPoint:CGPointMake(90, 200)];
    [drawPath addCurveToPoint:CGPointMake(300, 230)
                controlPoint1:CGPointMake(0, 0)
                controlPoint2:CGPointMake(-100, 300)];
  }
  return self;
}
- (void)dealloc {
  [drawPath dealloc];
  [super dealloc];
}
- (void)drawRect:(CGRect)rect {
  [[UIColor blackColor] setStroke];
  [drawPath stroke];
}
@end
Note that since this class is instantiated only from within an .xib file, and never directly in code, we implement initWithCoder: and not initWithFrame:.
If we wanted to also be able to instantiate this class in code, we
would need to implement the latter as well in order to create the path.
4. Implementing the Controller
Now that we have a working StrokeDemoView, our next move is to go back and implement StrokeWidthController. This class is quite simple, and quite similar to the FontSizeController we built earlier. Here's the entire content of StrokeWidthController.m:
//  StrokeWidthController.m
#import "StrokeWidthController.h"
#import "StrokeDemoView.h"
@implementation StrokeWidthController
@synthesize strokeWidth;
- (void)viewDidLoad {
  [super viewDidLoad];
  NSInteger i = self.strokeWidth;
  strokeDemoView.strokeWidth = i;
  label.text = [NSString stringWithFormat:@"%d", i];
  slider.value = i;
}
-
(BOOL)shouldAutorotateToInterfaceOrientation:(UIInterfaceOrientation)interfaceOrientation {
    // Overriden to allow any orientation.
    return YES;
}
- (void)takeIntValueFrom:(id)sender {
  NSInteger i = ((UISlider *)sender).value;
  self.strokeWidth = i;
  strokeDemoView.strokeWidth = self.strokeWidth;
  label.text = [NSString stringWithFormat:@"%d", i];
  slider.value = self.strokeWidth;
}
@end
5. Making it Work
Now all we need to do is update our main controller to make it aware of the new popover. Open DudelViewController.m, and start with an import:
#import "StrokeWidthController.h"
Once again, we update the handleDismissedPopoverController: method, this time grabbing the new stroke width after completion:
- (void)handleDismissedPopoverController:(UIPopoverController*)popoverController {
  if ([popoverController.contentViewController isMemberOfClass:
    [FontListController class]]) {
    // this is the font list, grab the new selection
    FontListController *flc = (FontListController *)
      popoverController.contentViewController;
    self.font = [UIFont fontWithName:flc.selectedFontName size:self.font.pointSize];
  } else if ([popoverController.contentViewController isMemberOfClass:
    [FontSizeController class]]) {
    FontSizeController *fsc = (FontSizeController *)
      popoverController.contentViewController;
self.font = fsc.font;
  } else if ([popoverController.contentViewController isMemberOfClass:
      [StrokeWidthController class]]) {
      StrokeWidthController *swc = (StrokeWidthController *)
      popoverController.contentViewController;
      self.strokeWidth = swc.strokeWidth;
  }
  self.currentPopover = nil;
}
And finally, we implement the action that sets it in motion:
- (IBAction)popoverStrokeWidth:(id)sender {
  StrokeWidthController *swc = [[[StrokeWidthController alloc] initWithNibName:nil
      bundle:nil] autorelease];
  swc.strokeWidth = self.strokeWidth;
  [self setupNewPopoverControllerForViewController:swc];
  self.currentPopover.popoverContentSize = swc.view.frame.size;
  [self.currentPopover presentPopoverFromBarButtonItem:sender
      permittedArrowDirections:UIPopoverArrowDirectionAny animated:YES];
}
Build and run the app, and try out the new popover. Now you can finally see what that UIBezierPath we defined in the StrokeDemoView class looks like! Figure 2 shows the stroke width popover in action.
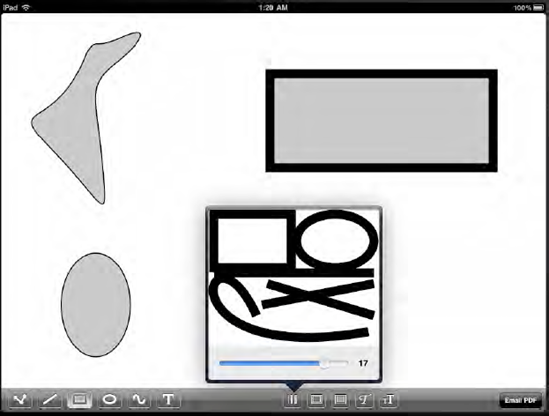
Drag the slider back and
forth, and the stroke width changes. As we discussed, there's no concept
of an active selection in Dudel, so changing this affects only the
stroke width of the next graphic you draw, leaving the existing graphics
unchanged.