If you like HTML tables, spreadsheet grids, and similar layout options, you will like Android's TableLayout,
which allows you to position your widgets in a grid to your
specifications. You control the number of rows and columns, which
columns might shrink or stretch to accommodate their contents, and so
on.
TableLayout works in conjunction with TableRow. TableLayout controls the overall behavior of the container, with the widgets themselves poured into one or more TableRow containers, one per row in the grid.
1. TableLayout Concepts and Properties
For your table layout to work
as you intend, you need to understand how widgets work with rows and
columns, and how to handle widgets that live outside of rows.
1.1. Putting Cells in Rows
Rows are declared by you, the developer, by putting widgets as children of a TableRow inside the overall TableLayout. You, therefore, control directly how many rows appear in the table.
The number of columns is
determined by Android; you control the number of columns in an indirect
fashion. First, there will be at least one column per widget in your
longest row. So if you have three rows—one with two widgets, one with
three widgets, and one with four widgets—there will be at least four
columns. However, you can have a widget take up more than one column by
including the android:layout_span property, indicating the number of columns the widget spans. This is akin to the colspan attribute one finds in table cells in HTML. In this XML layout fragment, the field spans three columns:
<TableRow>
  <TextView android:text="URL:" />
  <EditText
    android:id="@+id/entry"
    android:layout_span="3"/>
</TableRow>
Ordinarily, widgets are put
into the first available column. In the preceding fragment, the label
would go in the first column (column 0, as columns are counted starting from 0), and the field would go into a spanned set of three columns (columns 1 through 3). However, you can put a widget into a different column via the android:layout_column property, specifying the 0-based column the widget belongs to:
<TableRow>
  <Button
    android:id="@+id/cancel"
    android:layout_column="2"
    android:text="Cancel" />
  <Button android:id="@+id/ok" android:text="OK" />
</TableRow>
In the preceding XML layout fragment, the Cancel button goes in the third column (column 2). The OK button then goes into the next available column, which is the fourth column.
1.2. Non-Row Children of TableLayout
Normally, TableLayout contains only TableRow elements as immediate children. However, it is possible to put other widgets in between rows. For those widgets, TableLayout behaves a bit like LinearLayout with vertical orientation. The widgets automatically have their width set to fill_parent, so they will fill the same space that the longest row does.
One pattern for this is to use a plain View as a divider. For example, you could use <View android:layout_height = "2dip" android:background = "#0000FF" /> as a two-pixel-high blue bar across the width of the table.
1.3. Stretch, Shrink, and Collapse
By default, each column will
be sized according to the natural size of the widest widget in that
column (taking spanned columns into account). Sometimes, though, that
does not work out very well, and you need more control over column
behavior.
You can place an android:stretchColumns property on the TableLayout. The value should be a single column number (again, 0-based)
or a comma-delimited list of column numbers. Those columns will be
stretched to take up any available space on the row. This helps if your
content is narrower than the available space.
Conversely, you can place an android:shrinkColumns property on the TableLayout.
Again, this should be a single column number or a comma-delimited list
of column numbers. The columns listed in this property will try to
word-wrap their contents to reduce the effective width of the column—by
default, widgets are not word-wrapped. This helps if you have columns
with potentially wordy content that might cause some columns to be
pushed off the right side of the screen.
You can also leverage an android:collapseColumns property on the TableLayout,
again with a column number or comma-delimited list of column numbers.
These columns will start out collapsed, meaning they will be part of the
table information but will be invisible. Programmatically, you can
collapse and uncollapse columns by calling setColumnCollapsed() on the TableLayout.
You might use this to allow users to control which columns are of
importance to them and should be shown versus which ones are less
important and can be hidden.
You can also control stretching and shrinking at runtime via setColumnStretchable() and setColumnShrinkable().
2. TableLayout Example
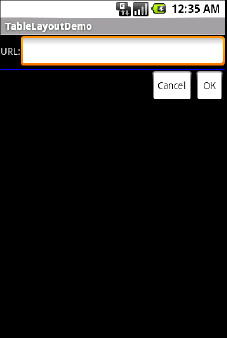
The XML layout fragments previously shown, when combined, give us a TableLayout rendition of the form we created for RelativeLayout, with the addition of a divider line between the label/field and the two buttons (found in the Containers/Table demo):
<?xml version="1.0" encoding="utf-8"?>
<TableLayout
  xmlns:android="http://schemas.android.com/apk/res/android"
  android:layout_width="fill_parent"
  android:layout_height="fill_parent"
  android:stretchColumns="1">
  <TableRow>
    <TextView
        android:text="URL:" />
    <EditText android:id="@+id/entry"
      android:layout_span="3"/>
  </TableRow>
  <View
    android:layout_height="2dip"
    android:background="#0000FF" />
  <TableRow>
<Button android:id="@+id/cancel"
      android:layout_column="2"
      android:text="Cancel" />
    <Button android:id="@+id/ok"
      android:text="OK" />
  </TableRow>
</TableLayout>
When compiled against the generated Java code and run on the emulator, we get the result shown in Figure 1.