2. Generating the Table of Attachments
The user interface for authors consists of the following:
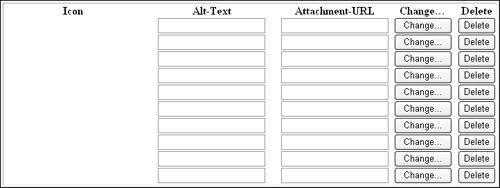
A table with multiple rows, one for each attachment.
Each row consists of a button labeled Change... that calls Web Author’s Insert Attachment dialog, a Delete button to remove the attachment from the list, and textboxes for displaying the attachment’s display text and URL.
It also shows an icon that represents the uploaded attachment.
Here’s the Multiple Attachment Placeholder control in authoring view:
Usually, when building custom placeholder controls, the logic for adding these controls is coded by overriding the CreateAuthoringChildControls()
method. We won’t do that here because we will be making heavy use of
JavaScript within our control. The easiest and most fuss-free way of
adding all that client-side script would be to code in the old fashion
way: as regular HTML.
Therefore, in the overridden CreateAuthoringChildControls() method, we will simply add a single Literal web control. Later on, we will attach HTML code to the Text property of this Literal control. Add the following code below the ResourceGalleryOnly property:
private System.Web.UI.WebControls.Literal baseAuthoringContainer;

protected override void CreateAuthoringChildControls
                     (BaseModeContainer authoringContainer)
{
  baseAuthoringContainer = new Literal();
  authoringContainer.Controls.Add(baseAuthoringContainer);
}
Now, let’s create the table. Because the table is
dynamically generated, with placeholder content mixed with HTML, we’ll
code it in the overridden LoadPlaceholderContentForAuthoring() method.
The table consists of five columns:
| Column 1 | Column 2 | Column 3 | Column 4 | Column 5 |
|---|
| Displays
the attachment as an icon. The icon shown is related to the type of the
file. For example, Office Word documents will have icons that look as
shown below. | Contains
a TextBox control that shows the display text of the attachment.
It also holds a hidden form field for storing the URL of the
icon displayed in Column 1. It’s hidden, so you can’t see it in
presentation view, but its value will be used by the client-side script
that we will be coding later on. | Contains a readonly TextBox that shows the URL of the attachment. | Provides a button labeled Change...that triggers the upload process. | Contains a Delete button to remove the attachment from the list. |

| 
| 
| 
| 
|
As we are writing the code from a class file, we
can’t insert HTML directly as we would with regular HTML or ASPX files.
Instead, we will write the code as a string variable and add it to the Text
property of the Literal control we created earlier. We shall start with
the table’s header. Append the following code to the class file:
private string crlf = "\n";

protected override void
LoadPlaceholderContentForAuthoring(PlaceholderControlEventArgs e)
{
  StringBuilder htmlCode = new StringBuilder();

  // table surrounding the authoring time placeholder control child controls
  htmlCode.Append("<table border=1><tr><td>" + crlf);
  htmlCode.Append("<table cellspacing=0 cellpadding=0>" + crlf);
  htmlCode.Append("<tr>" + crlf);
  htmlCode.Append("<th width=200>Icon</th>" + crlf);
  htmlCode.Append("<th width=200>Alt-Text</th>" + crlf);
  htmlCode.Append("<th>Attachment-URL</th>" + crlf);
  htmlCode.Append("<th>Change...</th>" + crlf);
  htmlCode.Append("<th>Delete</th>" + crlf);
  htmlCode.Append("</tr>"  + crlf);

  baseAuthoringContainer.Text = htmlCode.ToString();
}
Next, we will generate the rows that make up the
table. As a row is required for each attachment, we will construct as
many rows as specified by the MaxAttachments property.
In the first column where the attachment’s icon
is displayed, we create an empty table cell. The cell’s name is made
unique by prepending MAPH_AttIcon and a number to the name of
the placeholder to bind. The name of the cell will be used by the
client-side script later to identify the cell for the addition of the
attachment’s icon. Add the highlighted code to the LoadPlaceholderContentForAuthoring() method.
protected override void
LoadPlaceholderContentForAuthoring(PlaceholderControlEventArgs e)
{
  . . . code continues . . .
  string sPhName = this.PlaceholderToBind;
						for (int i = 0; i < m_maxAttachments; i++)
						{
						htmlCode.Append("<tr>");
						// Add the cell for the attachment's icon
						htmlCode.Append("<td align=center id=\"MAPH_AttIcon_" + sPhName
						+ "_" + i.ToString() + "\"></td>" + crlf);
						}
  baseAuthoringContainer.Text = htmlCode.ToString();
}
The second cell holds two controls: a hidden
control and a Text Box. The TextBox stores the attachment’s display text
and has a name that begins with MAPH_AttName_. It is editable,
so authors can update the display text here. The hidden form field
stores the icon and has a name prepended with MAPH_AttIconUrl_. Add the code that generates both controls to the LoadPlaceholderContentForAuthoring() method:
protected override void LoadPlaceholderContentForAuthoring
                             (PlaceholderControlEventArgs e)
{
  . . . code continues . . .
  for (int i = 0; i < m_maxAttachments; i++)
  {
    . . . code continues . . .
    // Add the cell for the attachment's display text
						htmlCode.Append("<td align=center>");
						// Add a hidden form field to store the icon
						htmlCode.Append("<input type=\"hidden\" name=\"MAPH_AttIconUrl_" + sPhName
						+ "_" + i.ToString() + "\">");
						// Add the Text box to display the attachment's display text
						htmlCode.Append("<input type=\"text\" name=\"MAPH_AttName_" + sPhName
						+ "_" + i.ToString() + "\">");
						// End the cell
						htmlCode.Append("</td>" + crlf);
  }
  . . . code continues . . .
}
In the third cell, we generate a single read-only
textbox that displays the attachment’s URL. We give it a unique name by
appending the placeholder’s name and a number to the string MAPH_AttLink_. Later on, we will display the URL here using client-side script.
protected override void LoadPlaceholderContentForAuthoring
                             (PlaceholderControlEventArgs e)
{
  . . . code continues . . .

  for (int i = 0; i < m_maxAttachments; i++)
  {
    . . . code continues . . .

    // Add the cell for that attachment's URL
						htmlCode.Append("<td align=center>");
						// Add the read-only Text box to display the attachment's URL
						htmlCode.Append("<input readonly type=\"text\" name=\"MAPH_AttLink_"
						+ sPhName + "_" + i.ToString() + "\">");
						// End the cell
						htmlCode.Append("</td>" + crlf);
  }

  . . . code continues . . .
}
Next, we add the cell with the Change... button as a fourth column. The button opens the Insert Attachment dialog.
protected override void LoadPlaceholderContentForAuthoring
                             (PlaceholderControlEventArgs e)
{
  . . . code continues . . .

  for (int i = 0; i < m_maxAttachments; i++)
  {
    . . . code continues . . .

    // Add the cell that contains the button
						htmlCode.Append("<td width=100 align=center>");
						// Add the Change... button to trigger the upload process
						htmlCode.Append("<INPUT type=BUTTON value=\"Change...\" onclick=\""
						+ GetAttachmentDialog(i) + "\">");
						// End the cell
						htmlCode.Append("</td>" + crlf);
  }
  . . . code continues . . .
}
Finally, we finish off the table by adding the cell that holds the Delete button.
protected override void LoadPlaceholderContentForAuthoring
                             (PlaceholderControlEventArgs e)
{
  . . . code continues . . .

  for (int i = 0; i < m_maxAttachments; i++)
  {
    . . . code continues . . .
    // Add the cell for the Delete button
						htmlCode.Append("<td align=center>");
						// Add the Delete button
						htmlCode.Append("<input type=\"button\" value=\"Delete\" "
						+ "onclick=\"DeleteAttachment("+i+")\">");
						// End both the cell and the row
						htmlCode.Append("</td></tr>" + crlf);
						}
						// End the first table
						htmlCode.Append("</table>" + crlf);
						// End the second table
						htmlCode.Append("</table>" + crlf);

  baseAuthoringContainer.Text = htmlCode.ToString();
}