Using off-camera flash for macro
1.
Setting up
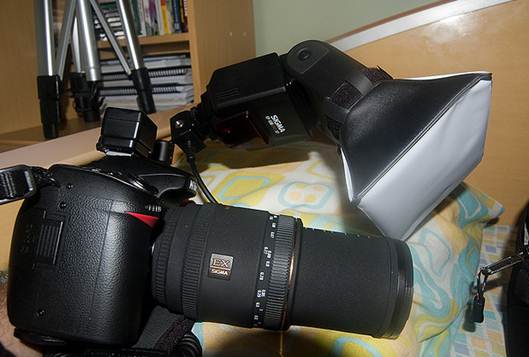
Mount your camera on a tripod and set your
flashes in place, either by mounting them on the lens or positioning them
off-camera. Using two flashes is ideal for an even spread of light.
2.
Manual exposure
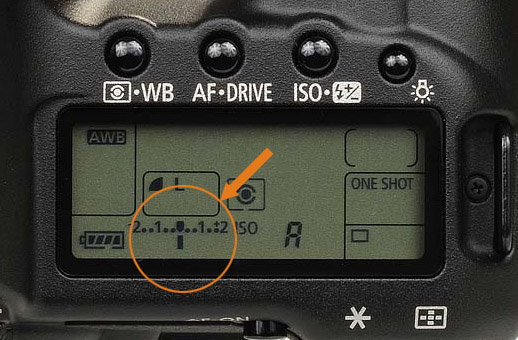
Set your camera to manual exposure and
choose an aperture no wider than f11. Use a fast shutter speed and fire off
some test shots to check how the light is falling.
3.
Be precise
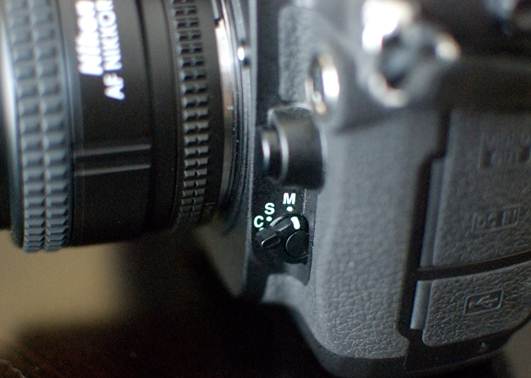
Focusing often presents a challenge at such
high magnifications. Your camera’s autofocus may struggle, so focus manually
instead. Precise focus is absolutely vital with macro.
4.
Check the shot
Inspect your shots by using the
magnification button to zoom in to check that you have a correctly exposed,
pin-sharp image. If not, check your focus and try a faster shutter speed.
Add a background
5.
Get gardening
Tuck or clip any unruly stems or leaves out
of view. Unless you are in your own garden, do not pick any leaves or flowers –
hide them out of view without destroy them.
6.
Insert a backdrop
Now select a piece of card and place it
around 10cm behind your subject. You could also use fabric or a piece of board
- just ensure it has a matte finish to avoid any nasty reflections.
7.
Add depth
Now set your aperture to around f11 to
ensure your subject remains in focus and the background melts away into a blur,
tinted by the colour of your piece of card.
10 expert shooting tricks
Macro-pro Dale Morris shares his
secrets for bagging top shots.
1.
Shoot at the right time
Insect and plant photography can be
particularly rewarding in the early morning. The air is usually calm and cool,
which means that plants are not swaying around and insects tend to be slugging
(they only get going when things warm up).
Dewdrops are also prevalent in the morning.
Harsh sunlight can ruin a photo so bring along a piece of card to create nice,
eve shade over your subject.
2.
Use a polariser
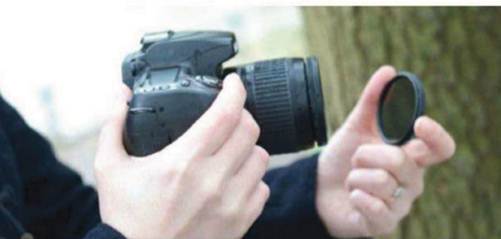
Use
a polariser
A polariser helps reduce glare from flower
petals and also help boost colours in your shot. Just remember – it reduces
available light, so you’ll need a longer shutter speed and a tripod.
3.
Lens hood
Remove the lens hood when photographing
flying insects such as wasps and bees. It reduces the chance of your subject feeling
threatened and either attacking or flying away.
4.
Your outdoor studio
Achieve a white background by creating mini
studio on location. Light some white Perspex or transparent material from
behind your subject. Then light your subject from the front with a reflector or
flash for a perfect macro shot.
5.
Depth of field
Use aperture priority and depth of field
preview button to check your focus. It’s tricky to see depth-of-field preview
when stopped down as the image in the viewfinder is very dark. Use a mini LED
flashlight to see what’s going on.
6.
Use fill-in flash
To retain some background, set your flash
to the slow or rear-curtain sync mode. It allows the camera to expose for the
correct ambient light while illuminating the foreground with a small burst of
light emitted just before the shutter curtain closes (i.e.at the end of the
exposure). This will give your photos a more natural look.
7.
Make a macro lens
Join two lenses together, front-element to
front-element with a simple macro-coupler adapter ring. The reversed lens
should be a smaller focal length than the one attached to the camera. Turn off
autofocus to reduce strain on the lenses’ mechanisms.
8.
Vary your lenses
Don’t limit yourself to just using macro
lenses. Wide-angle lenses such as a 15mm or 24mm will still offer a minimum
focusing distance of under 20cm, while giving you the opportunity to shoot your
subject in more of their natural environment.
9.
Use a cable release
Minimise camera shake by using a cable
release. Pressing the shutter can have ‘earthquake’-including effects on your
shot so remove yourself from the camera. You can also use the camera’s
self-timer as an alternative.
10.
Back away from your subject
Remove yourself from your subject’s ‘zone
of awareness’ by using a longer-focal-length lens. Combine with a teleconverter
a larger working distance and higher magnification.