Accessing a Server Using the Remote Desktop Client
A Windows Server 2003 or Windows Server 2008 system with Terminal Services installed can be accessed from a variety of clients.
Accessing Terminal Services Using the Windows Remote Desktop Protocol (RDP) Client
All Windows Server 2003
server, Windows Server 2008 server, Vista, and Windows XP Professional
versions include a terminal server client called Remote Desktop
Connection. This
full-featured client enables end users to tune their connections to run
in Full-screen mode, utilizing advanced features, such as server audio
redirection, true-color video, and local disk, COM port, and printer
redirection. Remote Desktop Connection can also be optimized to run over
a slow connection.
Down-level client workstations can get the RDP client as a free download from the Microsoft website.
Accessing Terminal Services Using the Web Client
Terminal Services
provides a web-based client that can easily be distributed through a web
browser. Connecting to a terminal server using this client requires a
web port connection to the terminal server logon web page and also
access to TCP port 3389 on the terminal server. The web-based client
still uses the RDP native to Windows Server 2008 Terminal Services.
Contrary to many
terminal server administrators’ beliefs, the web server system hosting
the web client pages does not need to be running on the terminal server.
If there is no particular reason to run a web server on the terminal
server, for security and performance reasons, place the terminal server
web client on a separate web server.
To install the web server client on a web server system, do the following:
1. | Launch Server Manager. Right-click on Roles and select Add Roles.
|
2. | Click Next.
|
3. | Select the Terminal Services role and click Next.
|
4. | Click Next.
|
5. | Select
TS Web Access role service and click Next. The wizard might prompt to
add the Web Services role if it is not already installed.
|
6. | Click Install to complete the installation of TS Web Access.
|
7. | Click Close to finish. A reboot might be required.
|
To access this page, open a web browser and type https://<servername>/ts. This can be accessed through a firewall as well.
Using the Remote Desktops MMC (Tsmmc.msc)
Remote Desktop is a
utility that provides a way to manage several Terminal Services sessions
from within one window. This utility still uses RDP to connect to
servers and workstations, but it allows an administrator to switch
between terminal sessions by clicking a button instead of having to
switch windows. Also, because the console settings can be saved, a new
terminal session can also be established with the click of a button.
Remotely Connecting to a Terminal Server Console
Administrators can
connect to terminal server consoles remotely by using the Remote Desktop
Connection client or the Remote Desktops MMC snap-in. With remote
console access, administrators can use Terminal Services to log on to
the server remotely as though they were logged on at the console.
Using
the Remote Desktops MMC snap-in, administrators can configure remote
desktop sessions that always connect to the terminal server console
session. This enables administrators to successfully install and update
the operating system and applications remotely.
Caution
You need to know
whether to leave the console session logged on and/or locked. If a user
logs off the session, the console will also be logged off. So, you need
to be informed and be safe.
To connect to a terminal server console using Remote Desktop Connection, run mstsc.exe from the command prompt with the /admin switch to gain console access.
Securing Remote Desktop for Administration
The security of
the Remote Desktop for Administration can be adjusted in a variety of
ways to enhance the security of the sessions. All of these settings are
configured in the Terminal Services Configuration MMC snap-in, which is,
by default, installed in the Administrative Tools, Terminal Services
folder. The security settings are properties of the RDP-Tcp connection
under the Connections folder in the tool.
These settings ensure that the Remote Desktop for Administration is secure.
Encryption Layer
The Encryption Level
setting can be used to change the encryption from the RDP Security Layer
to SSL. This supports the use of certificates. This is a little-used
feature of Remote Desktop for Administration but can be used to enhance
or standardize security.
Terminal
Services in Windows Server 2008 supports three different security
levels. The main difference is in the support for Network Level
Authentication, which uses certificates to authenticate the server
identity to the client. This prevents man-in-the-middle attacks. The
three security levels follow:
RDP Security— This is the native RDP encryption and does not support Network Level Authentication.
SSL (TLS 1.0)—
Network Level Authentication is performed to verify the identity of the
server to the client. Certificates are used to secure the transmission
and to perform Network Level Authentication.
Negotiate—
The most secure level that the client supports will be used. If the
client supports SSL (TLS 1.0), that will be used. If not, RDP security
will be used. This is the default setting.
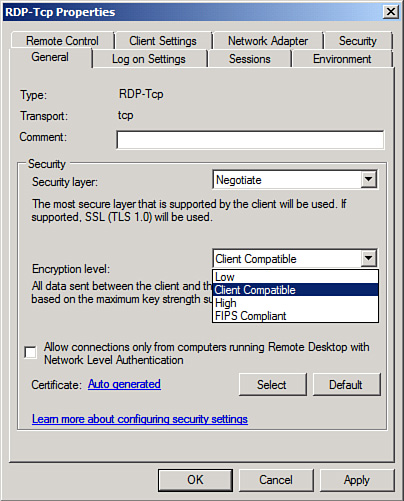
Encryption Level
In
addition to the security levels, Windows Server 2008 terminal services
can be run in four different encryption levels to provide the
transmission protection appropriate for the organization. The four
levels of encryption follow:
Low—
Encryption is performed at the highest level supported by the client,
but only on the data sent from the client to the server. Data sent from
the server to the client is not encrypted. This is insecure and not
recommended.
Client Compatible— Encryption is performed at the highest level supported by the client, but all data between the client and server is encrypted.
High—
128-bit encryption is performed on all data between the client and the
server. If the client cannot support 128-bit encryption, the connection
is refused by the server.
FIPS Compliant—
Federal Information Process Standard (FIPS) 140-1 validated encryption
is performed on all data between the client and the server. If the
clients cannot support FIPS encryption, the connection is refused by the
server.
The various options are shown in Figure 2.
An administrator can
use Group Policy to limit client functionality as needed to enhance
server security and, if increased network security is a requirement, can
consider requiring clients to run sessions in 128-bit high-encryption
mode.
The
sessions can be made more secure by changing the setting to High, which
ensures that the clients will always connect at 128-bit. Older clients
that don’t support 128-bit or clients that are hard-coded for 56-bit
will fail.
Remote Control
The Terminal
Services connection allows the sessions to be remotely controlled,
meaning that a third party can view and possibly interact with the
Terminal Services session. Although this can be useful for training and
support by facilitating support, it can also present a security risk.
The ability to use
remote control can be disabled by selecting the Do Not Allow Remote
Control check box on the Remote Control tab.
Disable Mappings
Another feature
of the Terminal Services connection is to map local drives, printers,
LPT ports, COM ports, the Clipboard, and the audio. These allow for a
much richer experience by allowing the administrator to copy files from
local drives, print to the local printer, and cut/paste from the
Terminal Services session to the local system.
However, these
features could also be security risks as they allow direct interaction
between the client and the Terminal Services session. These mapping
features can be disabled as needed on the Client Settings tab in the
Connection Properties dialog box. By default, all are allowed except the
Audio mapping.
Always Prompt for Password
The Terminal Services
Client can be configured to save the logon password and allow for
automatic logon to the Exchange server. This is very convenient for the
Exchange Server administrator, who can just launch the Terminal Services
client and get access to the Exchange server without being prompted to
enter credentials.
However, this is
a very bad security practice because any user can click on the icon and
then have full access to the Exchange server. Unfortunately, the
password is saved at the client level and not on the server side.
Fortunately, the
Terminal Services connection can be configured to always prompt for a
password regardless of whether one is supplied automatically. The Always
Prompt for Password feature can be enabled on the Logon Settings tab of
the Connection Properties dialog box.
Session Disconnect
If an Exchange
Server administrator’s Terminal Services session breaks, the session is
normally left in a disconnected state. This allows the Exchange Server
administrator to reconnect to the session and pick up where he left off.
The Exchange Server administrator can also choose to disconnect rather
than log off a session. This is frequently done when a long-running
process is started on the Exchange server, such as a migration of a
large mailbox.
Although the disconnected
session is convenient, it might also be considered a security risk to
have active sessions left unattended so to speak. If this is a security
concern, the connection can be configured on the Sessions tab to end a disconnected session after a period of time, as shown in Figure 3.
The session is ended after being in a disconnected state for five
minutes, which gives the Exchange Server administrator ample time to
reconnect following connection problems.
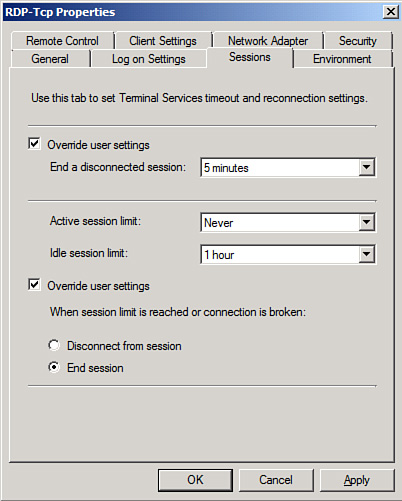
Other session
limits can be configured on this tab as well, such as ending or
disconnecting a session that has been active too long (not recommended)
or that has been idle too long.
Permissions
By default, only
members of the local Administrators group or the local Remote Desktop
Users group are able to access the server via the Remote Desktop for
Administration. These permissions can be customized to explicitly grant
access or explicitly deny access. The permissions for the connection can
be accessed in the RDP-Tcp connection properties on the Security tab.
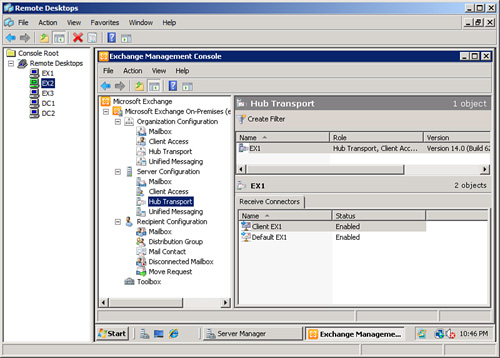
Using the Remote Desktop Tool for Remote Exchange Management
The Remote Desktop tool
comes standard with all Windows 2003 and Windows Server 2008
implementations and facilitates managing multiple Exchange servers. As
shown in Figure 4,
multiple console screens can be defined for each server in the tool, as
well as multiple connections can be established simultaneously to
various servers in the environment. The left pane shows a list of
servers that can be connected to and switched between. The credentials
for each session can optionally be saved to have the sessions
automatically connect.
The multiple
connections can be toggled between quickly simply by clicking on their
icon or even arranged in multiple panes on a single screen. A large
display is very effective for this.
Another interesting
Remote Desktop tool feature is that the tool has an option to connect to
the console session rather than establish a new session. This allows
the Exchange Server administrator to connect directly to the console
session and interact with any applications that were started at the
server keyboard.
The Remote Desktop configuration can be saved in Microsoft Management Console files (*.msc)
to be quickly launched. This allows the Exchange Server administrator
to create different custom consoles with the appropriate Terminal
Services sessions for the task at hand, such as when doing mailbox
maintenance or troubleshooting front-end problems.