As
previously mentioned, new versions of Outlook continue to provide new
features and functionality, in addition to enhancing existing features.
In this section, administrators can find information covering some of
the new features that organizations might find beneficial, along with
new tools for the end user.
Understanding the Outlook 2007 Interface
There
is a lot of information kept in Exchange Server mailboxes these days,
and the Outlook interface has changed to improve the organization and
presentation of this data. Additionally, the price of large screen
monitors has come down significantly, and they are in ever-widening use,
giving many users more “real estate” to work with.
In Outlook 2007,
Microsoft divided the Outlook view into four main sections: the
navigation pane, the message index pane, the reading pane (also
sometimes called the preview pane), and the To-Do bar, as shown in Figure 1.
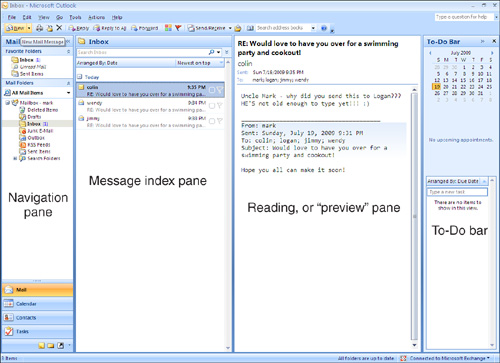
The Navigation Pane
The navigation
pane is primarily used to view, open, and manage individual folders that
make up the user’s mailbox. It enables the user to add or remove
favorites, which are shortcuts to commonly accessed folders. There is
also a shortcuts section, which allows single-click access to the
various areas of the Outlook client. The navigation pane can be
minimized or turned off completely. Under the View menu, click
Navigation Pane, and select either Normal, Minimized, or Off.
Alternatively, the user can toggle through these choices by pressing the
Alt+F1 keys.
The Message Index Pane
To
the right of the navigation pane is the message index pane. This
display box shows a summary for each message contained in the folder
that is currently viewed (the folder currently selected in the
navigation pane). This summary typically includes the Sender’s address,
the date and time the message was received, and a portion of the
information contained in the Subject.
When a user clicks a
message in the index pane one time, they select the message, and a
preview of the message displays in the reading pane. When the user
double-clicks a message instead, Outlook 2007 opens that message in a
separate window.
The message index pane
can be resized by hovering the mouse on the border of the pane until
the pointer turns into a double-headed arrow. Click the left mouse
button and hold it while dragging the border to the desired location.
The Reading Pane
The reading pane
enables the user to preview the contents of a message without opening
the message completely. In addition to the convenience of this method,
there is a security related benefit as well—potentially malicious
scripts or attachments are not activated or opened automatically in the
reading pane.
Users can also
view attachments in the reading pane. After the user clicks the
attachment in the reading pane, they are warned, You Should Only Preview
Files from a Trustworthy Source. The user can then click Preview File
and view the contents of the attachment.
Note
For users to preview an attachment, they must have an application installed on their workstation that is capable of opening the attachment. For example, to preview an Excel spreadsheet, users must have Excel installed.
In addition
to viewing attachments, the reading pane also enables users to follow
embedded hyperlinks, use voting buttons, view follow-up information, and
respond to meeting requests.
The reading pane can be
enabled or disabled by clicking Reading Pane in the View menu. When
enabled, the reading pane can be located to the right of the message
index pane or underneath it. As with the preceding index pane, the
reading pane can be resized by dragging and dropping the borders to the
desired location.
The To-Do Bar
On
the right edge of the main Outlook page is the To-Do bar. By default,
the To-Do bar displays a Date Navigator, which is a calendar of the
current month. Dates shown in bold
are dates where the user has at least one meeting scheduled. By
clicking any date on the date navigator, the users are taken immediately
to the selected date in their own Calendar inside of Outlook. Next, the
pane shows the user’s next three appointments and a list of outstanding
tasks.
Any of these three
features can be disabled, and the To-Do bar minimized or turned off
completely, by going to the View menu and clicking To-Do Bar.
Alternatively, the user can minimize the To-Do bar, turn it off
completely, or restore it, by pressing the Alt+F2 keys.
Similarities with Outlook Web App
The Outlook 2007
graphical user interface (GUI) is similar to the GUI for Outlook Web
Access users on an Exchange Server 2007 environment. It is similar to
OWA 2010 as well, in the general layout, but Outlook 2007 cannot take
advantage of some of the new features that Exchange Server 2010
provides, such as viewing the Presence status of fellow employees and
the MailTips feature.
Methods for Highlighting Outlook Items
Each new version of
Outlook has improved the methods for organizing and finding messages. As
email becomes a more and more common way of sharing information, the
volume of mail received by end users will continue to increase. With
Outlook 2007, users are given enhanced methods for organizing,
categorizing, and flagging messages when working with Outlook and
Exchange Server.
Using Quick Flags to Tag Messages
Using quick flags has
changed in Outlook 2007. End users used to assign a colored flag to a
message to help them organize messages. In previous versions of Outlook,
these flags had no predetermined meanings. This meant the user was free
to use them in whatever manner they wanted. In Outlook 2007, the flags
now have some predefined meanings for follow-up tasks. Flags can be set
for when a message must be dealt with and setting these flags results in
a new entry in the Tasks area of the To-Do Bar.
To set quick flags in the Outlook 2007 client, complete the following:
1. | Right-click on the gray flag icon on the far-right side of the email message in the Inbox to access the flag options.
|
2. | Choose the flag you need to use.
|
Flags can also be used
to configure a reminder. The option for using reminders with flags
allows users to configure information and a due date associated with
each flag. To configure a reminder, complete these steps:
1. | Flag the message.
|
2. | Right-click on the flag and choose Add Reminder.
|
3. | Choose the reason to flag the message and then choose a due date.
|
4. | Choose the date and time for the reminder, and click OK when you are finished.
|
If you have the To-Do bar enabled, you will now see your flagged message in the task area, similar to that shown in Figure 2, showing the flag, the category, and a bell to represent that there is a reminder set.

In addition to
flags, Outlook 2007 supports color-coded Categories that can be assigned
to items. Categories have no predefined meaning, so users can implement
them however they want. For example, a user might decide that the
Yellow category references projects that are in danger, and Red refers
to projects that are over budget. By simply right-clicking the rounded
square to the left of the flag, the user can tag the message with the
desired color. Additionally, multiple categories can be assigned to
messages, as shown in our example.
To help users remember
what their color categories mean, they can be renamed. To do so,
right-click on a category and select All Categories. Select the category
to be changed and click Rename; then click the OK button. As can be
seen in Figure 27.2, these category names display in the preview pane when looking at a message.
Note
A flag with an
associated reminder provides the end user a standard Outlook reminder
pop-up balloon when the preconfigured reminder comes due.
Like
any column in Outlook, the flag and category columns can be used as a
sorting point for arranging messages. To do so, simply click the desired
column header in the index pane.
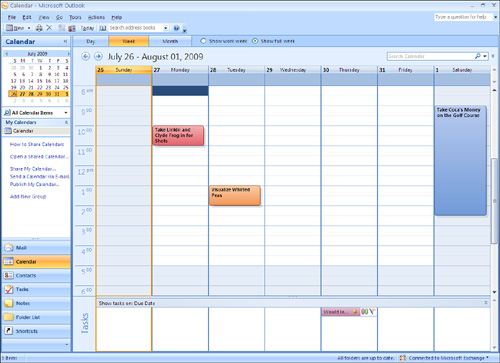
Making Key Appointments Stand Out with Color
Using the
Outlook 2007 calendar, this feature allows for the customization and
organization of appointments using colors, allowing end-user
appointments to stand out when viewing the calendar.
To choose a color and label an appointment, follow these steps:
1. | Open
the appointment in the calendar and select the multicolored button
labeled Categorize. Alternatively, right-click the message in the
calendar view and select Categorize.
|
2. | Choose the category you want to apply.
|
3. | Close the calendar item.
|
The calendar item will now appear with the color you selected, similar to what is shown in Figure 3.
Creating Meetings Based on Time Zone
In older versions of
Outlook, users who travel often found it difficult to schedule meetings
when their destination was in another time zone. Outlook (and most
computers, email servers, and email clients) uses Coordinated Universal
Time (UTC) for appointments and adjusts the time of the meeting based on
the current time zone for the computer.
Users
found that they would create a meeting while sitting in one time zone,
for a date in the future when they would be in another time zone. At
what time should they set the meeting? And if they changed their time
zone on their computer when they arrive, will it adjust the meeting
time?
Outlook 2007 helps with this
problem with the addition of a Time Zone option from within meeting
requests. To utilize this feature, open a new meeting request and
complete the following:
1. | Toward the right side of the main set of buttons, find the Globe icon labeled Time Zones.
|
2. | Click the Time Zones icon and a new drop-down is created next to the start and end times.
|
3. | Via the drop-down, select the time zone where the meeting is going to occur.
|
4. | Select the start and stop times as usual.
|
5. | Invite your attendees and click Send when you are finished.
|
By selecting the time
zone that the meeting will be held in when creating the meeting request,
users find it much easier to set the appointments for the proper time.
Using the New Search Functionality
Outlook 2007 makes it
easier than ever to search through large mailboxes and calendars. Users
can save searches that are commonly used and can leverage the flag and
category functions mentioned earlier to provide very powerful ways of
managing messages, appointments, or tasks.
Using the Query Builder
The query
builder is easily accessible from the top of the toolbar above the
message pane. To perform a search, do the following:
1. | Enter the word(s) to search for in the Search Inbox box and matches will immediately highlight.
|
2. | Click the double-down arrow next to Search Inbox to expand the query builder.
|
3. | Click Add Criteria to add additional fields to search against.
|
Typing in the search area updates the results in near real time.
Saving Commonly Used Searches
To save a search, the
search must be started from within the Folder list under Search Folders.
To do so, complete the following steps:
1. | Right-click on Search Folders and choose New Search Folder.
|
2. | Within
the New Search Folder pop-up window, choose the search folder and
criteria for your search. Depending on what selection is made, the user
might be presented with more options to complete before commencing the
search. Choose also what part of Outlook to search.
|
3. | Click OK when you are finished.
|
4. | The
search completes and the results are displayed in the center pane. In
addition, the search is saved under the Search Folders area in the
Folder list.
|
5. | To delete the saved search, click on it and choose Delete.
|
Tip
Saved searches
are also available when using Outlook Web App (OWA). For saved searches
to be accessed via Outlook Web App, a user must create the saved search
in Outlook 2007 first.
Managing Multiple Email Accounts from One Place
Outlook 2007 allows the
end user to access multiple email accounts from the same Outlook client,
including IMAP, POP3, and Hypertext Transfer Protocol (HTTP) mail
accounts.
To configure Outlook to access multiple mailboxes, do the following:
1. | From Outlook 2007, select Tools; then select Account Settings.
|
2. | From the E-mail tab, click New.
|
3. | Select the Microsoft Exchange, POP3, IMAP, or HTTP radio button and click Next.
|
4. | Enter the appropriate information for the email account so that it can be properly connected.
If your server does not support autodiscovery (that is, Exchange
2000 Server or Exchange Server 2003), you need to check the box for
Manually Configure Server Settings.
|
5. | Click Next.
|
6. | Click Finish, completing the account setup.
|
Taking Advantage of the Trust Center
Outlook 2007 adds a
new function called the Trust Center. The Trust Center is a centralized
location for the management of security-related functions in Outlook
2007. This includes the following:
Trusted Publishers
Add-ins
Privacy Options
Email Security
Attachment Handling
Automatic Download
Macro Security
Programmatic Access
By placing these functions under a single interface, it is much easier to manage the security functions in Outlook 2007.
Introducing RSS Feeds
New to Outlook 2007
is the ability to subscribe to RSS feeds. RSS stands for Really Simple
Syndication. Many blogs and news sites are offering RSS feeds as a way
to disseminate information. RSS feeds are a concept similar to the old
Network News Transfer Protocol (NNTP).
To subscribe to an RSS feed, simply do the following:
1. | In Outlook 2007, select Tools; then Account Settings.
|
2. | From the Account Settings window, click the RSS Feeds tab.
|
3. | Click New.
|
4. | Enter the uniform resource locator (URL) to the RSS feed you want to add, and click Add.
|
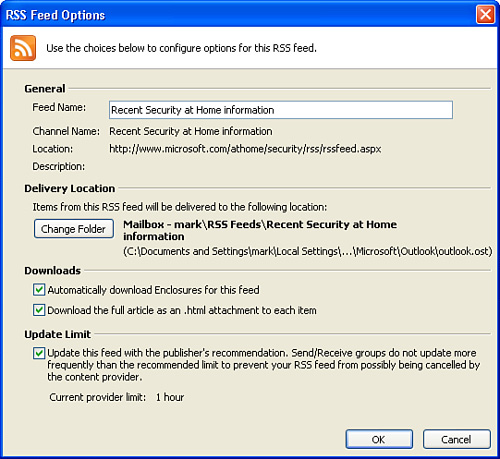
5. | If
the URL is valid, you will see the RSS Feed Options page. Choose the
settings you want for this feed, similar to those shown in Figure 4, and click OK.
|
6. | Click Close and then click OK.
|