Working with virtual disks
By default, the New Virtual Machine wizard
creates each new VM with a dynamically expanding disk in the VHDX format. This
is a good general purpose setup, but depending on how you plan to use your VM,
it may not be the best choice.
For a start, VHDX is a new format,
introduced with Windows 8 and its Server 2012 counterpart. If you want your
virtual disk to work with older hosts and disk image management tools, you’ll
need to choose the established VHD format instead. This provides a slightly
lower level of fault tolerance, and supports disk images only up to 2TB in
size, but it should be ample for all but the most ambitious projects.
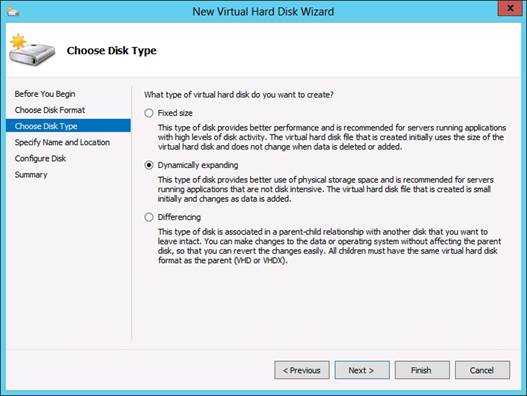
Consider disk type, too. A dynamically
expanding disk appears to the guest operating system as a fresh, independent
hard disk of a user specified size (the default is 127GB), but in reality it’s
simply a data file on your real hard disk. When created this data file takes up
a mere 4MB on your physical disk, and grows as needed up to your specified size
to accommodate the files that are written to it.
Windows
2012 Hyper-V VHD to VHDX Disk Conversion
Dynamically expanding storage saves space
(see Compacting and converting VHDs, below), but the trade-off is performance.
It takes time to dynamically allocate file space, and over time the disk file
is likely to end up becoming fragmented, further slowing things down. If you
can spare the space, you’ll likely see consistently smoother performance from a
fixed size disk, where the entire space of the disk is allocated when it’s
created.
If you want to get the very best
performance in your VM, a third option is to give it a dedicated physical hard
disk. This must be a non-removable drive, set offline in the host OS: it will
remain in this state while it’s being used by Hyper-V, ensuring the guest OS
remains fully isolated from your real system.
In certain cases you may not want to use a
dedicated disk or image at all, but to create what’s called a differencing
disk. Here, an existing disk image is chosen as the base image: to the guest
operating system it looks like a normal disk, but in reality any writes you
make are stored in a separate file, leaving the original image file unchanged.
If you want to base several VMs on the same operating system image, this can be
a space-efficient way to do it.
If you want to use one of these disk types
with your new VM, skip the default disk creation section of the New Virtual
Machine wizard by selecting “Attach a virtual hard disk later”. Then, to create
your new virtual disk, select New | Hard Disk in the Actions pane of the main
Hyper-V Manager and follow the wizard. Under “Configure Disk” you’ll notice the
additional option of copying the contents of a physical drive into your new
disk: this provides an easy way to virtualise a running system, perhaps so you
can try out software without affecting your real operating system.
Once your virtual disk file has been
created, you can store it anywhere you want even on a network share or USB
stick. All you need to do now is attach it to your VM.
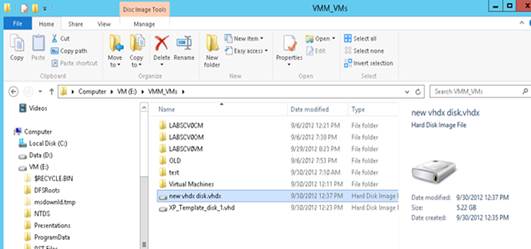
After
a couple of minutes, you have a .vhdx formatted drive from your original .vhd
drive.
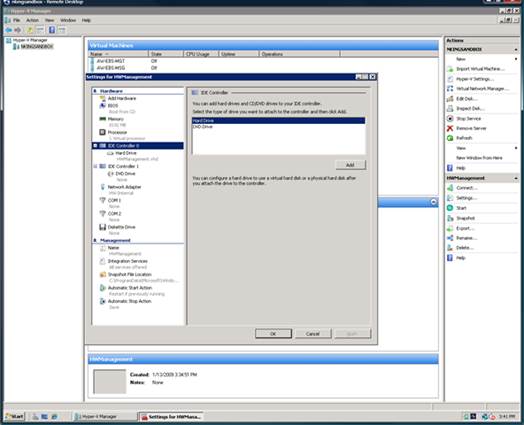
Configuring virtual hardware
When you right click on a VM in the Virtual
Machines pane and select Settings, you’ll see a selection of hardware and
management options. Some of these relate to advanced features that you won’t
normally need to worry about, but feel free to browse: the interface provides
plenty of helpful contextual information explaining what the various settings
do.
It’s here that you attach virtual disks to
VMs. To do this, click on one of the virtual IDE or SCSI controllers in the
left-hand list, ensure Hard Drive is selected from the list of disk types, then
click Add and select the disk file you want to use.
You can also connect a VM to a virtual
switch from this interface: simply click on Network Adapter and select your
switch from the dropdown.
While you’re here, it may be worth looking
at the BIOS options, which allow you to set boot priorities if you have more
than one virtual disk attached. Memory options let you assign RAM to your VM
and prioritise how memory should be dynamically allocated if it becomes low.
Processor options let you control how many cores and how much processor power
your VM can use useful if you want to ensure your host OS remains responsive.
You’ll also find a compatibility setting here, which restricts the processor to
using features that work across a wide range of physical hardware, so the VM
can be hosted by multiple different computers.
Installing the OS
Virtual hard disks are created blank, so
unless you’ve copied the content of an existing physical drive, the first thing
you’ll need to do is install an operating system on your virtual machine. If
you allowed the New Virtual Machine wizard to create a virtual hard disk,
you’ll have had the option of mounting a physical bootable DVD, or an ISO file,
from which to install your operating system.
You can also configure this from your VM’s
Settings window: select an IDE controller, then choose DVD drive as your disk
type. Click Add, then choose either a physical drive installed in your host OS
or an ISO image file to mount as a DVD drive in your VM. Job done.
Installing
the OS
Remember: you need a licence to install an
operating system in a VM, just as you do for physical hardware. Legally, a
retail copy of Windows 7 or 8 can be used on only one machine at once be it
physical or virtual so you’ll need a product key that isn’t being used anywhere
else to legitimise your virtual installation. If your OS is an OEM edition then
you have even less flexibility: these licences are valid only for the first
system upon which the OS is installed, so if your OEM copy of Windows has ever
been used on a physical PC, you’re not permitted to install it in a VM at all.
Unless you have some spare Windows licences
to hand, therefore, you might prefer to use one of Microsoft’s freely available
virtual Windows environments (mentioned above) or simply install a Linux
distribution, such as Ubuntu, available free from www.ubuntu.com.