Microsoft’s virtualization host is
now available to all users of Windows 8 Professional. We show you how to get
started
Window 8 Professional is the first desktop
edition of Windows to include the Hyper-V virtualization host. It’s a
terrifically powerful and flexible system, based on serve grade technology, so
if you’ve ever fancied dabbling in virtualization there’s never been a better
time to dive in.
To be clear, this isn’t the first time
desktop Windows users have been able to take advantage of virtualisation
software. All editions of Windows 7 (save for the netbook-orientated Starter
edition) come with the option to install Microsoft’s Virtual PC host, which in
the Professional, Ultimate and Enterprise editions underpins “XP Mode”. If
you’re using Windows 7 you can download Virtual PC, with or without XP Mode.
Window
8 Professional is the first desktop edition of Windows to include the Hyper-V
virtualization host
There are third-party options too. We’ve
written before about Oracle’s VirtualBox (www.virtualbox.org),
a completely free, general purpose virtualisation host. Alternatively, IT
professionals with VMware experience may prefer the VMware Player host, which
is available for free for personal usefrom www.vmware.com.
The version of Hyper-V provided with
Windows 8, however, is more capable than any of these. In fact, it’s largely
identical to the version provided with the full blown Windows Server 2012, to
the extent that you can configure and manage it across a networked environment
using PowerShell cmdlets. To detail these capabilities in full would fill a
book, but if you just want to create a few virtual machines (VMs) for testing
or development, you can get started quickly and easily and on these pages,
we’ll show you how.
The power of virtualisation
Virtualisation is often associated with big
data centre applications, but the technology can be useful on a smaller scale
too. For example, if you want to try out a different OS without repartitioning
your hard disk, virtualisation provides an easy way to do it. A VM can also
serve as a “sandbox” environment for testing new, possibly untrusted,
applications. If you take “snapshots” of your VM before making changes, you can
easily revert to an earlier state if something goes wrong.
For developers, maintaining a library of
VMs means you can quickly and easily test your code on multiple platforms
without leaving your desk. Microsoft even makes available a selection of VM
images, covering Windows Vista with Internet Explorer 7 and Windows 7 with
Internet Explorer 8 and 9, offered at no charge for software testing purposes.
These images were originally created for use with Virtual PC, but they’ll run
happily in Hyper-V. Just don’t try to use them for everyday computing, as
they’re not activated.
Installing Hyper-V
Hyper-V’s system requirements reflect its
professional-grade design. To give the best performance, security and software
compatibility, it makes use of second-generation hardware virtualisation
features. This means you’ll need an AMD Phenom II or later processor, or an
Intel Core i3, i5 or i7. If you’re running Windows 8 on an old Athlon or Core 2
Duo system, Hyper-V won’t work.
Hyper-V also requires at least 4GB of RAM,
and a 64-bit OS. The guest OSes you install in your VMs can be either 32-bit or
64-bit (an advantage over Virtual PC, which supports only 32-bit OSes), but the
copy of Windows 8 doing the hosting must be 64-bit. New Windows 8 systems will
almost certainly meet this requirement, but if you’ve performed an in place
upgrade of a 32-bit Windows 7 or Vista system, you’ll be left out.
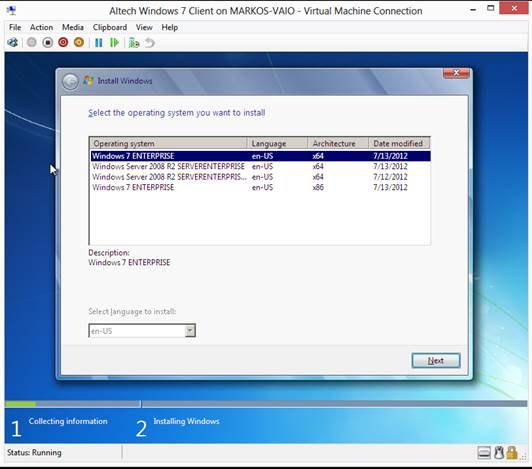
Using
Windows 8 Hyper-V to install Windows via the network using Windows Deployment
Services.
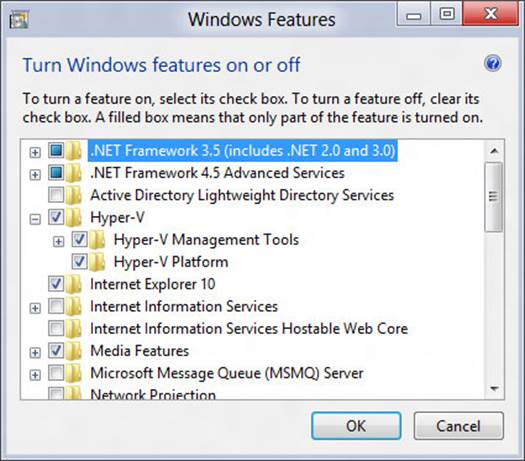
So long as your PC meets the requirements,
setting up Hyper-V is simple. Search Settings for “Turn Windows features on or
off”, then, when the window opens, tick Hyper-V and click OK. Hyper-V will be
downloaded and installed, after which you’ll be prompted to reboot Windows.
Don’t try to skip the reboot: Hyper-V installs at a very low level,
“underneath” Windows 8, to allow guest operating systems and software to run
directly on the CPU. You could even think of Windows 8 as just another VM running
within Hyper-V although this particular machine is unique since it has full
control over the hardware and Hyper-V itself.
Configuring a virtual switch
Creating a VM with default settings is very
straightforward: our six-step walkthrough overleaf will guide you through the
whole process. However, if you just step through the default settings your VM
will end up with no internet access.
To remedy this you need to create a
“virtual switch” to connect your VM’s virtual network controller to your physical
network. You do this from the Virtual Switch Manager, accessible under the
Action menu in the main Hyper-V console. The default option is to create a new
external virtual network switch, which is what we want to do. Click on Create
Virtual Switch, check that your correct physical network controller is selected
from the dropdown, give the connection a name and click OK. Your new switch
will now be available within the New Virtual Machine wizard. Alternatively, you
can connect an existing VM to it using the Settings view, as we’ll discuss
below.
You can create other types of virtual
switch, too: an internal switch lets your VMs talk to one another, and to the
host OS, but is isolated from the outside world. A private switch can be used
only among VMs.