Microsoft Sync Framework (MSF) is a complete platform
enabling synchronization of data, files, feeds, or other critical
information between clients, peers, and servers over common transport
protocols and across networks. It provides the necessary interfaces,
assemblies, code-generation tools, script wizards, and other components
that make it easy for developers to begin using it.
Occasionally Connected Application (OCA)
is a descriptive term for a program that relies on data on a regular
basis, yet which is not permanently connected to the Internet. If your
target users are stuck with a slow, unreliable, or occasionally
unavailable network provider, they are the perfect targets candidate for
building an OCA.
OCAs include phone,
PDA, tablet, or other portable device applications, such as those needed
by a mobile salesperson, floor manager, insurance adjuster, physician,
or any other professional who is on the go. People in these positions
cannot be expected to always have access to a high-speed wireless network, and MSF enables you to build programs that accommodate them.
Getting Started with MSF and Sync Services for ADO.NET
As is the trend with many new
Microsoft technologies, much of the work of configuring and preparing
your application is done by wizards and other code-generation
mechanisms. In the sections that follow, we examine how to use the
MSF-related tools and templates provided with SQL Server 2008 and Visual
Studio 2008 to accomplish our goal of building an OCA-style Windows
Forms application.
To begin, you must first
have MSF installed on your local machine. To accomplish this, you have
two options: install the feature using the SQL Server installer
(illustrated in Figure 1) or download MSF using the links found at MSF’s home page at http://www.msdn.com/sync.

You also need to install Sync
Services for ADO.NET (SSADO) if your system does not have it already.
SSADO provides assemblies in the Microsoft.Synchronization.Data*
namespaces that enable data synchronization for ADO.NET applications.
To see whether you have these assemblies, open Windows Explorer and
navigate to %PROGRAMFILES%\Microsoft Synchronization Services\ADO.NET. If they aren’t installed, visit the MSF home page and look for the Sync Services for ADO.NET links; then download and install.
The general architectural model for MSF with SSADO is made up of the following:
Synchronization
providers, both client and server side, which abstract the details of
and provide access to the data stores on each side of the
synchronization
A synchronization agent, which acts as the runtime that communicates with each synchronization provider
Databases, which store the desired content as well as synchronization metadata and supporting T-SQL code
The main idea behind these
components is that they enable your application to read and write to a
local database; then, when synchronization time comes, any changes that
happened on the local side get pushed up to the server database. In
turn, any changes that happened on the server since the last
synchronization get pushed down to the local database. Any conflicts
that occur are resolved by the conflict resolution logic built in to the
synchronization components (which, of course, you can tweak as
necessary). In this way, when synchronization completes, your local
database always has the latest and greatest, and you can continue to
work offline until the next synchronization.
In the sample OCA, you build a simple WinForms application that synchronizes with the AdventureWorks2008 database on your local server.
Building Our Example OCA
To begin, start Visual
Studio and create a new Windows Forms application (this example is in
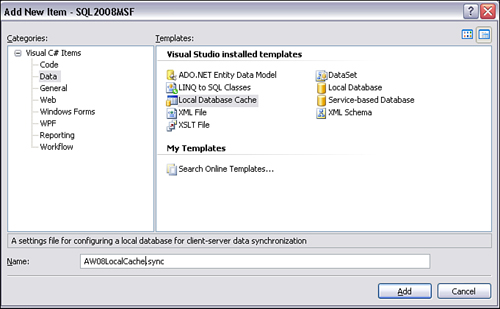
C#). Next, right-click your application name in Solution Explorer and
click Add New Item. Click the Data node under the Categories heading on the left. Under Templates, click Local Database Cache, and name this new file AW08LocalCache.sync (as illustrated in Figure 2).
Local database caches (LDCs) provide you with the code area in your
project where you can control how data synchronization works.
After your LDC has been
added, the new Configure Data Synchronization (CDS) dialog opens (you
can also view this dialog anytime by double-clicking your LDC). This is a
critical dialog to understand because it is responsible for generating
all the C#, T-SQL, and configuration code needed for using
synchronization in your program.
When you use SSADO with SQL Server 2008 databases, two options exist for performing the change tracking at its core:
Using SQL Server
Change Tracking, a new feature in SQL Server 2008 that natively tracks
row changes and stores them as metadata, accessible via a new set of
functions .
Using the default tracking mechanism, which relies on T-SQL triggers to compare datetime values stored in columns added to the server tables
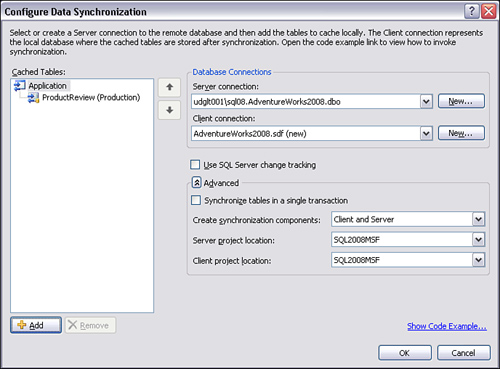
Returning to the CDS dialog, under the Database Connections group box, select the connection to your local AdventureWorks2008
database under Server Connection. Under Client Connection, leave the
default AdventureWorks2008.sdf (New) selection. This option creates a
new SQL Server Compact (SQLCE) 3.5 database in your application that
acts as your OCA’s local data store (illustrated in Figure 3).
On the left side of the dialog, under Cached Tables, is a tree structure (the top of the tree represents the Application
itself). Using the Add and Remove buttons below the tree, you can
configure which tables you want to synchronize between the local SQLCE
database and the remote database. Those you select are created and/or
populated before your first synchronization with the server.
Click the Add button, and,
using the ensuing Configure Tables for Offline Use dialog, scroll down
under Tables and put a check mark next to ProductReview (Production) (illustrated in Figure 4).
As you can see on the right side, there are a number of options for
which data to download (all or incremental), which columns will be used
to compare records (either by using existing columns or adding new ones
to the server table), and where deleted records’ keys will be stored on
the server (TableName_Tombstone is the default naming convention). The wizard adds the CreationDate and ModifiedDate columns to ProductReview in both the local and server databases. The wizard creates the ProductReview_Tombstone
table on the server. It also generates two handy T-SQL DDL scripts in
your Visual Studio project to accomplish and undo these changes.

When your Configure Tables for Offline Use dialog matches the one in Figure 45.15,
click OK to return to the main CDS dialog. Next, uncheck the Use SQL
Server Change Tracking check box, found under the Database Connections
group box. Next, click the Advanced button. This group box contains
options that allow you to generate the server and client provider code
in either the same or two different Visual Studio projects.
If you click the Show Code
Example link button on the bottom of the CDS dialog, you are presented
with a handy dialog that provides you with a block of prewritten
synchronization code and a Copy button that puts that code on the
Clipboard. Click the Copy button and then click Close. When your CDS
dialog matches the one in Figure 3,
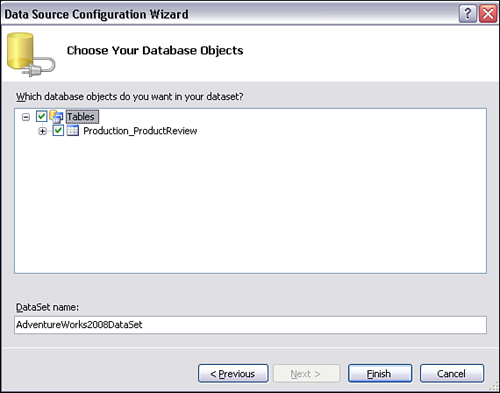
click OK. To make things even easier for development, the next dialog
that appears (Data Source Configuration Wizard) will generate a strongly
typed dataset (called AdventureWorks2008DataSet) that encapsulates your selected tables (illustrated in Figure 5). Be sure to put a check mark in the root Tables
node; then click Finish. (If you get a warning about MSF needing to
upload or synchronize changes, accept the default state of the dialog
and click OK.)
Using Solution Explorer, examine all the files created throughout this process. Notice your new App.Config and corresponding Settings.Settings
files, with their connection strings to the local and server databases.
Then look at the T-SQL DLL script that creates the triggers, columns,
and tombstone table which facilitate change tracking. Examine your new
SQLCE database (using SSMS if you like), strongly typed dataset, LDC,
and other code files.
Believe it or not, the only things left to do to set up the OCA for synchronization are to add a DataGridView
to the application’s main form, associate it with the strongly typed
dataset, add the block of code that you copied to your Clipboard
(earlier, from the CDS dialog) to an event handler, and change your
agent to perform bidirectional synchronization (it does unidirectional
download-only by default).
Perform the following steps to complete your application:
To set the synchronization mode, open your LDC’s designer file (AW08LocalCache.designer.cs), locate the synchronization agent class (AW08LocalCacheSyncAgent), and replace its partial method declaration for OnInitialize to the following:
    private void OnInitialized()
   {
           Production_ProductReview.SyncDirection =
               Microsoft.Synchronization.Data.SyncDirection.Bidirectional;
      }
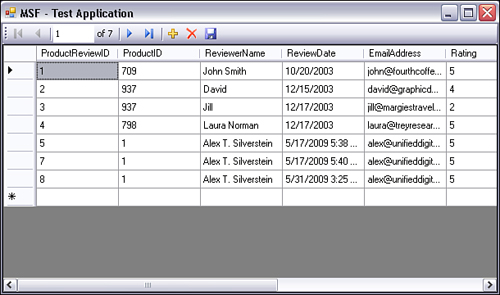
Next, open your project’s main form in the forms designer. Reveal the Data Source tool window by pressing Shift+Alt+D. Drag the Production_ProductReview node from the Data Source tool window onto your form. This provides your form with an instance of your strongly typed dataset (AdventureWorks2008DataSet) as well as a DataGridView (production_ProductReviewDataGridView) with standard buttons, table adapter (production_ProductReviewTableAdapter) and associated manager (tableAdapterManager), and data navigator (production_ProductReviewBindingNavigator) for moving through the data using the toolbar.
Set the Dock property of your DataGridView to Fill. The final result should look something like the form shown in Figure 6.
Double-click the title area of your form. In the OnLoad event handler that opens in the text editor, replace the code in the body with the following synchronization code:
private void Form_Load(object sender, EventArgs e)
  {
     //Sync the data when the application starts
      try
      {
           new AW08LocalCacheSyncAgent().Synchronize();
      }
      catch (Exception)
      {
          MessageBox.Show("Unable to synchronize at this time.");
      }
      finally
     {
         production_ProductReviewTableAdapter.Fill(
             adventureWorks2008DataSet.Production_ProductReview);
     }
}
Run your application in debug mode. Edit and save any record using your DataGridView; then, using SQL Server Management Studio, edit and save a different record in the Production.Product
review table. Examine the results of bidirectional synchronization by
restarting your application. Validate the changes by querying the server
data by writing a new SELECT query and executing it in SSMS.
If you are interested in
learning all the implementation details of MSF, feel free to walk
through your synchronization code in debug mode to familiarize yourself
with all the components at work, including the providers, agent,
adapters, and T-SQL triggers.
Although this tutorial provided an MSF jump-start, you should be sure to visit the MSF Developer Center at http://www.msdn.com/sync for full coverage on all aspects of MSF and SSADO.