6. Restricting Permissions Using Security Zones
Security levels and zones are important parts of Internet
Explorer’s security features. You can display security options for
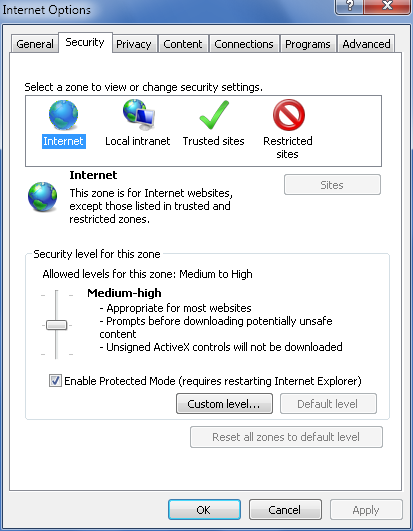
Internet Explorer by clicking Tools→Internet Options, and then clicking the Security
tab in the Internet Options dialog box, as shown in Figure 8. The standard levels
of security that you can use are:
- High
Appropriate for sites that might contain harmful content.
With this security level, Internet Explorer runs with maximum
safeguards and with less-secure features disabled.
- Medium-high
Appropriate for most public Internet sites. With this
security level, Internet Explorer prompts you prior to downloading
all potentially unsafe types of content and disables downloading
of unsigned ActiveX controls.
- Medium
Appropriate only for trusted sites. With this security
level, Internet Explorer prompts you prior to downloading most
potentially unsafe contents and disables downloading of unsigned
ActiveX controls.
- Medium-low
Appropriate only for sites on your internal network. With
this security level, Internet Explorer disables downloading of
unsigned ActiveX controls but downloads and runs most types of
content without prompting. This option is available only for the
“Local intranet” and “Trusted sites” zones.
- Low
Appropriate only for sites you know are trustworthy, such as
secure internal sites. With this security level, Internet Explorer
uses minimal safeguards, and downloads and runs most types of
content without prompts. This option is available only for the
“Local intranet” and “Trusted sites” zones.
Internet Explorer 8 uses security zones to help you restrict
permissions according to where websites are located and what you know
about them. Each security zone is assigned a default security level.
From most trusted to least trusted, the security zones are:
- Local intranet
This zone is used to configure security settings for
sites on your local network. The default security level is
Medium-low.
NOTE
Unlike early releases of Windows, Windows 7 (and Vista)
can automatically detect when websites are on your local
network. Windows 7 does this by checking the network address of
the website and comparing it to the network address of your
computer. Windows 7 also considers sites bypassed by the proxy
server and network paths, such as Universal Naming Convention
(UNC) paths, as being on the local network.
- Trusted sites
This zone is used to configure security settings for
sites that you explicitly trust and that are considered to be free
of content that could damage or harm your computer. The default
security level is Medium.
- Internet
This zone is used to configure security settings for
sites on the public Internet, and is used for all sites not placed
in other zones. The default security level is Medium-high.
- Restricted sites
This zone is used to configure security settings for
sites that could potentially damage your computer. The default
security level is High.
When you are working with the “Local intranet,” “Trusted sites,”
and “Restricted sites” zones, you can specify the web addresses of sites
that should be associated with these zones. With the “Local intranet”
zone, you can also control the way Windows 7 detects sites on the local
network.
6.1. Setting the security level for a zone
One way to modify the security level for a zone is to
assign a new security level. With the “Local intranet” and “Trusted sites” zones, you can assign any desired
security level. With the Internet zone, the only allowed security
levels are Medium, Medium-high, and High. With the Restricted zone,
the only allowed security level is High. You can also enable or
disable Protected Mode on a per-zone basis. Protected Mode is enabled
by default for all zones except the “Trusted sites” zone.
To configure the security level for a particular zone, follow
these steps:
In Internet Explorer, click Tools→Internet Options. This
displays the Internet Options dialog box.
On the Security tab, click the zone you want to work
with.
To change the security level, move the “Security level for
this zone” slider up or down to the desired level.
To enable Protected Mode for the zone, select the Enable
Protected Mode checkbox. To disable Protected Mode for the zone,
clear the Enable Protected Mode checkbox. Any changes you make to
the Protected Mode settings require that you restart Internet
Explorer for the changes to take effect.
To restore the default security settings for the selected
zone, click the “Default level” button.
Click OK to save your settings.
To reset security for all zones, follow these steps:
In Internet Explorer, click Tools→Internet Options. This
displays the Internet Options dialog box.
On the Security tab, click the “Reset all zones to default
level” button and then click OK to save your settings.
6.2. Setting a custom security level for a zone
In addition to being able to assign a specific security level
for a zone, you can also set a custom level by configuring the
individual security settings summarized in Table 1. Generally, you want
to set a custom level only to resolve a specific problem you are
experiencing and should otherwise rely on the predefined security
levels to achieve the desired results. To resolve a problem with a
specific site, you might want to consider adding it to a different
zone temporarily rather than changing settings for all Internet sites.
For example, you could add a site to the Trust Site zone temporarily
to see if this resolves a problem.
You can configure a custom security level for a particular zone
by completing these steps:
In Internet Explorer, click Tools→Internet Options. This
displays the Internet Options dialog box.
On the Security tab, click the zone you want to work
with.
Click the “Custom level” button to display the Security
Settings dialog box.
Use the individual security settings to specify how you want
to handle potentially risky actions, files, programs, and
downloads. With most settings your options may include:
- Prompt
Click Prompt to be prompted for approval before
proceeding.
- Disable
Click Disable to skip prompting and automatically
refuse the action or download.
- Enable
Click Enable to skip prompting and automatically
accept the action or download.
Click OK to save your settings.
Table 1. Internet Explorer security settings and their
meanings
| Security
category/setting | Description |
|---|
| .NET Framework | |
|---|
| Loose
XAML | Controls the use of
Extensible Application Markup Language (XAML) documents that
are formatted loosely (rather than strictly) according to
their Document Type Definitions (DTDs). |
| XAML Browser
Applications | Controls the use of
XAML browser applications for viewing XAML documents within
Internet Explorer. |
| XPS
Documents | Controls the use of XML
Paper Specification (XPS) formatted documents. |
| .NET Framework-reliant
components |
|---|
| Permissions for
components with manifests | Controls how .NET
Framework components with manifests are used. They are either
disabled completely or run in High Safety mode. |
| Run components not
signed with Authenticode | Controls the use of
.NET Framework components that are not digitally
signed. |
| Run components signed
with Authenticode | Controls the use of
.NET Framework components that are digitally
signed. |
| ActiveX controls and plug-ins |
|---|
| Allow previously unused
ActiveX controls to run without prompt | Controls whether new
ActiveX controls can run without first prompting for
permission. |
| Allow
scriptlets | Controls the use of
scriptlets in web pages. |
| Automatic prompting for
ActiveX
controls | Controls whether you
are automatically prompted each time before using ActiveX
controls. |
| Binary and script
behaviors | Controls the direct
execution of binary executables and scripts, such as when you
click links to an executable or script. |
| Display video and
animation on a web page that does not use external media
player | Controls whether
embedded video and animation play in Internet
Explorer. |
| Download signed ActiveX
controls | Controls the
downloading of signed ActiveX controls. |
| Download unsigned
ActiveX controls | Controls the
downloading of unsigned ActiveX controls. |
| Initialize and script
ActiveX controls not marked as safe for
scripting | Controls whether
ActiveX controls not marked as safe for scripting can be
modified or scripted based on the contents of a web
page. |
| Only allow approved
domains to use ActiveX without prompt | Controls whether
installed ActiveX controls can run on a domain other than the
one you installed it from. |
| Run ActiveX controls
and plug-ins | Controls whether
ActiveX controls and browser plug-ins run in Internet
Explorer. |
| Script ActiveX controls
marked for safe scripting | Controls whether
ActiveX controls marked for safe scripting can be modified or
scripted based on the contents of a web page. If you change
this setting, you must restart Internet Explorer for the
change to be applied. |
| Downloads |
|---|
| Automatic prompting for
file downloads | Controls whether
Internet Explorer prompts you for file
downloads. |
| File
download | Controls whether
Internet Explorer downloads files. |
| Font
download | Controls whether
Internet Explorer downloads fonts. |
| Enable .NET Framework setup |
|---|
| Enable .NET Framework
setup | Controls whether .NET
Framework setup is launched when you visit a site that
contains .NET content. |
| Miscellaneous |
|---|
| Access data sources
across domains | Controls whether
scripts and other elements in a page can access data sources
from other domains. |
| Allow META
refresh | Controls whether
automatic refresh or redirection of a page is allowed using
the HTML META
tag. |
| Allow scripting of
Microsoft web browser control | Controls whether a web
page can script the browser control directly. |
| Allow script-initiated
windows without size or position constraints | Controls whether a
script in a web page can open a window without size or
position details. |
| Allow web pages to use
restricted protocols for active content | Controls whether a web
page can use restricted protocols with scripts and other types
of active content. |
| Allow websites to open
windows without Address or Status bar | Controls whether a
script in a web page can open a window without an Address or
Status bar. |
| Display mixed
content | Controls whether a web
page can display content from both secure and unsecure
sources. |
| Don’t prompt for client
certificate selection when no certificates or only one
certificate exists | Controls whether
Internet Explorer prompts you to select a client certificate
when there is only one or no certificate
available. |
| Drag and drop or copy
and paste files | Controls whether
Internet Explorer allows you to use drag and drop or copy and
paste with web pages. |
| Include local directory
path when uploading to a server | Controls whether
Internet Explorer includes the full local directory path when
you upload files to a remote server. |
| Installation of desktop
items | Controls whether
Internet Explorer allows items to be installed on the
desktop. |
| Launching applications
and unsafe files | Controls whether
Internet Explorer allows other applications to be started and
whether it allows unsafe files to be opened. |
| Launching programs and
files in an IFRAME | Controls whether
Internet Explorer allows other applications and files to be
opened in an IFRAME. |
| Navigate windows and
frames across different domains | Controls whether
Internet Explorer allows windows and frames to come from
multiple domains. |
| Open files based on
content, not file extension | Controls whether
Internet Explorer opens files based on the Multipurpose
Internet Mail Extension (MIME) type or based on the file
extension. |
| Submit nonencrypted
form data | Controls whether
Internet Explorer can submit nonencrypted (plain-text) form
data to a website. |
| Use Pop-up
Blocker | Controls whether the
Pop-up Blocker is enabled or disabled. |
| Use SmartScreen
Filter | Controls whether the
phishing filter is enabled or disabled. |
| User data
persistence | Controls whether user
data such as browsing history is included in a web page that
has been saved to disk. |
| Websites in less
privileged content zone can navigate into this
zone | Controls whether
websites in a zone with a lower security level can redirect to
websites in a zone with a higher security
level. |
| Scripting |
|---|
| Active
scripting | Controls whether Active
scripting of web pages is allowed. |
| Allow programmatic
clipboard access | Controls whether a
script or other element in a web page can read what is copied
to your computer’s clipboard. |
| Allow Status bar
updates via script | Controls whether a
script or other element in a web page can update the Status
bar. |
| Allow websites to
prompt for information using scripted windows | Controls whether a
script or other element in a web page can display a
prompt. |
| Enable XSS
filter | Controls whether
cross-site scripting filtering is enabled. When enabled the
filter tries to limit cross-site scripting attacks which occur
when a website adds JavaScript to otherwise legitimate
requests to another website, often in an attempt to gain
access to privileged information. |
| Scripting of Java
applets | Controls whether a
script or other element in a web page can script Java
applets. |
| User authentication |
|---|
| Logon | Controls the way user
authentication works when you need to log on to a website. The
options are Anonymous Logon, Automatic Logon Only in Intranet
Zone, Automatic Logon with Current User Name and Password, and
Prompt for User Name and Password. |
6.3. Configuring local intranet detection and sites
Windows 7 automatically detects sites on the local
network according to their network address. If you experience problems
with sites not being detected properly, you may want to disable
automatic detection settings and allow only specifically included
types of sites to be considered local sites. In addition to or instead
of doing this, you can specifically identify a site as being on the
local network.
To configure local intranet detection, specify local sites, or
both, complete the following steps:
In Internet Explorer, click Tools→Internet Options. This
displays the Internet Options dialog box.
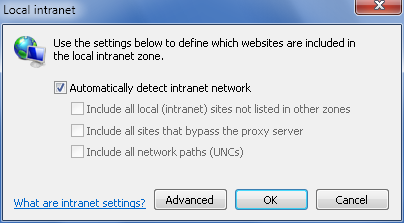
On the Security tab, click the “Local intranet” zone and
then click the Sites button. This displays the “Local intranet”
dialog box, as shown in Figure 7-22.
If Windows 7 is unable to detect sites on the local network
automatically, you may need
to manually configure the intranet zone settings. To do this,
clear “Automatically detect
intranet network” and then specify sites to include. You can
include local (intranet) sites not listed in other zones, sites
that bypass the proxy server, and network paths (UNCs) by
selecting the related checkboxes. To exclude a type of resource,
clear the related checkbox.
To specify additional sites for the “Local intranet” zone or
require secure verification using Hypertext Transfer Protocol
Secure (HTTPS) for all sites in the “Local intranet” zone, click
the Advanced button. This displays a new “Local intranet” dialog
box with the following options:
- Add
To add a site to the “Local intranet” zone, type the
web address for a site, then click Add.
- Remove
To remove a site from the “Local intranet” zone, click
the web address, then click Remove.
- Require server verification (https:) for all sites in
this zone
To require secure verification for all sites in this
zone using HTTPS, select this checkbox.
6.4. Configuring trusted sites
If you find that the normal security settings are too
restrictive for a site that you explicitly trust and know to be free
of content that could damage your computer, you can designate the site
as a trusted site by completing these steps:
In Internet Explorer, click Tools→Internet Options. This
displays the Internet Options dialog box.
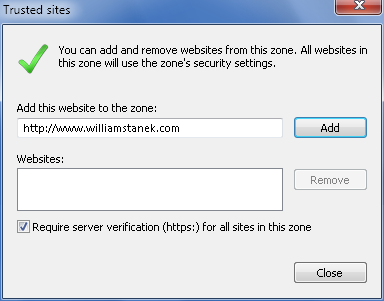
On the Security tab, click the “Trusted sites” zone and then
click the Sites button. This displays the “Trusted sites” dialog
box, as shown in Figure 10.
To add a site to the “Trusted sites” zone, type the web
address for the site and then click Add.
To remove a site from the “Trusted sites” zone, click the
web address and then click Remove.
To require secure verification for all sites in this zone
using HTTPS, select the “Require server verification (https:) for
all sites in this zone” checkbox.
Click OK to save your settings.
6.5. Configuring restricted sites
If you find a site that has offensive content or content
that could damage your computer, you can designate the site as a
restricted site by completing the following steps:
In Internet Explorer, click Tools→Internet Options. This
displays the Internet Options dialog box.
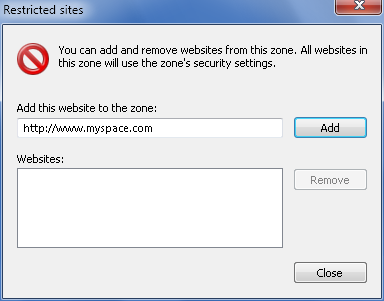
On the Security tab, click the “Restricted sites” zone and
then click the Sites button. This displays the “Restricted sites”
dialog box, as shown in Figure 11.
To add a site to the “Restricted sites” zone, type the web
address for the site, then click Add.
To remove a site from the “Restricted sites” zone, click the
web address, then click Remove.
Click OK to save your settings.
NOTE
Keep in mind that designating a site as a restricted site
doesn’t stop you or anyone else from accessing the site. Instead, it
establishes a higher level of security for the site.