2. Understanding Web Address and Domain Restrictions
In Internet Explorer, the component responsible for parsing web
addresses and determining domain name and location components is the
Universal Resource Locator (URL) handler. URLs are simply the formal names of web
addresses and other types of addresses that you can use to universally
locate resources on the Internet. While the URL handler is extracting
the domain name and location components from a web address, it performs
several checks to ensure the validity of the web address and prevent
possible URL-parsing exploitations, such as URLs that attempt to run
commands or URLs that perform suspect actions.
As part of its standard features, Internet Explorer 8 supports
both standard English domain names and internationalized domain names.
English domain names are domain names represented using the letters A–Z,
the numerals 0–9, and the hyphen. Internationalized domain names, also
referred to as IDNs, are domain names represented using native language
characters.
Unfortunately, as sometimes happens when features are introduced,
Internet Explorer’s support for internationalized domain names makes it
possible to create lookalike domain names for popular and trusted sites.
For example, someone might create a site at
http://www.micrósoft.com, and if you didn’t look
really closely at the domain name, you could be fooled into believing
you were accessing http://www.microsoft.com.
To help ensure that international characters aren’t used to make a site seem
like something it isn’t, Internet Explorer implements international
domain name antispoofing. International domain name
antispoofing is designed to warn you against sites that could otherwise
appear as known, trusted sites. Thanks to this feature, you’d receive a
warning notification about possible spoofing if you clicked on a
lookalike link.
3. Viewing and Managing Browsing History
As you browse the Web, Internet Explorer stores information about
the pages you visit, the content of those pages, the information that
websites collect from you, and the information you provide while at
websites. This information is collectively referred to as your
browsing history. Your browsing history
includes:
- Temporary Internet files
Temporary Internet files are copies of web pages, images,
and other related files.
- Browser cookies
Browser cookies store information about you collected by the
websites you visit.
- History list
The history list stores a list of websites and pages
you’ve visited according to the date accessed and the web
address.
- Form data
Form data consists of information you’ve typed into online
forms.
- Passwords
Passwords consist of passwords you’ve used when you signed
into websites that use forms-based authentication.
Internet Explorer stores copies of this information to improve
your browsing experience. If you visit the same site or page later,
Internet Explorer can use the data it has stored in its browser cache on
your computer rather than having to reload the page and its contents
over the Web. This data can also be used to reauthenticate you on
websites that require authentication and to provide information for
automatically completing web forms.
3.1. Configuring temporary Internet file storage
With temporary Internet files, Internet Explorer can use
copies of web pages, images, and other related files rather than
having to download these files. This allows you to view pages faster
on subsequent visits. You can control the way Internet Explorer stores
copies of temporary Internet files by completing the following
steps.
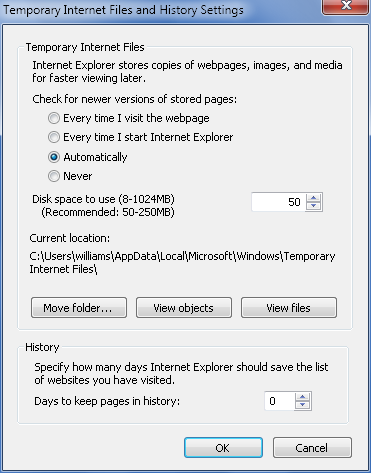
In Internet Explorer, click Tools→Internet Options. This
displays the Internet Options dialog box.
On the General tab, click Settings under Browsing History.
This displays the Temporary Internet Files and History Settings
dialog box, as shown in Figure 3.
Configure how Internet Explorer uses stored data using the
following “Check for newer versions of stored pages”
options:
- Every time I visit the webpage
Select this option if you want Internet Explorer to
check for a newer version every time you access a page. With
this option selected, Internet Explorer will use a newer
version when available and the cached version of the page
otherwise.
- Every time I start Internet Explorer
Select this option if you want Internet Explorer to
check for a newer version the first time you access a page
during a browser session. With this option selected,
Internet Explorer will use a newer version when available
and the cached version of the page otherwise.
- Automatically
Select this option if you want Internet Explorer to
check for a newer version the first time you access a page
during a browser session, and to check for changes to images
in a page according to the frequency with which they are
changed. With this option selected, Internet Explorer will
use a newer version when available and the cached version of
the page otherwise. Internet Explorer will also check for
newer images less frequently when images are changed infrequently.
- Never
Select this option if you want Internet Explorer to
always use a cached version of a page if available. With
this option selected, Internet Explorer will download a page
only the first time you access it and will use the cached
version of the page otherwise.
Use the “Disk space to use” combo box to set the amount of
disk space reserved for temporary Internet files. The recommended
space to reserve is from 50 MB to 250 MB; the default value is
based on the amount of free space available.
By default, your temporary Internet files are stored in your
user profile. If you want to move the folder used for temporary
Internet files to a different location, click “Move folder” and
then use the Browse for Folder dialog box to select the new
location. Generally speaking, you’ll want to move the temporary
Internet files only if your primary disk is running low on space
and you have another disk available.
Click OK to save your settings.
3.2. Configuring the history list
With the history list, Internet Explorer stores
information about the date you accessed a site and the pages you
visited while at the site. You can control the way Internet Explorer
creates and uses the history list by completing the following
steps:
In Internet Explorer, click Tools→Internet Options. This
displays the Internet Options dialog box.
On the General tab, click Settings under Browsing History.
This displays the Temporary Internet Files and History Settings
dialog box shown in Figure 7-16.
By default, Internet Explorer saves 20 days’ worth of
information regarding websites and web pages you’ve accessed. If
you don’t want Internet Explorer to create a history list, you can
set the “Days to keep pages in history” box to 0. Otherwise,
set the “Days to keep pages in history” box to the desired number
of days to retain the browser history.
Click OK to save your settings.
3.3. Configuring AutoComplete settings for forms and
passwords
AutoComplete settings control whether and how Internet
Explorer stores web addresses, form data, and passwords. As you type
web addresses in the Address bar, these addresses are listed according
to the text you enter, allowing you to select an address in the
history list. With form data, Internet Explorer stores the text you
entered into online forms. When you fill out similar form fields
later, Internet Explorer displays the data you previously provided so
that you can select it rather than having to retype it.
With passwords, Internet Explorer stores the passwords you used
when you signed into websites that use forms-based authentication.
When you visit a site again, Internet Explorer can use the password to
reauthenticate you or provide the password for you after you enter
your username.
You can control the way AutoComplete works by completing the
following steps:
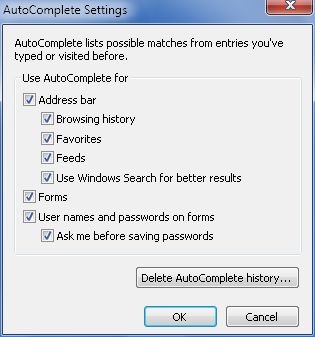
In Internet Explorer, click Tools→Internet Options. This
displays the Internet Options dialog box.
On the Content tab, click Settings under AutoComplete. This
displays the AutoComplete Settings dialog box shown in Figure 4.
Use the following options to configure how AutoComplete
works, and then click OK to save your settings:
- Address bar
Select this option to save AutoComplete data for web
addresses.
- Browsing history
Select this option to include web addresses from the
browsing history.
- Favorites
Select this option to include web addresses from your
favorites lists.
- Feeds
Select this option to include web addresses from your
RSS feeds.
- Use Windows Search for better results
Select this option to use Windows Search results to
enhance AutoComplete’s results.
- Forms
Select this option to save AutoComplete data for form
fields.
- User names and passwords on forms
Select this option to save AutoComplete data for
usernames and passwords you enter.
- Ask me before saving passwords
Select this option to prompt you before saving a
password. If you don’t select this option, passwords are
saved automatically.
3.4. Configuring the use of browser cookies
Internet Explorer stores in browser cookies the
information about you that is collected by the websites you visit.
Websites use cookies for a variety of reasons, such as tracking your
preferences and storing information about items you’ve added to a
shopping cart. When you access the same site later, the site can use
the information stored in the cookie to enhance your browsing
experience or obtain any necessary information about you.
Internet Explorer allows sites to store cookies on your computer
based on where those sites are located. For sites on your local
network and sites you’ve specifically designated as trusted, Internet
Explorer accepts all cookies regardless of your privacy settings. For
sites you’ve specifically designated as restricted, Internet Explorer
blocks all cookies regardless of your privacy settings. When you are
accessing sites on the public Internet that are configured as neither
trusted sites nor restricted sites, you can manage the way cookies are
used on the Privacy tab of the Internet Properties dialog box.
Internet Explorer relies on a website’s compact privacy policy
to determine how the site uses cookies. The World Wide Web Consortium
(W3C) has defined an official recommendation regarding web privacy,
called the Platform for Privacy Preferences Project (P3P). P3P
enables websites to report their privacy practices in policy
statements. Internet Explorer relies on what the site reports and
cannot determine whether cookies are used as reported.
When working with cookies, the two important terms to understand
are explicit consent and
implicit consent. Explicit consent means you have specifically opted to
allow a site to collect personal information, such as when you accept
a site’s rules during signup. Implicit consent means you haven’t opted out or told the
site you don’t want personal information to be collected. On the
Privacy tab, use the Settings slider to specify how cookies should be
used. Privacy settings available include:
- Block All Cookies
Blocks all new cookies and ensures that websites cannot
read any existing cookies. Because Allow exceptions are ignored while this setting is
selected, any sites you’ve configured as Allow exceptions are
blocked as well.
- High
Blocks all cookies from sites that do not have a declared
privacy policy regarding consent. It also blocks all cookies
with a declared privacy policy stating that cookies gather
information that could be used to contact you without your
explicit consent.
- Medium High
Blocks cookies from sites other than the one you are
viewing if they do not have a declared privacy policy statement
regarding consent. It blocks cookies from other sites with a
declared privacy policy stating that cookies gather information
that could be used to contact you without your explicit consent.
It also blocks cookies from the current site if there is a
declared privacy policy statement specifying that cookies gather
information that could be used to contact you without your
implicit consent.
- Medium
The default privacy setting. Blocks cookies from sites
other than the one you are viewing that do not have a declared
privacy policy regarding consent. It restricts cookies from the
current site and blocks cookies from other sites that have a
declared privacy policy stating that cookies gather information
that could be used to contact you without your implicit
consent.
- Low
Blocks cookies from sites other than the one you are
viewing that do not have a declared privacy policy regarding
consent. It restricts cookies from other sites that have a
declared privacy policy stating that cookies gather information
that could be used to contact you without your implied
consent.
- Accept All Cookies
Accepts all new cookies and allows websites to read
existing cookies. Because Block exceptions are ignored while
this setting is selected, any sites you’ve configured as Block
exceptions are allowed as well.
You can configure Internet Explorer’s cookie settings by
completing the following steps:
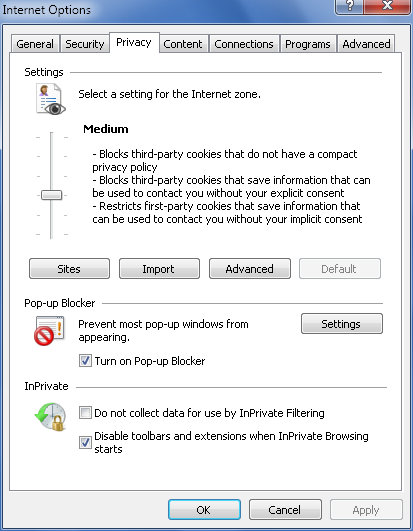
In Internet Explorer, click Tools→Internet Options. This
displays the Internet Options dialog box.
On the Privacy tab, shown in Figure 5, use the
Settings slider to set the desired privacy level for
cookies.
To make an exception for a site rather than raise or lower
your privacy setting, click the Sites button. Type the address of
the website in the field provided, and then click Allow or Block
as appropriate. If you click Allow, cookies for the site will
always be accepted. If you click Block, cookies for the site will
always be blocked.
NOTE
You cannot make exceptions when you use the Block All Cookies
or Allow All Cookies setting. With these settings, all cookies are
always either blocked or allowed.
3.5. Clearing your browsing history
Occasionally, you may want to clear your browsing
history. You may want to do this to prevent malicious individuals from
getting your information or to maintain your privacy regarding
websites and pages you’ve visited. You may also want to do this if you
are experiencing problems accessing a particular site or page, or to
ensure that you are accessing the most recent version of a website or
page.
Although Internet Explorer makes it appear you can clear out the
browsing history while the application is running, you need to close
all Internet Explorer windows to fully clear out the browsing history.
You also can configure Internet Explorer to clear out the history when
you exit the browser and close all open windows.
To automatically clear the history when you exit Internet
Explorer, complete these steps:
In Internet Explorer, click Tools→Internet Options. This
displays the Internet Options dialog box.
On the General tab, select the “Delete browsing history on
exit” checkbox and then click OK.
To clear out your browsing history, complete these steps:
Close all Internet Explorer windows. Click Start→Control
Panel→Network and Internet→Internet Options.
On the General tab, click Delete under Browsing History.
This displays the Delete Browsing History dialog box shown in
Figure 6. Note that the
dialog box has two sections. The first checkbox is for preserving
data; all the others are for removing data.
If you want to preserve cookies and other temporary files
for websites listed in the Favorites Center, select the “Preserve
Favorites website data” checkbox. Otherwise, to ensure all
temporary data can be removed, clear this checkbox.
Specify the individual types of temporary Internet files to
remove by selecting their checkboxes.
Click Delete to clear out the specified types of temporary
Internet files.
