1. Architecture
The client object model has three variants:
JavaScript Client Object Model
This version is implemented in %SPRoot%\ Template\Layouts\SP.js. A lot
of the new functionality in the SharePoint 2010 user interface is
implemented using the JavaScript Object Model. The JavaScript Object Model is useful for
enhancing the user experience without requiring additional plug-ins. Silverlight Client Object Model
This version was designed for use by Silverlight client applications
and is implemented in %SPRoot%\Template\Layouts\ClientBin\
Microsoft.SharePoint.Client.Silverlight.dll and
Microsoft.SharePoint.Client .Silverlight.Runtime.dll. The Silverlight
object model is useful when you’re developing a more visually appealing
and interactive user experience. While JavaScript is useful for
improving the interactivity of the user interface by minimizing
server-side post backs and page redrawing, at the end of the day, the
visual presentation is still constrained by the limitations of HTML.
Silverlight has no such limitations, and when you’re using the
Silverlight Object Model, creating user interface components that
reference SharePoint data is relatively straightforward. Managed Client Object Model
This version has been designed for use by .NET-managed applications and
is implemented in %SPRoot%\ISAPI\Microsoft .SharePoint.Client.dll and
Microsoft.SharePoint.Client.Runtime.dll. As you’ve already seen,
Silverlight and JavaScript are great tools for developing a rich
web-based user interface. However, the services available on the
SharePoint platform are not only useful to web clients, but they have
myriad uses in rich-client applications as well. For example, using a
SharePoint document library as the data store for a purchasing
application would allow users to store created purchase orders in a
web-based system that could be used as an extranet tool by suppliers.
Although each of these variants has a slightly
different implementation, in terms of the capabilities exposed and the
way that the object model works, they are all practically identical.
Each Client Object Model variant exposes a number of client-side
representations of server-side objects. Communication from the
client-side object to the server-side counterpart is accomplished via a
new Windows Communication Foundation (WCF) service called Client.svc,
as the following illustration shows:
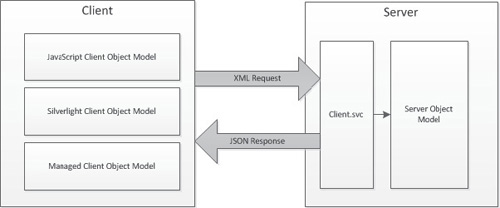
Effectively, Client.svc acts as a proxy for the
actions performed on the client. It performs the appropriate actions
using the Server Object Model and returns the results to the client
using the lightweight JavaScript Object Notation (JSON) data exchange
format.
Note
From an implementation perspective, to ensure that
the classes exposed by the Client Object Model exactly matched the
classes within the Server Object Model, the client classes were created
using a code-generation tool that examined the Server Object Model for
classes that were decorated with the ClientCallableType attribute. 2. Demonstration Environment Setup
Using
a web browser, navigate to an appropriate root site within your
SharePoint farm—for example, http://<Your Server Name>. From the
Site Actions menu, choose New Site. In the Create dialog, select Team Site. Type the title for the new site, Chapter 04, and the URL Name, Chapter 04. After the site has been created, click the Lists link and select the Announcements list. Add a few rows of sample data; we’ll use this for our demo code.
Host Silverlight in SharePoint
To demonstrate the Silverlight Client Object Model,
we’ll create a basic application and host it in a page on our
SharePoint test site. Take the following steps:
Using Visual Studio, choose File | New Project. In the New Project dialog, select Empty SharePoint Project and name the new project Chapter 04, as shown: 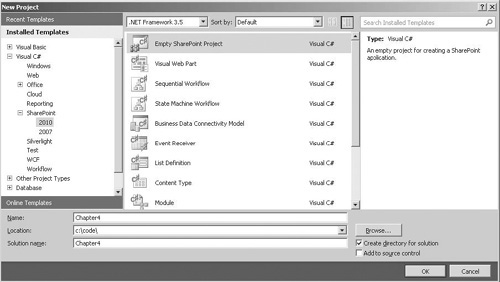 In
the SharePoint Customization Wizard dialog, set the debugging site to
the demo site that we created earlier. Select Deploy As A Farm
Solution, and then click Finish. Choose File | Add | New Project. In
the Add New Project dialog, select Silverlight in the Installed
Templates list and Silverlight Application in the middle pane, and then
type the project name, SilverlightCOMDemo, as shown: 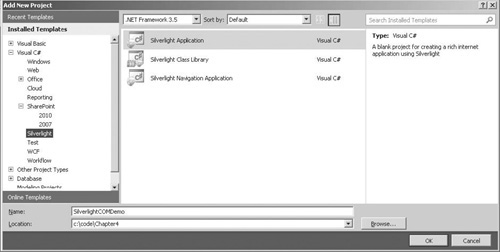 In
the New Silverlight Application dialog, uncheck the Host The
Silverlight Application In A New Web Site checkbox, and then click OK. Choose Project | Add Reference. Select
the Browse tab and navigate to %SPRoot%\Template\Layouts\ClientBin and
add references to Microsoft.SharePoint.Client.Silverlight.dll and
Microsoft .SharePoint.Client.Silverlight.runtime.dll. Be aware that the
SPRoot environment variable isn’t resolved in the Add Reference dialog,
so you’ll need to enter the complete path: C:\Program Files\Common Files\Microsoft Shared\Web Server Extensions\14\Template\Layouts\ClientBin.
To ensure that our Silverlight project is
automatically deployed as part of our SharePoint project, let’s create
a new document library in SharePoint and add the compiled output of our
Silverlight project to it as part of the build process:
Right-click the Chapter4 project and select Add | New Item. Select List Instance from the list, and type the name SilverlightControls as shown: 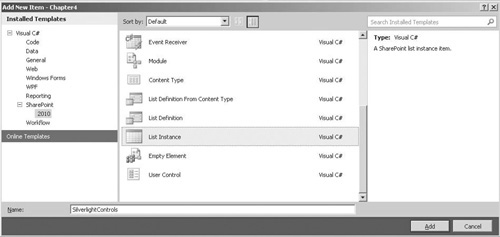 Type the display name for the list as SilverlightControls and then, from the Which List Do You Want To Instantiate drop-down, select Document Library. Set the relative URL to SilverlightControls and click Finish. A
new SilverlightControls folder will be added to the Chapter4 project.
If it’s not already open, open the Elements.xml file from the
SilverlightControls folder and add the following XML after the closing
ListInstance tag: <Module Name="SilverlightControls" Url="SilverlightControls">
<File Path="SilverlightControls\SilverlightCOMDemo.xap"
Url="SilverlightCOMDemo.xap" Type="GhostableInLibrary" />
<File Path="SilverlightControls\JScriptTest.js"
Url="JScriptTest.js" Type="GhostableInLibrary" />
</Module>
These files are used by the deployment mechanism to determine
configuration settings and files that should be deployed to SharePoint
when the package is installed. The additional XML that we’ve added will
load SilverlightCOMDemo.xap and JScriptTest.js into our
SilverlightControls document library. Of course, before we can load
these files into the library we need to create them. In the SilverlightControls folder, add a new JScript file named JScriptTest.js. Right-click the SilverlightCOMDemo project node and select Properties. Select the Build Events tab, and in the Post-build event command line, enter the following (on a single line): xcopy "$(TargetDir)$(TargetName).xap"
"$(SolutionDir)Chapter4\SilverlightControls" /Y
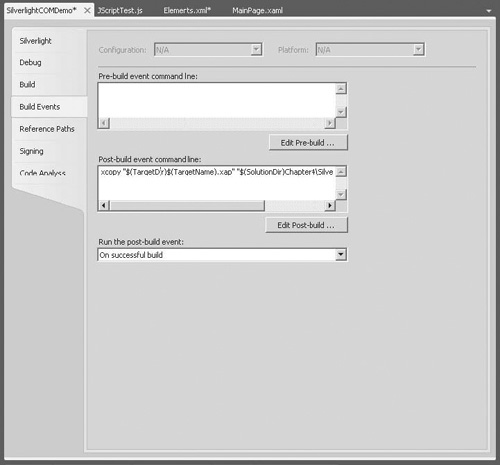 This
command line statement will copy the .xap file that’s built by the
Silverlight project into the SilverlightControls folder in our
SharePoint project. To
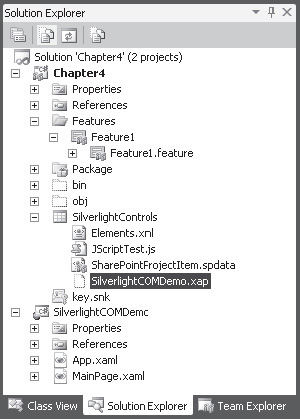
be sure that all is working correctly, build the Silverlight project by
right-clicking the SilverlightCOMDemo node and selecting Build. Click
the Show All Files icon at the top of the Solution Explorer pane, as
shown, and then right-click the SilverlightCOMDemo.xap file in the
SilverlightControls folder and select Include In Project.
Click
the Show All files icon again to hide extraneous files. Select the
JScriptTest.js file, and then in the Properties pane, set the
Deployment Type to ElementFile. Repeat this process for the
SilverlightCOMDemo.xap file. To ensure that the Silverlight project is always updated, right-click the Chapter 4 node and select Project Build Order.. In the Dependencies tab, select Chapter4 from the Projects drop-down, and then check the SilverlightCOMDemo dependency. We’re now ready to deploy our solution to our SharePoint site. Choose Build | Deploy Chapter 04.
Using the Silverlight Web Part
Our
solution will create a new document library named SilverlightControls
on our test site. So that we can see our demo control, we need to host
it within a SharePoint page. The easiest way to do this is to use the
new Silverlight web part that’s included out-of-the-box with SharePoint
2010.
Using
a web browser, navigate to the Chapter4 demo site that we set up
earlier. Notice that a new SilverlightControls document library has
been added, which contains our Silverlight package and test JavaScript
file. From the Site Actions menu, choose New Page. Name the new page SilverlightTest. From
the Insert tab in the ribbon, click the Web Part button. Then select
the Silverlight Web Part from the Media And Content category, as shown.
Then click Add. 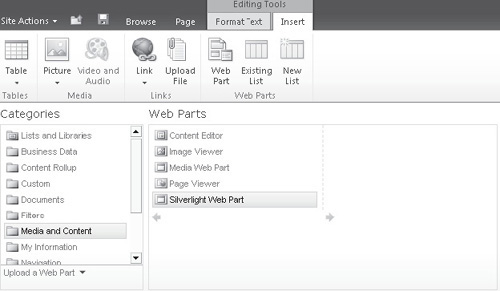 In the Silverlight Web Part dialog, set the URL to <Demo SiteUrl>/SilverlightControls/SilverlightCOMDemo.xap. From the Page tab in the ribbon, select Save.
Referencing the JavaScript Client Object Model
We’ll adopt a similar technique to test our
JavaScript code. However, in this case, we don’t have the luxury of a
web part that hooks everything up for us, so we’ll need to edit the
page template to add the appropriate references.
From the Site Actions menu, choose New Page. Name the new page JavaScriptTest. From the Page tab in the ribbon, click Save. Also from the Page tab, click the arrow under the Edit button and select Edit In SharePoint Designer. In SharePoint Designer, from the Home tab on the ribbon, select Advanced Mode. In
the Content control with the ID PlaceHolderAdditionalPageHead, add the
following markup after the SharePoint:RssLink tag (on one line): <SharePoint:ScriptLink runat="server" Name="sp.js"
Localizable="false" LoadAfterUI="true"/>
Scroll to the bottom of the page, and before the WebPartPage:WebPartZone tag, add the following markup (on one line): <script type="text/javascript"
src="../SilverlightControls/JScriptTest.js" ></script>
<div id="DemoConsole"></div>
Click
the Save icon in the upper-left corner of the window to save the
changes to SharePoint. Click Yes in the Site Definition Page Warning.
|