The GridView is an extremely flexible grid
control that displays a multicolumn table. Each record in your data
source becomes a separate row in the grid. Each field in the record
becomes a separate column in the grid.
1. Automatically Generating Columns
The GridView provides a DataSource property for the data object you want to display.
Once you've set the DataSource property, you call the DataBind() method
to perform the data binding and display each record in the GridView.
However, the GridView doesn't provide properties, such as DataTextField
and DataValueField, that allow you to choose what column you want to
display. That's because the GridView automatically generates a column
for every field, as long as the AutoGenerateColumns property is True (which is the default).
Here's all you need to create a basic grid with one column for each field:
<asp:GridView ID="GridView1" runat="server" />
Once you've added this GridView tag to your page, you
can fill it with data. Here's an example that performs a query using
the ADO.NET objects and binds the retrieved DataSet:
Protected Sub Page_Load(ByVal sender As Object, _
  ByVal e As EventArgs) Handles Me.Load

    ' Define the ADO.NET objects.
    Dim connectionString As String = _
      WebConfigurationManager.ConnectionStrings("Northwind").ConnectionString
    Dim selectSQL As String = _
      "SELECT ProductID, ProductName, UnitPrice FROM Products"
    Dim con As New SqlConnection(connectionString)
    Dim cmd As New SqlCommand(selectSQL, con)
    Dim adapter As New SqlDataAdapter(cmd)

    ' Fill the DataSet.
    Dim ds As New DataSet()
    adapter.Fill(ds, "Products")

    ' Perform the binding.
    GridView1.DataSource = ds
    GridView1.DataBind()
End Sub
Remember, in order for this code to work you must
have a connection string named Northwind in the web.config file.
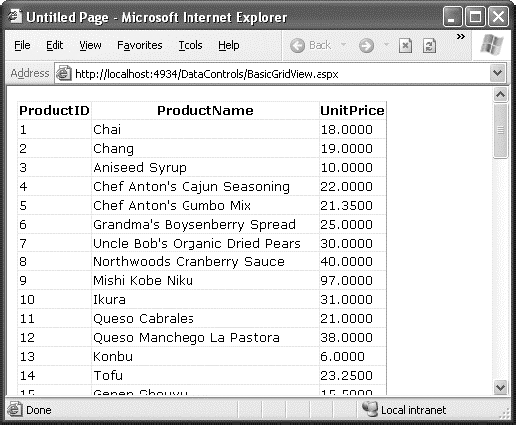
Figure 1 shows the GridView this code creates.
Of course, you don't need to write this data access
code by hand. You can use the
SqlDataSource control to define your query. You can then link that query
directly to your data control, and ASP.NET will take care of the entire
data binding process.
Here's how you would define a SqlDataSource to perform the query shown in the previous example:
<asp:SqlDataSource ID="sourceProducts" runat="server"
  ConnectionString="<%$ ConnectionStrings:Northwind %>"
  SelectCommand="SELECT ProductID, ProductName, UnitPrice FROM Products" />
Next, set the GridView.DataSourceID property to link the data source to your grid:
<asp:GridView ID="GridView1" runat="server"
DataSourceID="sourceProducts" />
These two tags duplicate the example in Figure 1 but with significantly less effort. Now you don't have to write any code to execute the query and bind the DataSet.
Using the SqlDataSource has positive and negative
sides. Although it gives you less control, it streamlines your code
quite a bit, and it allows you to remove all the database details from
your code-behind class.
2. Defining Columns
By default, the GridView.AutoGenerateColumns property
is True, and the GridView creates a column for each field in the bound
DataTable. This automatic column generation is good for creating quick
test pages, but it doesn't give you the flexibility you'll usually want.
For example, what if you want to hide columns, change their order, or
configure some aspect of their display, such as the formatting or
heading text? In all these cases, you need to set AutoGenerateColumns to
False and define the columns in the <Columns> section of the
GridView control tag.
|
It's possible to have AutoGenerateColumns set to True
and define columns in the <Columns> section. In this case, the
columns you explicitly define are added before the autogenerated
columns. However, for the most flexibility, you'll usually want to
explicitly define every column.
|
|
Each column can be any of several column types, as described in Table 1. The order of your column tags determines the left-to-right order of columns in the GridView.
Table 1. Column Types
| Class | Description |
|---|
| BoundField | This column displays text from a field in the data source. |
| ButtonField | This column displays a button in this grid column. |
| CheckBoxField | This
column displays a check box in this grid column. It's used
automatically for true/false fields (in SQL Server, these are fields
that use the bit data type). |
| CommandField | This column provides selection or editing buttons. |
| HyperLinkField | This column displays its contents (a field from the data source or static text) as a hyperlink. |
| ImageField | This column displays image data from a binary field (providing it can be successfully interpreted as a supported image format). |
| TemplateField | This
column allows you to specify multiple fields, custom controls, and
arbitrary HTML using a custom template. It gives you the highest degree
of control but requires the most work. |
The most basic column type is BoundField, which binds
to one field in the data object. For example, here's the definition for
a single data-bound column that displays the ProductID field:
<asp:BoundField DataField="ProductID" HeaderText="ID" />
This tag demonstrates how you can change the header text at the top of a column from ProductID to just ID.
Here's a complete GridView declaration with explicit columns:
<asp:GridView ID="GridView1" runat="server" DataSourceID="sourceProducts"
 AutoGenerateColumns="False">
  <Columns>
    <asp:BoundField DataField="ProductID" HeaderText="ID" />
    <asp:BoundField DataField="ProductName" HeaderText="Product Name" />
    <asp:BoundField DataField="UnitPrice" HeaderText="Price" />
  </Columns>
</asp:GridView>
Explicitly defining columns has several advantages:
You can easily fine-tune your column order, column headings, and other details by tweaking the properties of your column object.
You
can hide columns you don't want to show by removing the column tag.
(Don't overuse this technique, because it's better to reduce the amount
of data you're retrieving if you don't intend to display it.)
You'll
see your columns in the design environment (in Visual Studio). With
automatically generated columns, the GridView simply shows a few generic
placeholder columns.
You can add extra columns to the mix for selecting, editing, and more.
This example shows how you can use this approach to
change the header text. However, the HeaderText property isn't the only
column property you can change in a column. In the next section, you'll
learn about a few more.
2.1. Configuring Columns
When you explicitly declare a bound field, you have the opportunity to set other properties. Table 2 lists these properties.
Table 2. BoundField Properties
| Property | Description |
|---|
| DataField | Identifies the field (by name) that you want to display in this column. |
| DataFormatString | Formats the field. This is useful for getting the right representation of numbers and dates. |
| ApplyFormatInEditMode | If
True, the DataFormat string is used to format the value even when the
value appears in a text box in edit mode. The default is False, which
means the underlying value will be used (such as 1143.02 instead of
$1,143.02). |
| FooterText, HeaderText, and HeaderImageUrl | Sets
the text in the header and footer region of the grid if this grid has a
header (GridView.ShowHeader is True) and footer (GridView.ShowFooter is
True). The header is most commonly used for a descriptive label such as
the field name; the footer can contain a dynamically calculated value
such as a summary. To show an image in the header instead of text, set the HeaderImageUrl property. |
| ReadOnly | If
True, it prevents the value for this column from being changed in edit
mode. No edit control will be provided. Primary key fields are often
read-only. |
| InsertVisible | If
True, it prevents the value for this column from being set in insert
mode. If you want a column value to be set programmatically or based on a
default value defined in the database, you can use this feature. |
| Visible | If
False, the column won't be visible in the page (and no HTML will be
rendered for it). This gives you a convenient way to programmatically
hide or show specific columns, changing the overall view of the data. |
| SortExpression | Sorts your results based on one or more columns. |
| HtmlEncode | If
True (the default), all text will be HTML encoded to prevent special
characters from mangling the page. You could disable HTML encoding if
you want to embed a working HTML tag (such as a hyperlink), but this
approach isn't safe. It's always a better idea to use HTML encoding on
all values and provide other functionality by reacting to GridView
selection events. |
| NullDisplayText | Displays
the text that will be shown for a null value. The default is an empty
string, although you could change this to a hard-coded value, such as
"(not specified)." |
| ConvertEmptyStringToNull | If True, converts all empty strings to null values (and uses the NullDisplayText to display them). |
| ControlStyle, HeaderStyle, FooterStyle, and ItemStyle | Configures
the appearance for just this column, overriding the styles for the row.
|
2.2. Generating Columns with Visual Studio
As you've already learned, you can create a GridView
that shows all your fields by setting the AutoGenerateColumns property
to True. Unfortunately, when you use this approach you lose the ability
to control any of the details over your columns, including their order,
formatting, sorting, and so on. To configure these details, you need to
set AutoGenerateColumns to False and define your columns explicitly.
This requires more work, and it's a bit tedious.
However, there is a nifty trick that solves this
problem. You can use explicit columns but get Visual Studio to create
the column tags for you automatically. Here's how it works: select the
GridView control, and click Refresh Schema in the smart tag. At this
point, Visual Studio will retrieve the basic schema information from
your data source (for example, the names and data type of each column)
and then add one <BoundField> element for each field.
|
If you modify the data source so it returns a
different set of columns, you can regenerate the GridView columns. Just
select the GridView, and click the Refresh Schema link in the smart tag.
This step will wipe out any custom columns you've added (such as
editing controls).
|
|
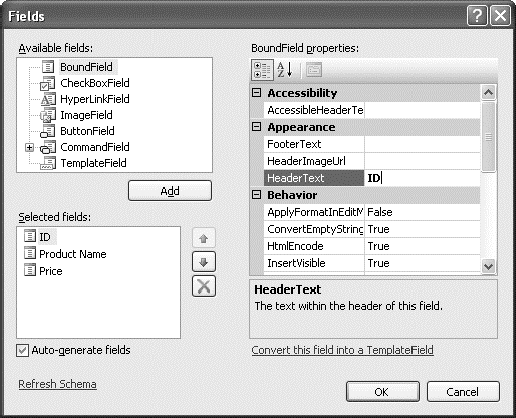
Once you've created your columns, you can also use
some helpful design-time support to configure the properties of each
column (rather than editing the column tag by hand). To do this, select
the GridView, and click the ellipsis ( . . . ) next to the Columns
property in the Properties window. You'll see a Fields dialog box that
lets you add, remove, and refine your columns (see Figure 2).
Now that you understand the underpinnings of the
GridView, you've still only started to explore its higher-level
features. In the following sections, you'll tackle these topics:
Formatting:
How to format rows and data values
Selecting:
How to let users select a row in the GridView and respond accordingly
Editing:
How to let users commit record updates, inserts, and deletes
Sorting:
How to dynamically reorder the GridView in response to clicks on a column header
Paging:
How to divide a large result set into multiple pages of data
Templates:
How to take complete control of designing, formatting, and editing by defining templates