6. Launch Sweet Home 3D and you’ll see four panels. The top-left shows
the library of models, and below is a list of models used in your design. The
top-right is a plan view, where the design takes place. Below that is a 3D
view. To create the perimeter walls of the room, you must know its
measurements, including celling height and distance from the corner to windows
and doors. Click the File menu, Preferences, and type the ceiling height into
the ‘New walls height’ box. Set New wall thickness to 100mm and click OK. Click
the Create Walls button. Click in the plan view and move the mouse to create
the first wall. Click to form a corner and continue until all the walls are
created, then hit Esc.

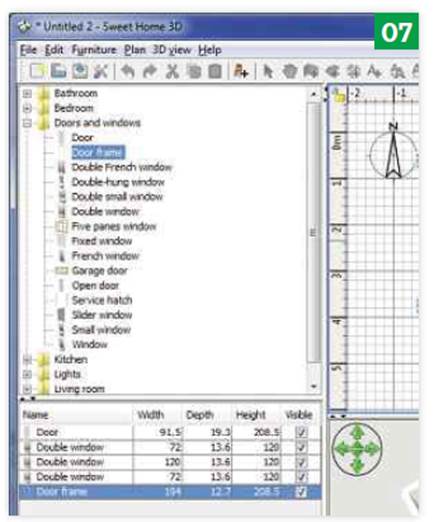
7. In the top-left panel, click to expand to Doors and windows folder
and drag the items into your model. They’ll snap to the walls and, as you drag
them into place, measurements will show how far along the wall they are. To set
the doors and windows’ width, double-click and change the Width value in the
pop-up box. For windows, you might want to set the Height and Elevation values,
too, where elevation is the height from the floor.
You can change
these values directly in the plan view. When an object is selected, handles
appear in the four corners, controlling width and depth, height, elevation and
rotation. The move an object, click in the center and drag it. Give the 3D view
a spin by dragging with the mouse to see how your room looks.
Click
the Create Rooms button (to the right of Create Walls) and double-click inside
your room in the plan view
8. Click the Create Rooms button (to the right of Create Walls) and
double-click inside your room in the plan view. This adds a floor and ceiling
to your model, although the ceiling isn’t visible yet.
Now is a good
time to add some color to your room. Return to the Select tool (an arrow icon),
double-click the floor and, in the dialog box that appears, choose a color or
texture for the floor and ceiling. You can import JPEGs to use as textures, and
even take a photo of your floor to use here. Click the button beside Texture,
Import, Choose image and browse to the JPEG. Click Continue, name the texture
and enter the size, which defines how regularly the image is repeated. Use this
process to add color or texture to your walls. You’ll need to change each
wall’s color individually.
Click the Create Rooms button (to the right of Create Walls) and
double-click inside your room in the plan view.
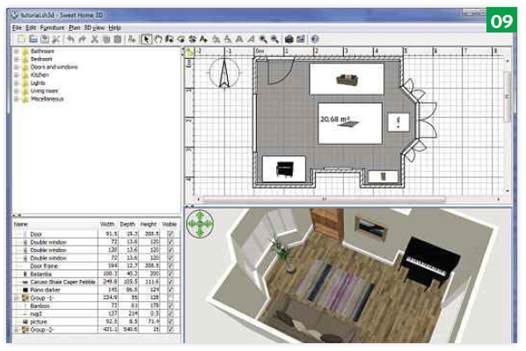
9. Fill your room with the 3D models created in SketchUp. Right-click
the top-left panel and select Import furniture. Click Choose model, locate the
DAE file you created and double-click to select it. Click Continue and use the
buttons to make it face the right way. Click Continue and name the model,
choose a folder and check the external dimensions are correct. If you’re using
a model from the 3D Warehouse, you may need to untick Keep proportions and
adjust width, depth and height. Click Continue, Finish to add the model to
Sweet Home 3D’s library. Drag the models into the room, trying out ideas and
inspecting them in the 3D view.
Sweet
Home 3D’s standard 3D view looks basic, but it can generate higher quality
images with shadows and reflections
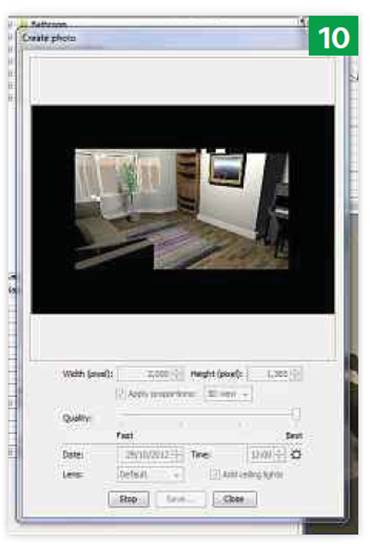
10. Sweet
Home 3D’s standard 3D view looks basic, but it can generate higher quality
images with shadows and reflections. Adjust the dividing lines between the four
panels so the 3D view is photo-shaped. Rotate and zoom it as necessary. It
might be worth switching to Virtual Visit to get an eye-level view of the room;
do this by right-clicking the 3D view. Right-click again, select Modify virtual
visitor, and increase the Field of view to 1000 for a wide-angle
view that takes in the whole room. Right-yet click again and select Create
Photo. Drag the Quality slider to Best and increase the Width to 2,000 to
generate a high-resolution image. Adjust the date and time to see sunlight
coming through the windows (adjust the compass in the plan view for
authenticity). Click Create and then, when the image is generated, click Save
to save it to your hard disk.
Sweet
Home 3D’s standard 3D view looks basic, but it can generate higher quality
images with shadows and reflections.