Internet Explorer security zones play an
important role in ensuring the security of Windows Vista systems. You
can use security zones to restrict or permit access to specific types
of Web content, including ActiveX controls and plug-ins, file and font
downloads, Java applets, and scripts. You can also use security zones
to control the types of actions users can perform while viewing Web
content. For example, you can enable launching of programs within an
internal browser frame, known as an IFRAME, but disable installation of
desktop items.
Group Policy can be used to manage security zones in
several ways. You can set policies that control the user actions with
regard to security zones and customize the settings for each security
zone. Before exploring how these procedures are implemented, let's look
at what security zones are and how they are used.
Understanding Security Zones
Security zones are used to control Web content
permissions for various content servers based on where they are located
and what is known about them. Each security zone is assigned a default
security level, which ranges from low to high. Low security means that
most actions are permitted and the security restrictions are very
relaxed. High security means that most actions are disabled and the
security restrictions are very stringent.
You
can override the security level by assigning a new security level or
setting a custom level. Either way, the security level consists of
dozens of parameters that typically are enabled, disabled, or set to
prompt a user before the related feature can be invoked. The security
zones to which the parameters apply are as follows:
-
Restricted Sites Controls user access to Web
content on sites that could potentially damage a computer or its data.
Default security level is High.
Security With Windows Vista, the Binary And Script Behaviors
security setting is disabled by default in the Restricted Sites zone.
This important security change is designed to prevent the execution of
scripts and other components that encapsulate functionality for HTML
elements. In other zones, Binary And Script Behaviors is enabled by
default, which could allow the execution of malicious scripts.
-
Trusted Sites Controls user access to Web content
on sites that are explicitly trusted and are considered to be free of
content that could damage or harm the computer and its data. Default
security level is a slightly modified version of Low, which allows
downloading of unsigned ActiveX controls and sets Java permissions to
Medium security.
-
Local Intranet Controls user access to Web content
on the local network, which can include local (intranet) sites, sites
bypassed by the proxy server, and all network paths, such as Universal
Naming Conventions (UNCs). Default security level is Medium-Low.
-
Internet Controls users' access to Web content on all sites not placed in other zones. Default security level is Medium-High.
Obvious security risks result from the enabling of
ActiveX controls, plug-ins, Java applets, scripts, and downloads. A
not-so-obvious risk results from the Logon parameter, which determines
whether user name and password information is sent automatically to
content servers when a logon is needed. Of all the available
parameters, Logon is the one that most people overlook. The key risk
from the Logon parameter is that computers outside the network can gain
access to logon names for your network and unauthorized external users
could use the logon names to stage attacks on your system.
With the Logon parameter, all security levels except High present a potential security risk:
-
With High security, content servers prompt for a
user name and password when a logon is needed, and information is never
passed automatically.
-
With Medium-High, Medium, or Medium-Low security,
the current user name and password are automatically returned for logon
requests to resources in the Intranet zone. Unlike earlier versions of
Windows, Windows Vista uses automatic intranet network detection by
default so the current user name and password are only returned for
resources on the intranet network. If Windows Vista is unable to detect
the intranet network automatically, you may need to manually configure
the intranet zone settings. In this case, intranet sites, network paths
(UNCs), and sites bypassed by the proxy server could all be considered
as being in the intranet zone. And it is the bypassed sites that are
easy to forget when you're considering possible security issues.
-
With Low security, logon information is returned
for logon requests from content servers in any zone. This is a
dangerous setting when used with external content servers.
Controlling Security Zone Usage Through Group Policy
As you set out to better manage security zone
usage, you might want to implement restrictions on who can change
security zone settings and how settings are applied. Several policies
control security zone modification and usage:
-
Security Zones: Use Only Machine Settings Enabling
this policy sets security zone settings by machine rather than by user.
The policy is intended to ensure that security zones are consistently
applied to all users of a computer. Unfortunately, if you enable this
policy without also preventing users from changing security zones, any
user could make changes to security zones that affect all other users
of the computer. This policy is located under Computer
Configuration\Administrative Templates\Windows Components\Internet
Explorer.
-
Security Zones: Do Not Allow Users To Change Policies
Enabling this policy prevents users from changing security zone
settings. If you enable this policy, the Custom Level and Default Level
buttons are disabled on the Security tab of the Internet Properties
dialog box. This prevents users from changing the security zone
settings established by the administrator. This policy is located under
Computer Configuration\Administrative Templates\Windows
Components\Internet Explorer.
-
Security Zones: Do Not Allow Users To Add/Delete Sites
Enabling this policy disables the Sites button on the Security tab of
the Internet Properties dialog box. This prevents users from modifying
the site management settings for the Local Intranet, Trusted Sites, and
Restricted Sites zones, which means users cannot add sites, remove
sites, or change the Include settings for the Local Intranet zone. This
policy is located under Computer Configuration\Administrative
Templates\Windows Components\Internet Explorer.
-
Disable The Security Page Enabling this policy
removes the Security tab in the Internet Properties dialog box. This
prevents users from making any changes to security zones. This policy
takes precedence and overrides Security Zones: Do Not Allow Users To
Change Policies and Security Zones: Do Not Allow Users To Add/Delete
Sites. This policy is located under User Configuration\Administrative
Templates\Windows Components\Internet Explorer\Internet Control Panel.
Enable
one or more of these policies to enforce restrictions on changing
security zone settings. Double-click the policy, select Enabled, and
then click OK.
Windows Vista includes policies for locking down
the local machine security zone. This special security zone applies
only to the security of the local computer and is designed to prevent
users from making changes that could materially affect the security of
their computers. Any policies set under User
Configuration\Administrative Templates\Windows Components\Internet
Explorer\Internet Control Panel\Security Page\Locked-Down Local Machine
Zone are locked out in the local machine zone and set according to
their policy configuration. Rather than setting each policy
individually, you can use the Locked-Down Local Machine Zone Template
policy under User Configuration\Administrative Templates\Windows
Components\Internet Explorer\Internet Control Panel\Security Page to
set the local machine zone security so that it is consistent with a
specific security level.
Configuring Security Zones Through Group Policy
Through Group Policy, you can implement standard
settings for each security zone and deploy these settings to users of
one or more computers. Before doing this, you'll need to configure the
security settings for each of the four security zones, starting with
the Internet security zone. Once you configure the zones, you can
import the settings into the Security Zones And Content Ratings policy
by following this procedure:
-
Configure each of the four security zones as
discussed in this chapter. When you are finished, access User
Configuration\Windows Settings\Internet Explorer Maintenance\Security
in Group Policy and then double-click Security Zones And Content
Ratings.
-
Select Import The Current Security Zone Settings
And Privacy Settings and then click Modify Settings. You can now check
the security zone settings you defined previously.
-
When you are finished, click OK twice to apply the policy.
Configuring the Internet Security Zone
The Internet security zone sets Web content
permissions for all sites not placed in other zones. The default
security level for the Internet Security zone is Medium-High. Follow
these steps to configure the Internet security zone:
-
Access the Internet Properties dialog box and then select the Security tab.
-
Select Internet from the zone list.
-
To restore the default level if it was changed, click Default Level. Then click OK and skip the remaining steps.
-
To set a different or custom level, click Custom
Level. You can use the Security Settings dialog box to set a custom
level for individual parameters or reset the zone to a preset security
level.
-
If you want to use a custom level, use the buttons provided to set individual parameters and then click OK.
-
If you want to reset the zone to a particular
security level, select the level using the Reset To drop-down list,
click Reset, and then click OK. The standard security levels that can
be used for this zone are Medium, Medium-High, and High.
Configuring the Local Intranet Zone
The Local Intranet security zone sets Web content
permissions on the local network. The default security level is
Medium-Low. You can configure this zone by completing these steps:
-
In the Internet Properties dialog box, click the
Security tab and then click Local Intranet in the zone list.
-
Next define which sites are included in the Local
Intranet zone by clicking Sites. This displays the Local Intranet
dialog box, shown in Figure 1.
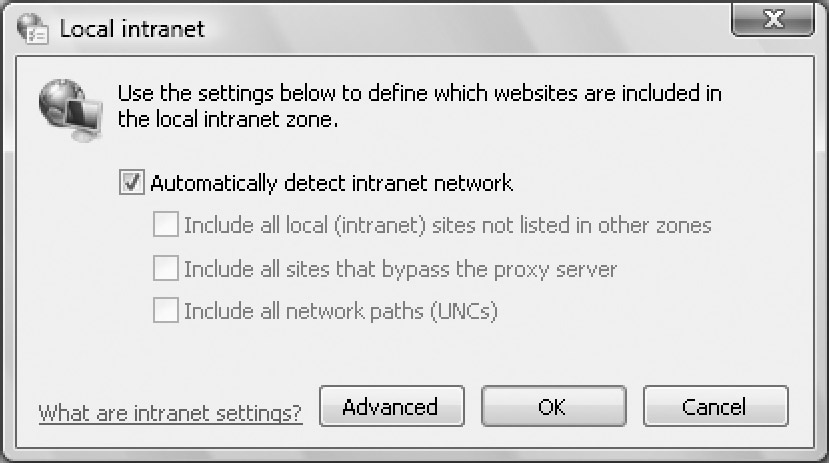
Figure 1: If
automatic detection doesn't work, optimize the Local Intranet settings
for your environment by including or excluding various options.
-
By default, Internet Explorer attempts to
automatically detect whether the user is on the intranet network and if
so, sets address checking appropriately. If Windows Vista is unable to
detect the intranet network automatically, you may need to manually
configure the intranet zone settings. To do this, clear Automatically
Detect Intranet Network and then include or exclude local (intranet)
sites not listed in other zones, sites that bypass the proxy server,
and network paths (UNCs). To include a resource, select the related
check box. To exclude a resource, clear the related check box.
-
If you want to specify additional sites for the
Local Intranet zone or require secure verification using Hypertext
Transfer Protocol Secure (HTTPS) for all servers in the Local Intranet
zone, click Advanced. This displays a new Local Intranet dialog box, in
which you can do the following:
-
q Add a site by typing its IP address in the Add This Web Site To The Zone text box and then clicking Add.
-
q Remove previously defined sites by selecting the site in the Web Sites list box and then clicking Remove.
-
q Require secure verification using HTTPS by selecting Require Server Verification (HTTPS:) For All Sites In This Zone.
-
Click OK twice to close the Local Intranet dialog boxes.
Configuring the Trusted Sites Security Zone
The Trusted Sites security zone sets Web content
permissions for sites that are explicitly trusted and are considered to
be free of potentially offensive or unauthorized content and content
that could damage or harm the computer. By default, the security level
for this zone is set to Low. You can configure this zone by completing
these steps:
-
In the Internet Properties dialog box, click the
Security tab and then click Trusted Sites in the zone list.
-
Click Sites to define which sites are included in the Trusted Sites zone. This displays the Trusted Sites dialog box.
-
You can now add and remove trusted sites from
this zone. All Web sites in this zone will use the zone's security
settings. To add a site, type its IP address in the Add This Web Site
To The Zone text box and then click Add. To remove a site, select the
site in the Web Sites list box and then click Remove.
-
You can also require secure verification using
HTTPS. Select Require Server Verification (HTTPS:) For All Sites In
This Zone to enable this feature, or clear the related check box to
disable this feature.
-
Click OK.
Configuring the Restricted Sites Security Zone
The Restricted Sites security zone sets
permissions for sites with potentially offensive or unauthorized
content and content that could damage or harm the computer. By default,
the security level for this zone is set to High. You can place sites on
the restricted list by completing the following steps:
-
In
the Internet Properties dialog box, click the Security tab and then
click Restricted Sites in the zone list.
-
Click Sites to define which sites are included in the Restricted Sites zone. This displays the Restricted Sites dialog box.
-
To add a restricted site, type its IP address in the Add This Web Site To The Zone text box and then click Add.
-
To remove a site, select the site in the Web Sites list box and then click Remove.
-
Click OK twice to close the Restricted Sites and Internet Properties dialog boxes.
| Note |
Site restrictions don't prevent users from
accessing unauthorized sites; they merely establish a different
security level for these sites. To prevent users from accessing
restricted sites, you need to configure a proxy server or firewall.
|
|