In the previous section we installed Xen using
binary packages. It was quite simple and quick, and enabled us to get
Xen running easily especially because the hard job of matching the
hypervisor/host/guest kernel options was done by RedHat. However, this
means that you depend on the Xen pre-built packages, keeping up with the
changes taking place in Xen, which is a fast moving target with bug
fixes and features. You cannot take advantage of a brand new feature or a
bug fix that was added recently and which is quite crucial for your
use. The binary packages usually track the release versions of Xen, so
there is no way for you to try out the development versions or the
pre-release versions. Here are some reasons why you should get
comfortable building Xen from the source code in the Xen revision
control repository hosted by Xensourc ( http://xenbits.xensource.com/):
You can access the latest bug fixes or new features immediately.
You can experiment with Xen to learn how it works.
You can extend and build products on top of Xen.
You can share the bug fixes or improvements you made with the Xen community.
You can create customized versions of Xen to use within your enterprise or as a commercial product.
In this section we are going
to get the latest source code for the next pre-release version of Xen
and build it from scratch. We will then install it on our base Fedora
system and use it.
Time for Action—Compile Xen
We are going to
retrieve the source code, install all the required dependencies, compile
the source and, finally, install it on our Fedora Core 6 system.
Create a directory that will be used to store the Xen source files and change to this new directory.
mkdir ~/xen-sourcecd ~/xen-source
Xen
source is stored in a Mercurial revision control repository. You will
need to install the mercurial client that can be used for checking out
the source code. Use yum to install mercurial.
Now
we are going to checkout the latest version of the Xen source files.
There are several different versions of Xen in the mercurial repository:
xen-3.0.4-testing.hg: pre-release of the next 3.0.4 version of Xen
xen-3.0.3-testing.hg: pre-release of the next 3.0.3 version of Xen
xen-3.0.2-testing.hg: pre-release of the next 3.0.2 version of Xen
xen-2.0-testing.hg: pre-release of the next 2.0 version of Xen
We will be using the 3.0.4 version of Xen in this article. Use the mercurial client (hg) to check out the source:
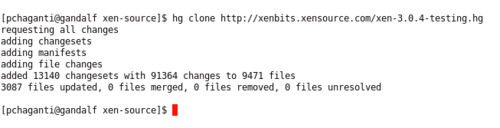
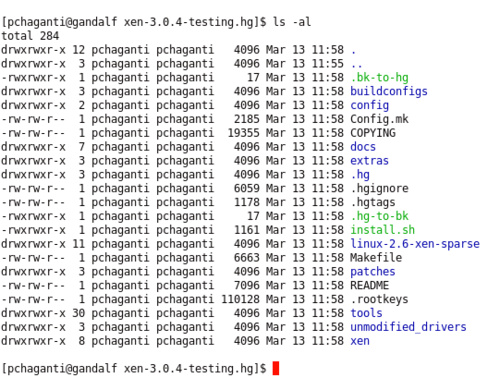
This will create a directory named xen-3.0.4-testing.hg under the xen-source directory and populate it with the source. The following screenshot shows a listing of the files and directories in it.
We are ready to
compile Xen. We need to install the pre-requisite packages that provide
the compiler, libraries, and development headers required for setting up
a Xen development environment. Here are the packages that need to be
installed on a Fedora Core 6 machine. If you have already compiled C
code on your machine, you may have some of these installed.
gcc: Contains the GNU Compiler Collection version 4.0 and is needed for compiling C code.
glibc-devel: Contains the object files necessary for developing programs, which use the standard C libraries.
libgomp: Contains GCC shared support library, which is needed for OpenMP 2.5 support.
glibc-headers: Contains the header files necessary for developing programs, which use the standard C libraries.
ncurses-devel: The header files and libraries for developing applications that use the ncurses terminal handling library.
openssl-devel:
Contains static libraries and include files needed to develop
applications that support various cryptographic algorithms and
protocols.
zlib-devel: Contains the header files and libraries needed to develop programs that use the zlib compression and decompression library.
xorg-X11-proto-devel: Contains all necessary include files and libraries needed to develop X11 applications.
python-devel: Contains the header files and libraries needed to develop Python extensions.
tetex-latex: Contains the LaTeX front end for the TeX text formatting system that is used for producing the documentation for Xen.
xen-devel: Contains the libraries and header files that are needed for compiling Xen from source.
Install these packages using yum:
yum install gcc glibc-devel xen-devel libgomp glibc-headersncurses-devel openssl-devel zlib-devel xorg-X11-proto-devel
python-devel tetex-latex
The
first step before we compile the kernel is to configure it. The
following command will bring up the familiar Linux kernel configuration
dialog. Accept the defaults unless you need to make changes to add
support for some drivers or other options. Exit the dialog and save the
changes when asked.
make linux-2.6-xen0-config
Compile the kernel and the modules.
make linux-2.6-xen0-build
The above command will compile and install the various artifacts from the build into the dist/install directory.
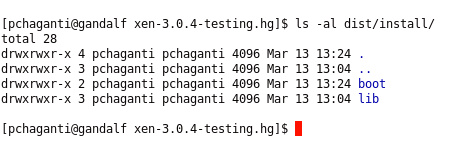
The
boot directory contains the configuration used for this Xen kernel, the
kernel image, and the kernel debugging symbols files.

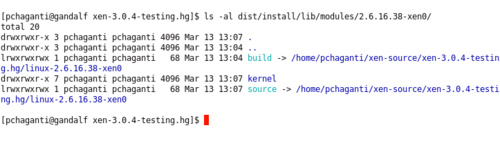
The lib directory contains all the kernel modules and drivers.
Install
these artifacts on to your system by running the following command as
root. This will install the kernel modules and copy the kernel image and
symbol files to /boot.
make linux-2.6-xen0-install
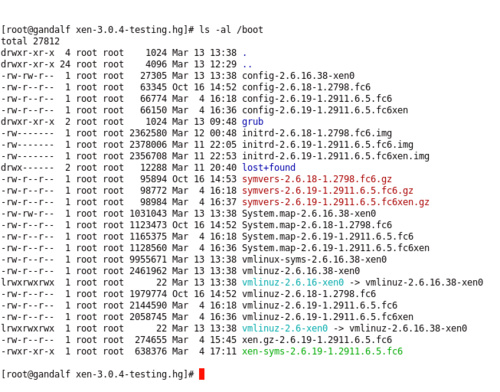
Following are the files in the /boot directory after running the above command.
Run depmod to create a list of module dependencies by reading each module under /lib/modules/2.6.16.38-xen0 and to determine what symbols it exports, and what symbols it needs
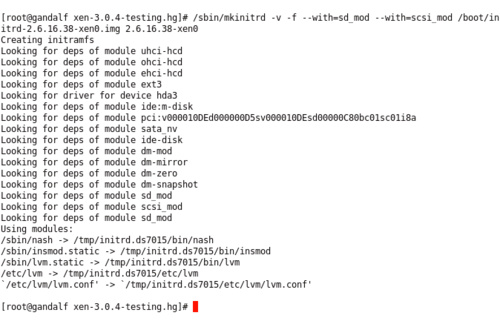
Create the initrd in the boot dir that will be used by the Xen kernel while booting.
Compile
and install the various Xen tools, libraries and Python modules.
Please make sure that you don't have the Xen tools binary package
installed before doing this.
make install KERNELS="linux-2.6-xen0"
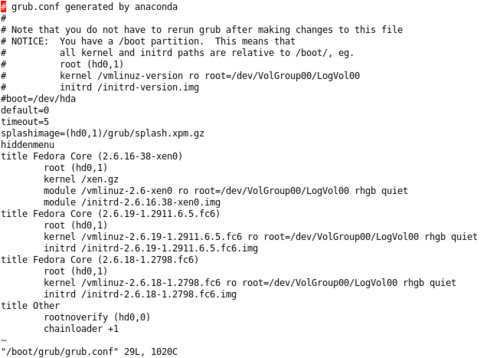
Modify grub to add an entry for booting this new Xen kernel.
Reboot into your new Xen system!
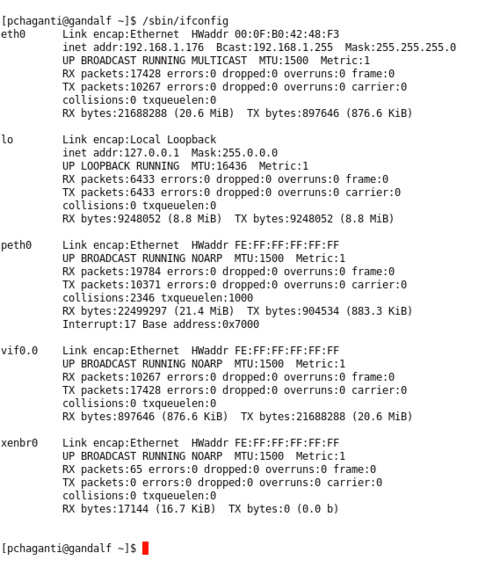
Check to make sure that everything started up fine.

Check the network interfaces to make sure they are all up and running.
You have successfully compiled and installed the development version of Xen in your machine and are now running it.
What Just Happened?
The source code for Xen is stored in a mercurial repository that is hosted at http://xenbits.xensource.com.
This is a public repository and contains the source code for the
open-source version of Xen. The code is tagged with different versions
for the stable and development versions. The stable released versions
are usually the ones that are available as pre-built packages. In the
previous section we used the pre-built packages for Xen 3.0.4 provided
by Fedora Core 6. However, there is a new pre-release version of Xen
that has several bug fixes and enhancements. It would be nice to use
this or any other version of Xen for that matter, without depending on a
pre-built package of Xen. We first installed the mercurial client used
for retrieving the source. We also installed all the pre-requisites for
compiling C code including the gcc
compiler collection. You may already have some of these packages if you
have ever compiled C code on your system. Also, there are some
libraries such as openssl and zlib that are needed to compile Xen.
The Makefile
provided with the Xen distribution has several pre-defined targets
that we can use for compiling Xen. the following were used in this
section:
linux-2.6-xen0-config: This target is used for configuring the dom0 kernel. The default will configure the linux kernel using the familiar menuconfig
option that brings up a
ncurses
dialog based
configuration utility. You can configure the various options to fine
tune the dom0 kernel to your specifications. You can also select a
different interface for configuration. Running this target for the first
time will download linux-2.6.16.38 from http://kernel.org to the current directory. This unmodified kernel is referred to as a pristine kernel. It is downloaded and stored locally in a directory called pristine-linux and is also archived to a bzip file. A dom0 directory named linux-2.6.16.38-xen0
is created, Xen patches are then applied to the pristine kernel in this
directory to create the dom0 kernel. This is the kernel that is
configured when we run this target. If you are new to Linux kernel
configuration the following resources will be useful:
linux-2.6-xen0-build:
This target compiles the kernel and the modules using the
configuration from the previous step. The compiled kernel and modules
are installed into a dist/install directory created within the current directory.
linux-2.6-xen0-install: This target will take everything from the dist/install directory and install it on to the local system. The kernel and the kernel configuration file are copied to the /boot
directory along with the kernel symbols file that is helpful for
debugging. In order to do this you must have administrative privileges.
So either use sudo or become the super user by using su before you execute this target.
install KERNELS="linux-2.6-xen0":
This target will compile the Xen libraries and Python modules and
install them on to the system. Once again you will need administrative
privileges in order to do this.
We have installed most of the things needed to run the pre-release version of Xen. After the compilation, we also created an initrd
image that can be used for booting. This was automatically installed for
us when we installed Xen using a pre-built package. Since we compiled
the kernel ourselves in this section, we created the
initrd image by using the
mkinitrd
command. Finally we added an entry to the
/boot/grub/grub.conf