6. Incorporating scripts in a Windows PE image
It is recommenced that
you keep your actual script on an accessible network share and not
within the Windows PE image so that you may easily test and modify it
without a need to rebuild and deploy the WIM.
There are a couple of ways to trigger the execution of scripts:
Editing the StartNet script
Editing the StartNet script (STARTNET.CMD)
is the easiest and most effective way to customize Windows PE startup
actions. You may edit the script directly or you may have this script
make a call to one of your own. If you are familiar with a batch file
(.BAT), a CMD file is the very same thing.
The script is located at C:\winpe_x86\mount\Windows\System32\Startnet.cmd.
By default, the script contains a comment and one command: wpeinit.
Wpeinit is a command line tool that initializes Windows PE each time it
boots. It installs PnP devices, processes Unattend.xml settings, and
loads network resources.
Specifying an alternate shell
The default shell that is
called by Windows PE is cmd.exe (the command prompt). You can, however,
change this behavior to launch your own script or supported executable.
To specify an alternate shell, follow these steps:
With the image mounted for read/write (/MountRW), run
notepad.exe
and enter the following text in a new file to be saved in the Windows\System32 folder of your mounted image as "myscript.cmd" (C:\winpe_x86\mount\Windows\System32\myscript.cmd)
@echo off
echo starting network...
wpeinit
echo mapping network drive...
net use q: \\server\share\tools Password1 /USER:appdeploy\
   bkelly
echo launching new cmd instance...
cmd /k
echo Ready to reboot.
pause
Create a second file in Notepad to be saved in the same location with a name of winpeshl.ini(C:\winpe_x86\mount\Windows\System32\winpeshl.ini) and enter the following text:
[LaunchApp]
AppPath = %SYSTEMROOT%\System32\myscript.cmd
NOTE
The AppPath entry does not support command line options.
After you are done editing your image, commit the changes back to the mounted image using the ImageX Unmount command:
Imagex /Unmount /Commit c:\winpe_x86\mount
|
When the shell closes, Windows PE reboots, so make sure to control the completion of your script.
|
|
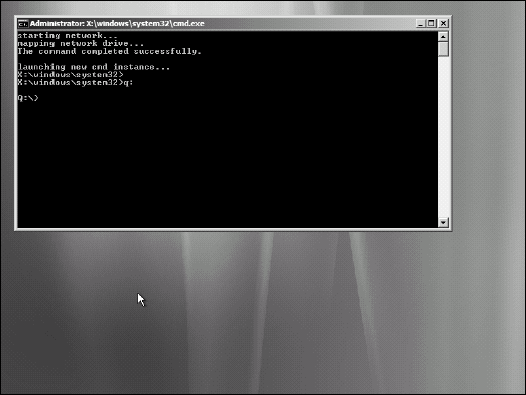
After following the
above steps, Windows PE will run the script that initializes the
network, map drive Q to a network share, and then start a new command
shell so that the user can perform actions without the script closing
(see Figure 1).
If the script were to close, the computer would be restarted. This
method allows the user to enter commands, and when done, typing exit
would return them to the script (where they would see the Ready to
reboot message).
7. Create a bootable ISO from WIM image
Creating a bootable ISO
image is a typical final step in customizing Windows PE. You can burn
this to a CD or DVD to use in production. For testing, a virtual machine
is the perfect tool due to a common feature that allows you to mount an
ISO as a virtual disk from which you can easily boot.
With the details of
each of these command lines already covered, here is an example of using
these tools to get your edited image in the form of an ISO.
Unmount the image and commit any changes:
imagex /unmount /commit c:\winpe_x86\mount
Copy
the updated Windows PE image over the existing boot.wim in the ISO
sources directory (answer yes if asked to confirm the overwriting of the
file):
copy c:\winpe_x86\winpe.wim c:\winpe_x86\iso\sources\boot.wim
Use the OSCDImg command line tool discussed earlier to generate the ISO:
oscdimg -n -bc:\winpe_x86\etfsboot.com c:\winpe_x86\ISO c:\
   winpe_x86\winpe_x86.iso
8. Configure a UFD to boot to Windows PE
A USB flash drive (UFD) can
be a handy deployment mechanism for Windows PE as compared to a CD or
DVD in that it can hold more, it can be accessed more quickly, and it
fits much better in your pocket. Not all computers will support booting
from a USB device, but most new computer motherboards do offer such
support. Enter your BIOS menu at startup to see what boot devices are
available (you can typically reorder such devices to dictate priority).
Unmount the image and commit any changes:
imagex /unmount /commit c:\winpe_x86\mount
Copy
the updated Windows PE image over the existing boot.wim in the ISO
sources directory (answer yes if asked to confirm the overwriting of the
file):
copy c:\winpe_x86\winpe.wim c:\winpe_x86\iso\sources\boot.wim
Now launch a command prompt as administrator by right-clicking the command prompt icon and choosing Run as administrator.
To launch the DiskPart command line tool, type:
DISKPART
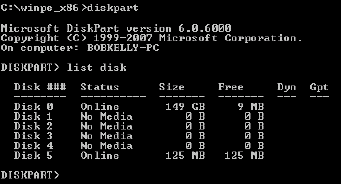
List the available disks to determine which is that of your UFD. It is very important that you determine the proper disk number
because all data will be removed from the specified disk when following
these steps. To list the disks, type the following command and, based
on its capacity, note the number that corresponds with your UFD (see Figure 2):
LIST DISK
Select the disk by number based on what was determined to be the correct drive in the previous step (be certain to select the correct disk!):
SELECT DISK 5
Now that the proper disk is selected, prepare it with the clean command:
CLEAN
Now create a partition on the clean drive:
CREATE PARTITION PRIMARY
Select the newly created partition:
SELECT PARTITION 1
Set the partition as active with the Active command:
ACTIVE
Format the partition with the Format command:
FORMAT
Assign the new partition with the Assign command:
ASSIGN
To quit DiskPart use the Exit command:
EXIT
Now copy to the contents of the c:\winpe_x86\ISO folder to the USB disk. In the following sample command, the USB disk is on the E drive (substitute as needed):
XCOPY C:\WINPE_X86\ISO\*.* E: /E
NOTE
If you have
trouble locating your drive, go back into DiskPart, select the disk and
the volume and then run the Assign command again using the optional
argument Letter to specify a specific drive letter:
ASSIGN LETTER=E
There are situations
where this is necessary, for example, when a disconnected network drive
was mistakenly assigned the same drive as the UFD. Specifying an
explicit drive letter like this will alleviate any such problems.
Now
you should be able to boot from the USB flash disk. Make sure to select
the right boot device during the boot cycle or to change the boot order
in your computer's BIOS.