Scheduling Backup Jobs
To schedule a backup job,
create the job in the Backup Utility then click Start Backup and
configure advanced backup options. After all options have been
configured, click Schedule and, in the Set Account Information dialog
box, type the user name and password of the account to be used by the
backup job.
Security Alert
Security
best practices suggest that you create an account for each service,
rather than run services under the System account. Do not configure a
service to run using a User account, such as your User account or the
Administrator account. When the password changes on a User account, you
must modify the password setting on all services that run under the
context of that account. The account for the backup job should belong to
the Backup Operators group. |
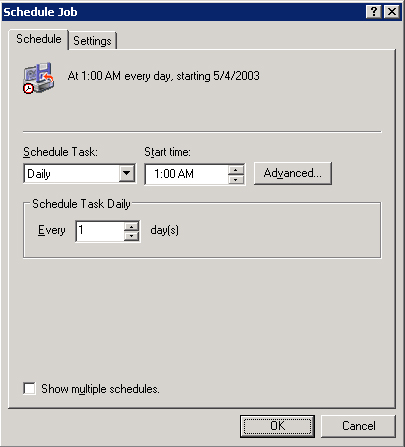
In the Scheduled
Job Options dialog box, enter a job name and click Properties. The
Schedule Job dialog box appears, as shown in Figure 2.
Configure the job date, time, and frequency. The Advanced button will
let you configure additional schedule settings including a date range
for the job. The Settings tab of the Schedule Job dialog box allows you
to refine the job, for example, by specifying that the job should only
take place if the machine has been idle for a period of time.
Once
a job has been scheduled, you can edit the schedule by clicking the
Schedule Jobs tab of the Backup Utility. Jobs are listed on a calendar.
Click a job to open its schedule. Although you can also add a backup job
by clicking Add Job on the Schedule Jobs tab, clicking Add Job will
launch the backup wizard so that you can select the files to back up and
some of the properties of the backup job. Most administrators find it
more convenient to create a backup job on the Backup tab directly, then
click Start Backup and Schedule, as described above.
Shadow Copies of Shared Folders
Windows Server 2003
supports another way for administrators and users alike to recover
quickly from damage to files and folders. Using VSS, Windows Server 2003
automatically caches copies of files as they are modified. If a user
deletes, overwrites, or makes unwanted changes to a file, you can simply
restore a previous version of the file. This is a valuable feature, but
is not intended to replace backups. Instead, it is designed to
facilitate quick recovery from simple, day-to-day problems—not recovery
from significant data loss.
Enabling and Configuring Shadow Copies
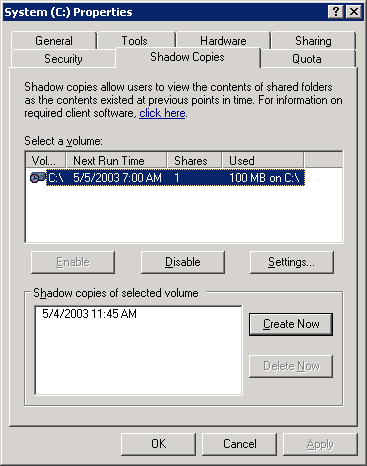
The
Shadow Copies feature for shared folders is not enabled by default. To
enable the feature, open the Properties dialog box of a drive volume
from Windows Explorer or the Disk Management snap-in. On the Shadow
Copies tab, as shown in Figure 3,
select the volume and click Enable. Once enabled, all shared folders on
the volume will be shadowed; specific shares on a volume cannot be
selected. You can, however, manually initiate a shadow copy by clicking
Create Now.
Caution
If
you click Disable, you delete all copies that were created by VSS.
Consider carefully whether you want to disable VSS for a volume or
whether you might be better served by modifying the schedule to prevent
new shadow copies from being made. |
The default
settings configure the server to make copies of shared folders at 7:00
A.M. and noon, Monday through Friday; and 10 percent of the drive space,
on the same drive as the shared folder, is used to cache shadow copies.
Each of the following settings can be modified by clicking Settings on the Shadow Copies tab:
Storage volume
To enhance performance (not redundancy), you can move the shadow
storage to another volume. This must be done when no shadow copies are
present. If shadow copies exist, and you want to change the storage
volume, you must delete all shadow copies on the volume, then change the
storage volume.
Details The dialog box lists shadow copies that are stored and space utilization statistics.
Storage limits
This can be as low as 100 MB. When the shadow copy runs out of storage,
it deletes older versions of files to make room for newer versions. The
proper configuration of this setting depends on the total size of
shared folders on a volume with shadowing enabled; the frequency with
which files change, and the size of those files; and the number of
previous versions you wish to retain. In any event, a maximum of 63
previous versions will be stored for any one file before the earliest
version is removed from the shadow storage.
Schedule You
can configure a schedule that reflects the work patterns of your users,
ensuring that enough previous versions are available without
prematurely filling the storage area and thereby forcing the removal of
old versions. Remember that when a shadow copy is made, any files that
have changed since the previous shadow copy are copied. If a file has
been updated several times between shadow copies, those interim versions
will not be available.
Using Shadow Copy
Shadow copies of
shared folders allow you to access previous versions of files that the
server has cached on the configured schedule. This will allow you to
Recover files that were accidentally deleted
Recover from accidentally overwriting a file
Compare versions of files while working
To access previous versions, click the properties of a folder or file and click the Previous Versions tab, as shown in Figure 4.
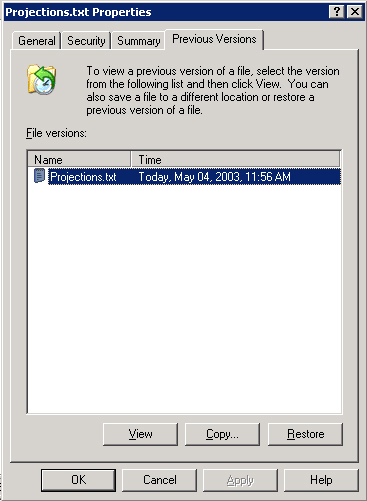
The Previous Versions
page will not be available if Shadow Copies is not enabled on the
server, or if there are no previous versions stored on the server. It
will also be unavailable if the shadow copy client has not been
installed on your system. This file is located in the %Systemroot%\System32\Clients\Twclient\x86
folder of a Windows Server 2003 system. The Windows Installer (.msi)
file can be deployed using Group Policy, SMS, or an e-mail message.
Finally, the Previous Versions page is only available when accessing a
file’s properties through a shared folder. If the file is stored on the
local hard drive, you will not see the Previous Versions tab, even if
the file is shared and VSS is enabled. See this lesson’s Practice for an
example.
You can then choose to Restore the file to its previous location or Copy the file to a specific location.
Exam Tip
Unlike
a true restore operation, when you restore a file with Previous
Versions, the security settings of the previous version are not
restored. If you restore the file to its original location, and the file
exists in the original location, the restored previous version
overwrites the current version and uses the permissions assigned to the
current version. If you copy a previous version to another location, or
restore the file to its original location but the file no longer exists
in the original location, the restored previous version inherits
permissions from the parent folder. |
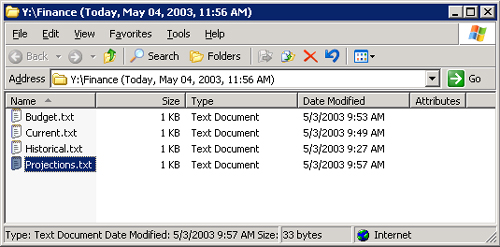
If a file has been
deleted, you obviously cannot go to the file’s Properties dialog box to
locate the Previous Versions page. Instead, open the Properties of the
parent folder, click the Previous Versions tab and locate a previous
version of the folder that contains the file you want to recover. Click
View and a folder window will open, as shown in Figure 5,
that displays the contents of the folder as of the time at which the
shadow copy was made. Right-click the file and choose Copy, then paste
it into the folder where you want the file to be recreated.
Shadow
copy, as you can see, is a useful addition to the toolset for managing
file servers and shared data. With VSS, you can preserve data sets at
scheduled points in time. Administrators or users can then restore
deleted or corrupted files, or compare files to previous versions. As
the VSS cache fills, old versions are purged and new shadow copies are
added.
If a user requires
data to be restored and that data is no longer available through
Previous Versions, you can restore the data from backup. If the server
becomes corrupted, you must restore the data from backup. Although VSS
enhances the manageability and resiliency of shared files, there is no
substitute for a carefully planned and verified backup procedure.
Practice: Advanced Backup and Restore
In
this practice, you will schedule a backup job, execute a backup from a
command prompt, and configure and use Shadow Copies of Shared Folders.
Exercise 1: Schedule a Backup Job
1. | Open the Backup Utility and click the Backup tab.
|
2. | From the Job menu, load the Finance Backup selections.
|
3. | Configure the Backup Media Or File Name: C:\Backup-Everyday.bkf.
|
4. | Click Start Backup.
|
5. | Click Advanced and configure an Incremental backup type. Click OK.
|
6. | Click Schedule.
|
7. | In the Set Account Information dialog box, type your password and click OK.
|
8. | Name the job Daily Incremental Backup.
|
9. | Click
Properties. Configure the job to run daily. Configure the time to be
two minutes from the current time so that you can see the results of the
job.
|
10. | Complete configuration of the scheduled job. You will be prompted to enter your password again.
|
11. | Close the Backup Utility.
|
12. | Open the C drive in Windows Explorer and wait two minutes. You will see the backup job appear.
|
13. | Open
the Backup Utility, choose the Report command from the Tools menu and
view the most recent backup log to confirm the status of the backup job.
The number of files copied may be zero if you have not made changes to
any of the files.
|
14. | If
the job did not run properly, open Event Viewer from the Administrative
Tools folder. Examine the Application Log to identify the cause of the
failure.
|
Exercise 2: Run a Backup from a Command Prompt
One of the easier ways to
determine the correct switches to use for a command prompt backup is to
schedule a backup, as you did in Exercise 1, and then examine the command that the scheduled task creates.
1. | Open the Backup Utility and click the Schedule Jobs tab.
|
2. | Click the icon, in the calendar, representing the scheduled job.
|
3. | Click Properties.
|
4. | Select the command in the Run box and press Ctrl+C to Copy it.
|
5. | Cancel to exit the Schedule Jobs dialog box and close the Backup Utility.
|
6. | Open the command prompt.
|
7. | Click
the window menu (the icon of the command prompt in the upper-left
corner of the command prompt window) and, from the Edit menu, choose
Paste. The Ntbackup command with all of its switches is pasted into the
command prompt. Press Enter. The backup job is executed.
Note It
is recommended that you delete the scheduled backup job at this point
in the Practice. You will schedule additional jobs in the Case Scenario,
and it will be easier to work with those jobs if the current schedule
is clear. In the Backup Utility, click the Schedule Jobs tab, then, in
the calendar, click the icon representing the scheduled job. Click
Delete. |
|
Exercise 3: Enable Shadow Copies
1. | Ensure that the C:\Data folder is shared and that the share permissions are configured to allow Everyone Full Control.
|
2. | Open My Computer.
|
3. | Right-click the C drive and choose Properties.
|
4. | Click the Shadow Copies tab.
|
5. | Select the C volume and click Enable.
|
6. | A message will appear. Click Yes to continue.
|
Exercise 4: Simulate Changes to Network Files
1. | Open the C:\Data\Finance folder and open Current.txt. Modify the file’s contents, then save and close the file.
|
2. | Delete the file C:\Data\Finance\Projections.txt.
|
Exercise 5: Recover Files Using Previous Versions
1. | Open the data share by clicking Start, choosing Run, and then typing \\server01\data.
Note It
is critical that you open the folder using its UNC, not its local path.
The Previous Versions tab is only available when connected to a shared
folder over the network. |
|
2. | Open the Finance folder.
|
3. | Right-click the Current.txt file and choose Properties.
|
4. | Select the Previous Versions tab.
|
5. | Select the previous version of Current.txt.
|
6. | Click Copy, select the Desktop as the destination, and then click Copy again.
|
7. | Click OK to close the Properties dialog box.
|
8. | Open Current.txt from your desktop. You will see that it is the version without the changes you made in Exercise 4.
|
9. | Return to \\Server01\Data. This time, do not open the Finance folder.
|
10. | To recover the deleted Projections.txt file, right-click the Finance folder and click Properties.
|
11. | Select the Previous Versions tab.
|
12. | Select the previous version of the Finance folder and click View.
A window opens showing the contents of the folder as of the time that the shadow copy was made.
|
13. | Right-click the Projections.txt file and choose Copy.
|
14. | Switch to the folder that shows you the current \\server01\data folder.
|
15. | Open the Finance folder.
|
16. | Paste the Projections.txt file into the folder. You have now restored the previous version of Projections.txt. |