3. Policy Removal Considerations
Table 1 summarizes what happens to redirected folders and their contents when a GPO no longer applies.
Table 1. Effects of Policy Removal Options
| When the Move The Contents Of Special Folder Type To The New Location setting is... | And the Policy Removal option is... | Results when the policy is removed are... |
|---|
| Enabled | Redirect The Folder Back To The Local Userprofile Location When Policy Is Removed | The special folder returns to its user profile location. |
| | | The contents are copied, not moved, back to the user profile location. |
| | | The contents are not deleted from the location they were redirected to. |
| | | The user continues to have access to the contents, but only on the local computer. |
| Disabled | Redirect The Folder Back To The Userprofile Location When Policy Is Removed | The special folder returns to its user profile location. |
| | | The contents are not copied or moved to the user profile location. |
| | | Caution: If the contents of a folder are not copied to the user profile location, the user can no longer see them. |
| Either Enabled or Disabled | Leave The Folder In The New Location When Policy Is Removed | The special folder remains at the location it was redirected to. |
| | | The contents remain at the location they were redirected to. |
| | | The user continues to have access to the contents at the location they were redirected to. |
4. Folder Redirection and Offline Files
Folder redirection provides users
with a central network access point for storing and finding
information, and it provides administrators with a central network
access point for managing information. However, in the event of a
network failure or for users who use portable computers, how will the
users be able to access the information in redirected folders? The
Offline Files feature provides users with access to redirected folders
even when they are not connected to the network. Offline Files
caches files accessed through folder redirection onto the hard drive of
the local computer. When a user accesses a file in a redirected folder,
the file is accessed and modified locally. When a user has finished
working with the file and has logged off, only then does the file
traverse the network for storage on the server.
Working Offline
If
the status of your network connection changes, Offline Files provides
notification by displaying an informational balloon over the
notification area (lower right corner of the desktop). If the
informational balloon notifies you that you are offline, you might or
might not be able to continue to work with your files as you normally
do. You can click the Offline Files icon in the notification area for
more information about the status of your connection.
If
you are working offline (either because you are disconnected from the
network or because you undocked your portable computer), you can still
browse network drives and shared folders in My Computer or My Network
Places. A red X appears over any
disconnected network drives. You can see only those files that you made
available offline and any files that you created after the network
connection was lost. Your permissions on the network files and folders
remain the same whether you are connected to the network or working
offline. When you are disconnected from the network, you can print to
local printers, but you cannot print to shared printers on the network.
Once
you reconnect to the network, the Synchronization Manager updates the
network files with changes that you made while working offline. When
you synchronize files, the files that you opened or updated while
disconnected from the network are compared to the files that are saved
on the network. As long as the files you changed haven’t been changed
by someone else while you were offline, your changes are copied to the
network.
If someone else made changes to
the same network file that you updated offline, you can keep your
version, the version on the network, or both. If you delete a network
file on your computer while working offline but someone else on the
network makes changes to that file, the file is deleted from your
computer but not from the network. If you change a network file while
working offline but someone else on the network deletes that file, you
can save your version onto the network or delete it from your computer.
If you are disconnected from the network when a new file is added to a
shared network folder that you have made available offline, the new
file is added to your computer when you reconnect and synchronize.
Setting Up Offline Files
If
you use redirected folders of any type, it is recommended that you set
up Offline Files. However, Offline Files does not depend on settings in
the Folder Redirection node and is set up and configured on network
shares separately from the Folder Redirection configuration. The tasks
for implementing Offline Files are:
1. | Configure the sharepoint.
|
2. | Configure computers to use Offline Files.
|
3. | Synchronize offline files and folders.
|
Configuring the Sharepoint
The
first step in setting up Offline Files is to configure the sharepoint.
You configure the sharepoint in the Sharing tab in the Properties
dialog box for the shared folder.
To configure the sharepoint, complete the following steps:
1. | Right-click the shared folder containing the offline files, and select Sharing And Security.
|
2. | In the Sharing tab in the Properties dialog box for the shared folder, click Offline Settings.
|
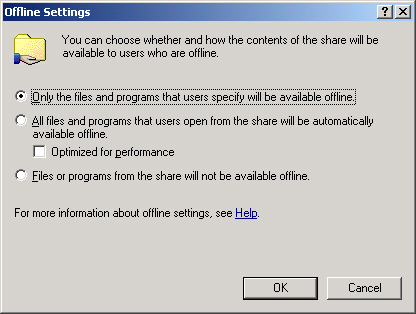
3. | In the Offline Settings dialog box, shown in Figure 4, select one of the following options:
Only
The Files And Programs That Users Specify Will Be Available Offline.
Select this option if you want users to be able to determine which
files will be available offline. All
Files And Programs That Users Open From The Share Will Be Automatically
Available Offline. Select this option if you want all files that users
open from the shared resource to be automatically available offline.
Select the Optimized For Performance check box if you want to
automatically cache programs so that they can be run locally. This
option is useful for file servers that host applications because it
reduces network traffic and improves server scalability. Files Or Programs From The Share Will Not Be Available Offline. Select this option to prevent users from storing files offline.
|
4. | |
5. | In the Properties dialog box for the shared folder, click OK.
|
Configuring Computers and Servers to Use Offline Files
After
you configure the sharepoint, you must configure clients to use Offline
Files. Windows 2000, Windows XP, and Windows Server 2003 are able to
use Offline Files. You can configure clients to use Offline Files
manually in the Offline Files tab in the Folder Options dialog box for
each client computer. Or, you can configure users’ computers and
servers to use Offline Files by setting policies in Administrative
Templates/Network/Offline Files in both the Computer Configuration and
User Configuration nodes. This section provides the procedure for
manually configuring clients to use Offline Files.
Important
In
Windows Server 2003, Remote Desktop For Administration (formerly known
as Terminal Services in Remote Administration mode in Windows 2000)
provides remote access to the desktop of any computer running a member
of the Windows Server 2003 family. Remote Desktop For Administration is
installed by default on computers running Windows Server 2003, but it
is not enabled by default. If
Remote Desktop For Administration is enabled on a server, you cannot
configure the server to use Offline Files because the Remote Desktop
For Administration and Offline Files features are mutually exclusive.
Therefore, before attempting to configure a server to use Offline Files
(for the exercises in this lesson, or in a production setting), you
must disable Remote Desktop For
Administration. To do this on the server, right-click My Computer and
select Properties. In the System Properties dialog box, select the
Remote tab. In the Remote Desktop section, clear the Allow Users To
Connect Remotely To This Computer check box and then click OK.
|
To configure computers and servers to use Offline Files, complete the following steps:
1. | Open My Computer.
|
2. | On the Tools menu, click Folder Options.
|
3. | In the Folder Options dialog box, click the Offline Files tab.
|
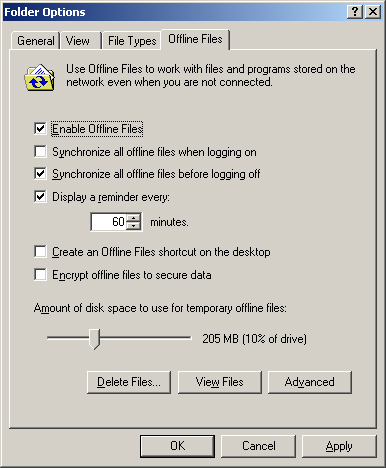
4. | In the Offline Files tab, shown in Figure 5,
select the Enable Offline Files check box. For computers running
Windows 2000 Professional and Windows XP Professional, this box is
selected by default.
|
5. | Select
the Synchronize All Offline Files When Logging On check box if you want
to fully synchronize offline files when a user logs on. Select the
Synchronize All Offline Files Before Logging Off check box if you want
to fully synchronize offline files before a user logs off. Full
synchronization ensures that the network files reflect the latest
changes. If you do not select these options, a quick synchronization
occurs when a user logs on or off. A quick synchronization provides a
complete version of online files, but it might not provide the most
current version.
Note It
is recommended that you always synchronize when you log on to your
computer. This ensures that changes made on your computer are
synchronized with changes that were made on the network while you were
disconnected. |
|
6. | Select
the Display A Reminder Every check box if you want to provide reminder
balloons in the notification area of the desktop (lower right corner)
when the computer goes offline. Specify in the Minutes box how often
(in minutes) you want the reminders to appear.
|
7. | Select
the Create An Offline Files Shortcut On The Desktop check box if you
want to place a shortcut to the Offline Files folder on the desktop.
|
8. | Select
the Encrypt Offline Files To Secure Data check box if you want to
encrypt offline files to keep them safe from intruders who might gain
unauthorized physical access to the client computer.
Note This
check box is disabled if you are not an administrator on the computer,
the local drive is not NTFS or does not support encryption, or your
system administrator has implemented an encryption policy for Offline
Files. |
|
9. | Select
the amount of disk space you want to use for temporary offline files on
the slider bar in the lower portion of the Offline Files tab.
|
10. | Click Advanced.
|
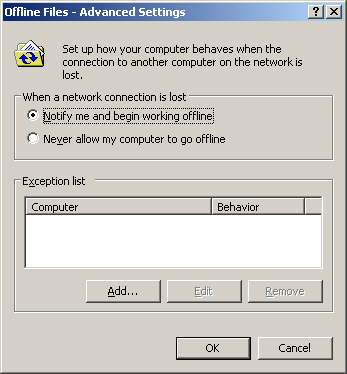
11. | In the Offline Files–Advanced Settings dialog box, shown in Figure 6,
select one of the following options to indicate how a computer behaves
when the connection to another computer on the network is lost:
Notify
Me And Begin Working Offline. Select this option to specify that the
user can work offline if the network connection is lost because network
files will continue to be available. Never
Allow My Computer To Go Offline. Select this option to specify that the
user cannot work offline if the network connection is lost because
network files will not be available.
|
12. | Click
Add if you want a specific computer to receive a different treatment if
the connection to another computer on the network is lost. If you click
Add, the Offline Files–Add Custom Action dialog box appears. In the
Computer box, type the name of the computer that will receive different
treatment. Then select the treatment you want the computer to receive
in the When A Network Connection Is Lost section. Click OK.
|
13. | In the Offline Files–Advanced Settings dialog box, click OK.
|
14. | In the Folder Options dialog box, click OK.
|
Synchronizing Offline Files and Folders
You
can determine the way you want your computer to synchronize your files
when you log on and off the network. There are two ways to set up
synchronization of offline files and folders. You can set up
synchronization manually by using the Items To Synchronize dialog box,
also referred to as the Synchronization Manager in documentation and
Help. Or you can set up synchronization by setting policies in
Administrative Templates/Network/Offline Files in both the Computer
Configuration and User Configuration nodes. This section provides the
procedure for manually setting up synchronization of offline files and
folders.
To set up synchronization of offline files and folders, complete the following steps:
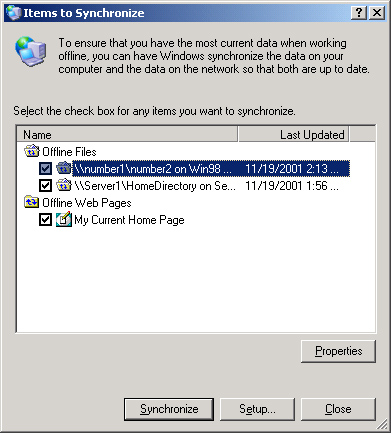
1. | Click Start, point to All Programs, point to Accessories, and then click Synchronize.
Note You can also open the Items To Synchronize dialog box by typing mobsync on the command line. |
|
2. | In the Items To Synchronize dialog box, shown in Figure 7, click Setup.
|
3. | In the Synchronization Settings dialog box, in the Logon/Logoff tab, shown in Figure 8, click the network connection that you want to use in the When I Am Using This Network Connection list.
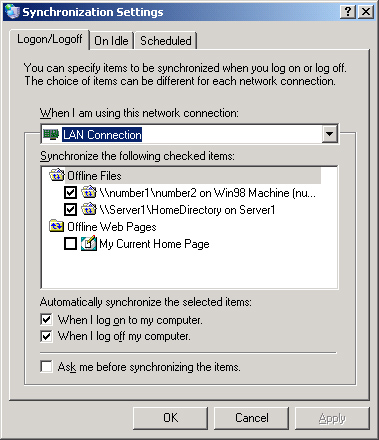
|
4. | In
the Synchronize The Following Checked Items list, select the check
boxes next to the offline items that you want to synchronize, such as a
folder on a mapped network drive or an Internet Explorer offline Web
page.
|
5. | Select
the When I Log On To My Computer check box to synchronize the selected
items when the user logs off. Select the When I Log Off My Computer
check box to synchronize the selected items when the user logs on.
Note It
is recommended that you always synchronize when you log on to your
computer. This ensures that changes made on your computer are
synchronized with changes that were made on the network while you were
disconnected. |
Note The
When I Log On To My Computer and When I Log Off My Computer check boxes
are selected by default if you selected the Synchronize All Offline
Files When Logging On or Synchronize All Offline Files Before Logging
Off options, respectively, in the Offline Files tab in the Folder
Options dialog box. These options are part of the “Configure Computers
to Use Offline Files” procedure. |
|
6. | Select
the Ask Me Before Synchronizing The Items check box if you want
Synchronization Manager to request permission before automatically
synchronizing your offline items.
|
7. | Click OK.
|
8. | In the Items To Synchronize dialog box, click Close.
|
You
can also specify items to be synchronized when a computer is idle by
using the On Idle tab in the Synchronization Settings dialog box. By
choosing when offline items are synchronized, you can better manage the
work on your computer and on the network. Finally, you can schedule
when synchronization occurs by using the Scheduled Synchronization
Wizard, available from the Scheduled tab in the Synchronization
Settings dialog box.
Note
To
manually synchronize offline files and folders immediately, right-click
the file or folder you want to synchronize, and then click Synchronize. |