Automatically import weather records
into Excel to make comparisons with previous years
You can win arguments about changes in the
weather by comparing actual data, not memories. If you use Excel you won’t need
to laboriously enter information by hand. The program can automatically
download and update information from web pages and insert it into worksheets.
Weather Underground (www.wunderground.com) includes several years’ worth of
data (rainfall, temperature, and more) that can be added in minutes. To begin,
just download our completed spreadsheet from www.snipca.com/8826.
Step 1
First,
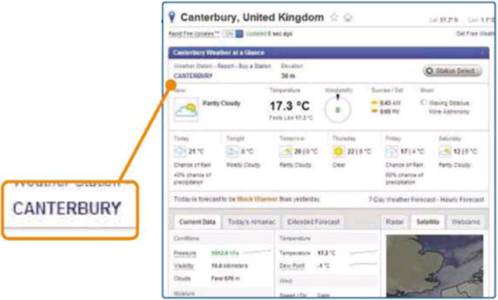
find the weather data for where you live
First, find the weather data for where you live. Go to www.wunderground.com and type the name of
your town in the ‘Enter your location’ search box. As the site is American add
‘.United Kingdom’. Click Search. Click the name of the Weather Station at the
top of the report. The next page has a Google map showing the location of the
weather station.
Step 2
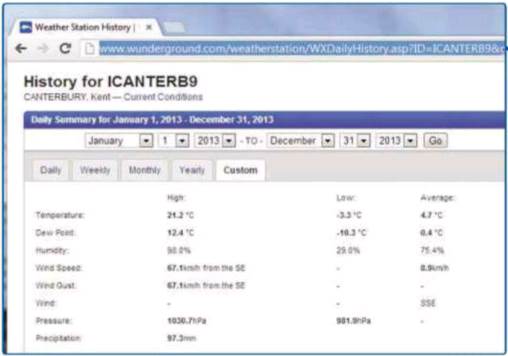
Click
the custom tab and select the dates
Click the custom tab and select the dates 1 Jan 2013 to 31 Dec 2013. Click Go. The year selection gives
you an idea of how many years are covered. If it doesn’t go back far enough,
click the back button and find the Nearby section. Click the View button in the
History and Almanac section - you can leave the date as it is. Click the Custom
tab and choose the full year as above. This data might not cover your exact
location but it will go back further. Click Go. Press Ctrl and L, then Ctrl and
C to select the contents of the address bar and copy it to the clipboard.
Step 3
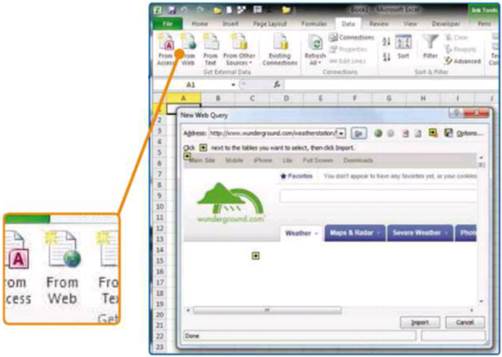
Start
Microsoft Excel and create a new Workbook
Start Microsoft Excel and create a new Workbook. Click the Data tab in the Ribbon and click the From
Web icon in the Get External Data section on the left. In the New Web Query
Page, click in the address bar, delete the URL and press Ctrl and V to paste in
the address of the weather station data. Click No if any script error messages
appear.
Step 4
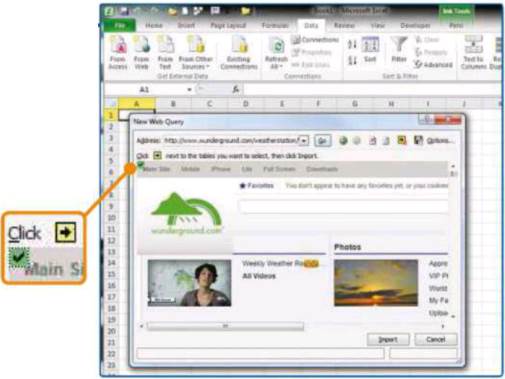
Click
the yellow square with a right-pointing arrow in
the top left-hand corner
Click the yellow square with a right-pointing arrow in the top left-hand corner of the web
page preview to select the entire page. We don’t need all the data at the top
but Excel doesn’t recognize the table with the data on its own. The icon will
turn green with a tick to show that the page has been selected. Click Import.
You can browse through Weather Underround if you want to change the information
to be imported.
Step 5
A
progress bar will appear while the page
downloads
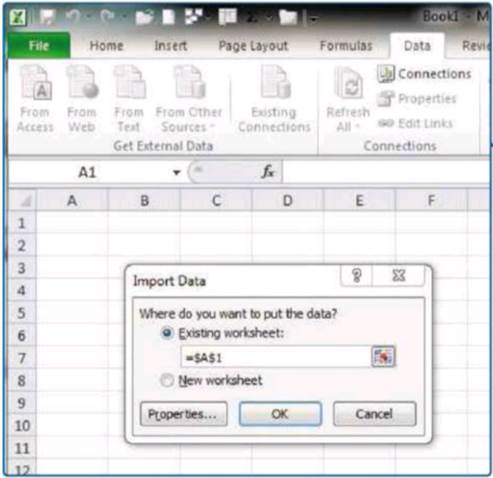
A progress bar will appear while the page downloads. You will then be asked where to put the
data. Select ‘New worksheet’. Click Properties. Select the ‘Refresh data when
opening the file’ option and click OK. Click OK again to import the data. At
first there will just be a single line of text, but this will be replaced by
the web page laid out in the spreadsheet. The daily weather data will start
around row 300. Now is a good time to name this sheet so you don’t confuse
different years. Double-click the white Sheet tab at the bottom of the screen,
enter the year and press Enter. Repeat as necessary to add extra years.
Step 6
The
weather data may not arrive exactly
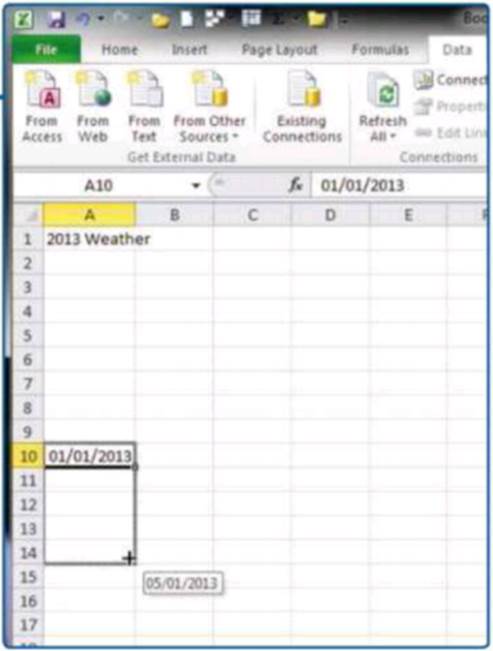
The weather data may not arrive exactly how you want it. This table has two un-necessary
rows at the beginning of every month. Rather than delete them, you should
create an intermediary table without gaps. This also fixes the unhelpful date
formatting. Click the Insert Worksheet button, double-click the new sheet and
give it a name. Enter a title in cell A1 and type 01/01/2013 in cell A10. Hover
your mouse over the bottom-right corner of that cell until it changes to a
black plus. Click and drag down to add dates for the year using Auto Fill.
Step 7
Auto
fill can also make entering the information
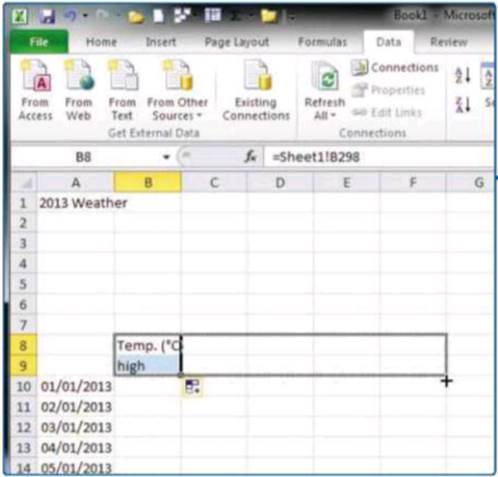
Auto fill can also make entering the information from the raw data much easier than it first appears.
Select B8 and type =. Click the raw data sheet tab and click cell B298. Use
Auto Fill to populate the cell below. Select these two cells and drag the Auto
Fill tool across to column T to add the titles. The data can be imported in the
same way. Select Cell BIO and type =. Go to the raw data sheet, click cell B300
and press enter.
Step 8
You
can then use auto fill to complete the rest of
the month
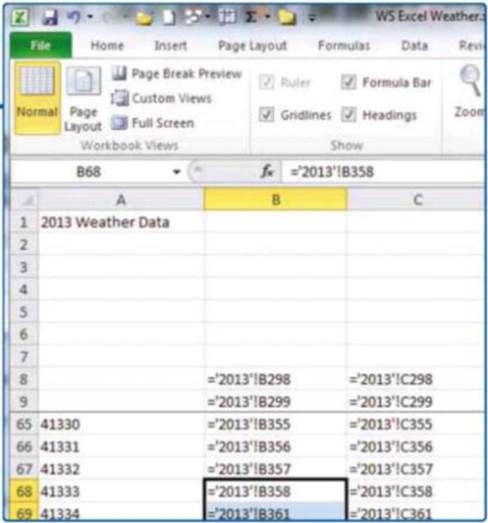
You can then use auto fill to complete the rest of the month. Look for any breaks in the data.
There will be two unwanted columns at the beginning of every month but there
may be other gaps. Stop the Autofill at the last day with data and start again
when the data resumes. If the end of the month is C358, the next month will
start at C361. It is important to keep the empty rows. When you have completed
the year, select all the data in column B from BIO to the end of the year. Use
Auto Fill to expand this to column T as you did with the titles and you will
have all the data in a table you can use for graphs.
Step 9
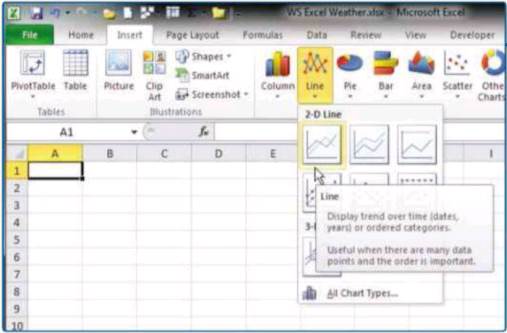
Press
shift and F11 to insert a new Worksheet
Press shift and F11 to insert a new Worksheet. Click the Insert tab, click Line in the
Charts tab and click the top-left option. In the Chart Tools Ribbon, click
Select Data in the Data section of the Design tab. Click Add in the left-hand
box. Name the series with a year - in this case 2012. Click the small icon to
the right of the bottom text box. Click the tab for 2012 and select the cells
for the whole year in the high temperature - it should look like =,2012Data’!$B$10:$B$374.
Click the icon in the Edit window to confirm the selection and click OK.
Repeat this to add extra years.
Step 10
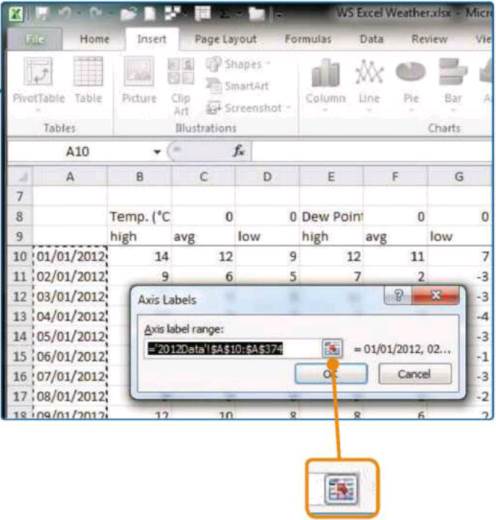
Adding
the dates as proper labels will make the chart
easier to read
Adding the dates as proper labels will make the chart easier to read. Click the Edit button in
the Horizontal (Category) Axis Labels section. Click the icon to the right of
the text box. Pick a sheet for which you have data for the full year. Select
the cells with the dates in - most likely A293:A657 - and click the icon in the
Axis Labels. Then click OK. Click the Page Layout tab in the ribbon, click
Orientation and then Landscape. Add more graphs and years to improve the comparisons.
Every time you open the sheet, Excel will update with the latest information.
Excel and security warnings
Getting information from the internet can
be a security problem, although there is little risk of problems with weather
data (Computeractive cannot take responsibility for any conclusions you may
draw from past weather data!). This means that Excel may display a security
warning when the spreadsheet opens. Click Enable Content and Excel will update
the spreadsheet. You can turn off the security warning completely but it’s best
not to.