When building a new Web site, it's usually best to
decide up front whether you want to use MVC. Although ASP.NET standard
parts work independently of the MVC framework, having Visual Studio create the Web application for
you can save some headaches. Visual Studio wires up a few components to
make MVC work in your application. For example, the routing mechanism
must be hooked in so that HTTP requests can be handled by the correct controller method. Visual Studio inserts the correct code into the Application_Start event in the application's Global.asax file. Here's an example:
protected void Application_Start()
{
  RegisterRoutes(RouteTable.Routes);
}
public static void RegisterRoutes(RouteCollection routes)
{
  routes.IgnoreRoute("{resource}.axd/{*pathInfo}");
  routes.MapRoute(
    "Default",                                              // Route name
    "{controller}/{action}/{id}",                           // URL with parameters
    new { controller = "Home", action = "Index", id = "" }  // Parameter defaults
  );

}
The MVC framework includes a class named RouteTable
that holds a number of entries that tell the MVC framework how requests
should be handled. Visual Studio generates a single entry for the RouteTable
that maps the URL to a specific method name in a specific controller,
along with parameters necessary to handle the request. The Visual
Studio–generated route map defaults to a method in the home controller
named Index with an empty parameter. Usually, the Index
method displays some default information for the site and represents a
starting point for the user. You are free to add as many entries to the RouteTable as you need to support your own routing scenarios.
In addition to adding the RouteTable setup
to the Global.asax file, the Visual Studio–generated code throws in a
slightly modified Default.aspx file. This file is necessary—in fact,
Visual Studio throws in a comment warning you never to delete it. A
quick look at the Default.aspx Page_Load handler reveals that it hooks up the MVC HttpHandler to intercept incoming MVC-based requests.
1. Following the Request Path
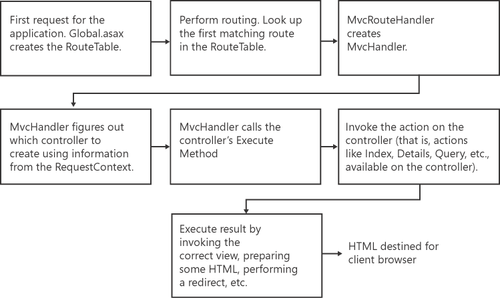
With all the MVC
framework pieces in place, the application is ready to start processing
requests. Requests come to the Web site in a typical fashion. For the
first request, ASP.NET fires up an instance of the application
(represented by Global.asax). After that, the first access to
Default.aspx hooks up the MVC handler so that requests are routed
correctly. Figure 1 illustrates the request path as it travels through the system.
The following procedure shows how you can create an MVC-based site to see how it all works.
Creating an MVC site
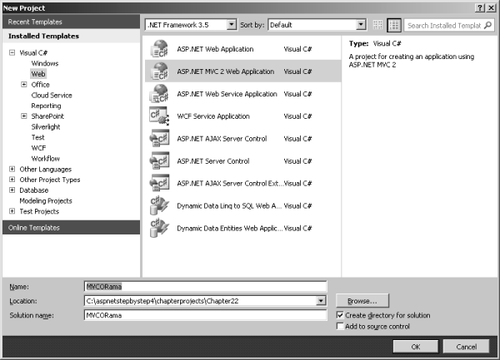
Start Visual Studio. Select New Project on the File menu. Select ASP.NET MVC Site from the available templates, as shown in the following graphic, and name the site MVCORama.
Visual Studio will ask you whether you want to create some unit tests
for the application; click OK. Visual Studio will create the site for
you.
When
it finishes, Visual Studio will have created a full ASP.NET project for
you to build around the MVC framework. Look in Solution Explorer and
notice the MVC folders: Controllers, Models, and Views. Run the application to see how it looks. To
see how MVC integrates with the rest of ASP.NET, open the master page
under the Views\Shared folder in the Designer. The master page file name
is Site.master.
You can see some typical HTML, as well as some HTML helpers doing some
work as inline code.For example, inside the master page, you can also see that the
application uses something called the LogOnUserControl. For now, change the heading text of the page from My MVC Application to Dot Net References. You can change the styles and colors of the master page, too. The main CSS file is in the Content folder and is named Site.css.
To change the body style, right-click inside the body style description
in the code, and click Build Style on the shortcut menu. You can change
the background color, as well as any other style elements, by using the
Style Builder dialog box. After changing some of the elements, run the
Web site by pressing Ctrl+F5 from within Visual Studio. You should be
able to see that the style elements have changed for the pages. To start you off, Visual Studio creates an AccountController and a HomeController
along with the files to support the accompanying views. The Home
controller/view includes the text Welcome To ASP.NET MVC. To change this
text, open the HomeController.cs file under the Controllers\Home
folder. The Index method prints out the greeting—change the Index method to emit Welcome to the Dot Net References Site. Then, open the Index.aspx file under the Views\Home folder. Change the text from the following: To learn more about ASP.NET MVC visit
<a href="http://asp.net/mvc"
title="ASP.NET MVC Website">http://asp.net/mvc</a>
to this: To learn more about Dot Net, visit
<a href="http://msdn.microsoft.com/en-us/netframework/default.aspx"
title="Dot Net Framework Development Center"> Dot Net Information </a>
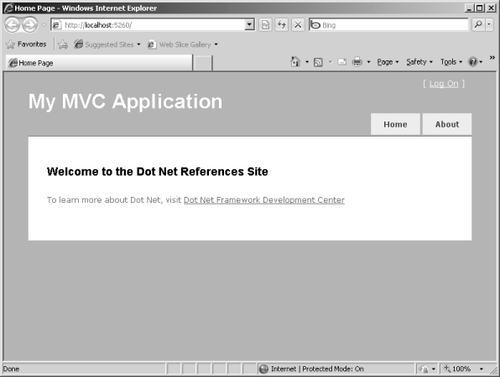
When
you run the site, you'll see that the new text appears, and the link
should take you to the Microsoft main .NET Framework Development Center:
Next, create the data model for the application. This is a Microsoft SQL Server database file
containing two tables. The first table includes some .NET book
references. The second table includes some HTTP links to .NET developer
Web sites. You can use these tables as the basis for the models for the
MVC-based application. To put the ASPNETStepByStep4.mdf file in your
App_Data directory, right-click App_Data in Solution Explorer and click
Add Existing Item. Locate the database file on the accompanying CD and
bring it into the project. Once
the database is available to your application, create some helper
classes to access the data. The easiest way to do this is to create some
LINQ to SQL
wrapper classes. In Solution Explorer, right-click the Models folder.
Click Add New Item on the shortcut menu. Select Data from the left-hand
side of the Add New Item dialog box. Select LINQ To SQL in the panel on
the right. Name the file DotNetReferences.dbml. This will create a Database Markup Language (DBML) source file that Visual Studio will add to the project. Next, drag the DotNetReferences table from the Server Explorer to the Designer surface. Visual Studio will create a wrapper class named DotNetReference that represents a single row from the table. You'll use this class shortly. The DotNetReference class is useful but operates only in the context of a live database. When Visual Studio created the DotNetReference class, it also created a class named DotNetReferencesDataContext that represents the DotNetReferences table. Rather than accessing the database directly, you can use LINQ and a database manager class to work with the data easily. In Solution Explorer, right-click the Model folder, and add a new class. Name this class DotNetReferencesManager. The DotNetReferencesManager class will wrap the DotNetReferencesDataContext, so have the DotNetReferencesManager create an instance of the DotNetReferencesDataContext class. Then, add a method named GetAllReferences to the DotNetReferencesDataContext class. It should return IQueryable<DotNetReference>. You can use the DotNetReferencesDataContext to fetch all the rows like so: using System;
using System.Collections.Generic;
using System.Linq;
using System.Web;
namespace MVCORama.Models
{
public class DotNetReferencesManager
{
DotNetReferencesDataContext dataContext =
new DotNetReferencesDataContext();
public IQueryable<DotNetReference> GetAllReferences()
{
return dataContext.DotNetReferences;
}
}
}
Create a view for the DotNetReferences model. Right-click the View folder. Create a new View folder and name it DotNetReferences
by right-clicking the project's Views folder and clicking New Folder.
Right-click the new folder and click Add and then View on the shortcut
menu. Visual Studio will then display the Add View dialog box for
configuring the view. Visual Studio will name the view Index. Make it
strongly typed based on the DotNetReferences class (it will be available in the dialog box). Leave the master as is. Finally, Visual Studio will generate the following view code for you by using reflection against the DotNetReferences model: <%@ Page Title=""
Language="C#"
MasterPageFile="~/Views/Shared/Site.Master"
Inherits="System.Web.Mvc.ViewPage<IEnumerable<MVCORama.DotNetReference>>" %>
<asp:Content ID="Content1" ContentPlaceHolderID="TitleContent" runat="server">
Index
</asp:Content>
<asp:Content ID="Content2" ContentPlaceHolderID="MainContent" runat="server">
<h2>Index</h2>
<table>
<tr>
<th></th>
<th>ID</th>
<th>Title</th>
<th>AuthorLastName</th>
<th>AuthorFirstName</th>
<th>Topic</th>
<th>Publisher</th>
</tr>
<% foreach (var item in Model) { %>
<tr>
<td>
<%= Html.ActionLink("Edit", "Edit", new { id=item.ID }) %> |
<%= Html.ActionLink("Details", "Details", new { id=item.ID })%>
</td>
<td>
<%= Html.Encode(item.ID) %>
</td>
<td>
<%= Html.Encode(item.Title) %>
</td>
<td>
<%= Html.Encode(item.AuthorLastName) %>
</td>
<td>
<%= Html.Encode(item.AuthorFirstName) %>
</td>
<td>
<%= Html.Encode(item.Topic) %>
</td>
<td>
<%= Html.Encode(item.Publisher) %>
</td>
</tr>
<% } %>
</table>
<p>
<%= Html.ActionLink("Create New", "Create") %>
</p>
</asp:Content>
Notice that the Index.aspx file is based on typical ASP.NET syntax. The Page directive appears at the top of the file followed by the ASP.NET Content control (so as to coordinate content placement with the master page). The view is tied to a model based on the DotNetReferences class. If you examine the code-beside class, you can see the Index iterates through each Item in the model and displays it. In this case, each Item represents a row in the DotNetReferences class. To show the view correctly, you just need to add a controller to the model and view for the edit scenario. Create a controller to handle requests pertaining to the DotNetReferences model. Right-click the Controllers folder and select Add, Controller. When the Add Controller dialog box appears, name your new controller DotNetReferencesController. Visual Studio will create a class based on the MVC framework Controller class. Add an instance of the DotNetReferencesManager to the controller. Look for the method named Index that returns an ActionResult. Instantiate a var in the Index method and use the DotNetReferencesManager.GetAllReferences method to populate it. The var
type is a typeless collection useful for managing a collection of
things—for when you don't know the type of objects in the collection
ahead of time. The code you should add is in bold type in the following
example: using System;
using System.Collections.Generic;
using System.Linq;
using System.Web;
using System.Web.Mvc;
using System.Web.Mvc.Ajax;
using MVCORama.Models;
namespace MVCORama.Controllers
{
public class DotNetReferencesController : Controller
{
DotNetReferencesManager dotNetReferencesManager =
new DotNetReferencesManager();
public ActionResult Index()
{
var dotNetReferences =
dotNetReferencesManager.GetAllReferences().ToList();
return View("Index", dotNetReferences);
}
}
}
When you navigate to the DotNetReferences
page, the MVC framework is set up to show the DotNetReferences view.
But to do this, you will need to add a tab to the master page to
navigate to the DotNetReferences page as shown: <%@ Master Language="C#" Inherits="System.Web.Mvc.ViewMasterPage" %>
<!DOCTYPE html PUBLIC "-//W3C//DTD XHTML 1.0 Strict//EN"
"http://www.w3.org/TR/xhtml1/DTD/xhtml1-strict.dtd">
<html xmlns="http://www.w3.org/1999/xhtml">
<head runat="server">
<title><asp:ContentPlaceHolder ID="TitleContent" runat="server" /></title>
<link href="../../Content/Site.css" rel="stylesheet" type="text/css" />
</head>
<body>
<div class="page">
<div id="header">
<div id="title">
<h1>My MVC Application</h1>
</div>
<div id="logindisplay">
<% Html.RenderPartial("LogOnUserControl"); %>
</div>
<div id="menucontainer">
<ul id="menu">
<li><%= Html.ActionLink("Home", "Index", "Home")%></li>
<li><%= Html.ActionLink("DotNetReferences", "Index",
"DotNetReferences")%></li>
<li><%= Html.ActionLink("About", "About", "Home")%></li>
</ul>
</div>
</div>
<div id="main">
<asp:ContentPlaceHolder ID="MainContent" runat="server" />
<div id="footer">
</div>
</div>
</div>
</body>
</html>
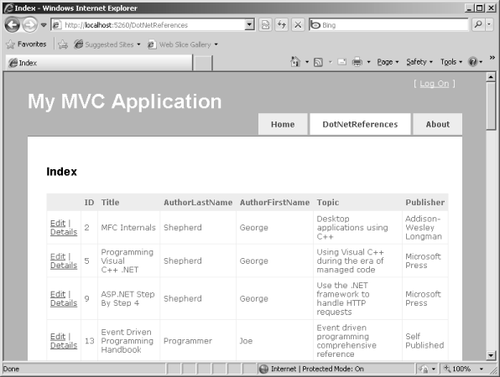
Go ahead and compile the application, and then press Ctrl+F5 to execute it. Once the default page is displayed, navigate to the DotNetReferences page using the new tab. You should see the application display the contents of the DotNetReferences database:
In the next procedure, you
create a more fully featured MVC-based section in the application that
is more interactive. This example illustrates how to display item
details as well as edit, delete, and create entries.
|