Application pools facilitate hosting a group of Web applications inside a separate set of IIS worker processes that share the same configuration. Application pools enable you to isolate applications for better security, reliability, and availability. The worker process serves as the process boundary that separates each application pool so that when one worker process or application is having an issue, other applications or worker processes are not affected. For example, imagine you plan to install an old ASP application that uses legacy component objects. To protect other applications in the Web site, you can create a new application pool and host the legacy application inside the new application pool. In this example, if the legacy application fails, other applications will not be affected, because the legacy application is served by a different application pool.
Each application pool can have one or more worker processes serving the application pool. However, each worker process belongs to only one application pool.
Application Pool Considerations
By default, there are two predefined application pools when IIS 7.0 is installed. As shown in Table 1, there are two application pools with different worker process models. The Web Server (IIS) role setup creates the DefaultAppPool application pool and is the default application pool for new applications. The ASP.NET role service setup creates the Classic .NET AppPool to enable ASP.NET applications to run with the Classic ASP.NET Integration mode. You can configure applications to run in these default application pools, or you can create a new application pool.
Table 1. Predefined Application Pools
| Application Pool | .NET Framework | Managed Pipeline | Identity |
|---|---|---|---|
| Classic .NET AppPool | Version 2.0 | Classic | NetworkService |
| DefaultAppPool | Version 2.0 | Integrated | NetworkService |
Note
The Classic .NET AppPool application pool is created during ASP.NET 2.0 setup. The installation of the .NET Framework 1.1 calls the aspnet_regiis.exe tool to install ASP.NET 1.1, which creates the ASP.NET 1.1 application pool.
Neither application pool is created by default when IIS 7.0 is installed.
Before you create a new application pool, you need to consider—from many perspectives—if such an application pool is needed. Because a dedicated worker process fulfills each application pool, the more application pools, the more worker processes may be running on the system to handle requests to the applications on the server. This could impact overall system performance, because each worker process consumes system resources such as processor time and memory. Even so, for most administrators, maintaining separate application pools for different applications will never cause any problems.
Note
For reliability reasons, you should by default use separate application pools try to host each application (and Web site). Doing so can also allow you to take advantage of least privilege by granting the minimal set of permissions to each application pool identity, helping isolate the application from each other.
Consider the following factors before creating new application pools:
-
Security. You can create a new application pool and configure a custom application pool identity with access rights when the application requires custom access to certain resources. A custom application that updates system configuration is an example of such a situation. As another example, consider applications that belong to two different customers and for which content access must be absolutely restricted to each respective customer.
-
Reliability. You can create a new application pool to isolate unstable or new applications. For example, you can isolate a legacy component application that crashes from time to time, or separate the new integration applications that are still in testing phase. Isolating these applications increases the reliability of other applications as failures in the legacy or testing applications will not affect other applications.
-
Customization. You can create a new application pool when an application requires different application pool settings. Such a situation arises if you have an old application that must run in the Classic process model, and others must run in Integrated mode. In IIS 7.0, the ASP.NET Integration mode and .NET Framework version are configurable at the application pool level. In addition, creating a new application pool allows you to configure a unique set of worker process settings (such as the application pool recycling interval or queue size) that are different from the common application pool. You might also want to isolate an application based on application types. For example, you might want different application pools for ASP and ASP.NET.
Note
Although IIS 7.0 supports side-by-side execution of applications using different versions of the .NET Framework, you should understand that different .NET Framework applications require different application pools because each application pool is assigned to only one .NET Framework run-time version.
Adding a New Application Pool
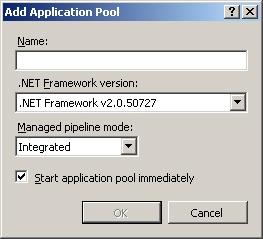
To use IIS Manager to create a new application pool, expand the IIS computer node in the Connections pane and navigate to the Application Pools node. Right-click the Application Pools node and select Add Application Pool. Alternatively, click Add Application Pool in the Actions pane. The result is shown in Figure 1.
Note
When using IIS Manager to add an application pool, select the Start Application Pool Immediately check box if you want to start the application pool right after creating it.
When an application picks up a request from an application pool which is not running, IIS 7.0 returns a 503 HTTP “The service is unavailable” error to the client browser.
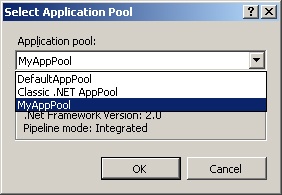
After you have created an application pool, you can either create a new application to run in the new application pool or assign the new application pool to an existing application. To assign an application pool to an existing application by using IIS Manager, expand the IIS computer node in the Connections pane and then expand the Site node in the tree listing. Navigate to the desired application and then click Basic Settings in the Actions pane. Click the Select button to choose the new application pool from the list of available application pools, as shown in Figure 2.
Caution
Assigning a new application pool to or changing the application pool for an application that is running may end up loading the application in the new worker processes for the newly assigned application pool, but application details or variables in the old worker process are not visible to the new worker process. The application will continue processing existing requests in the old worker process but will not receive any additional requests after the changes are applied and are detected by the original worker process.
Use the following Appcmd syntax to create a new application pool.
appcmd add apppool /name:string /managedPipelineMode:enum /managedRuntimeVersion:string
To set the properties on an existing application pool, use this syntax.
appcmd set apppool ApppoolName /managedPipelineMode:enum /managedRuntimeVersion:string
Table 2 describes the parameters for ADD APPPOOL or SET APPPOOL syntaxes.
Table 2. Syntax for Appcmd to Configure Application Pool Properties
The following command creates a new application pool with the name “Fabrikam Stock”.
appcmd add apppool /name:"Fabrikam Stock"
The output, shown in the following syntax, indicates a new application pool object has been added to the configuration store.
APPPOOL object "Fabrikam Stock" added
To change the new application pool’s basic settings, such as the process model and the .NET run-time version, use the SET command. The following command reconfigures the newly created “Fabrikam Stock” application pool to run on .NET run-time version 1.1 and changes the process model to Classic ISAPI mode.
appcmd set apppool /apppool.name:"FabrikamStock"
/managedRuntimeVersion:"v1.1" /managedPipelineMode:"Classic"
Note
To enable support for .NET Framework version 1.1, you need to install the .NET Framework 1.1. By design, when it is installed, a new application pool named as ASP.NET 1.1 is created. This new application pool is configured to run in the Classic worker process model with the .NET Framework 1.1 run time.
Finally, when the new application pool is ready, you can either create a new application to run on the application pool or assign the application pool to any existing application. For example, the following syntax configures the existing “Stock” application to run in the “Fabrikam Stock” application pool.
appcmd set app "Fabrikam HR/Stock"
/applicationPool:"Fabrikam Stock"
Caution
When using Appcmd to set the application pool for an application, the command line tool does not verify if the specified application pool exists in the configuration system. If the application pool does not exist, the application will fail to load at run time.
When adding a new application pool, the configuration system creates a new application pool element under the <applicationPools> section in the applicationHost.config file. The element includes the name of the application pool, the worker process model, and the process identity if it is different from the default settings. The following shows the <applicationPools> configuration of the newly created Fabrikam Stock application pool in .NET Framework version 1.1 run time.
<applicationPools>
    <add name="DefaultAppPool" />
<add name="Classic .NET AppPool" managedPipelineMode="Classic" />
<add name="ASP.NET 1.1" managedRuntimeVersion="V1.1"
    managedPipelineMode="Classic" />
    <add name="Fabrikam Stock" managedRuntimeVersion="V1.1"
        managedPipelineMode="Classic" />
    <applicationPoolDefaults>
        <processModel identityType="NetworkService" />
    </applicationPoolDefaults>
</applicationPools>
When you assign a new application pool to an existing application, the <application> element inside <site> element is updated by IIS Web core.