There's a lot to be said for do-it-yourself data
access. It allows you to separate the data layer from the rest of your
web application—and even hand off the data component to a completely
different programmer. And because all the details are there in explicit
ADO.NET code, you have the freedom to tweak them, all without disturbing
the rest of your web page code. This approach allows you to change your
data strategy as your applications evolves—whether you simply want to
replace hard-coded queries with stored procedure calls or you have a
more ambitious plan in mind, such as implementing a data logging system
or using database cache invalidation.
But despite these benefits,
the trend of the future is toward increasingly convenient ways to handle
data. This shift began with basic data binding and gained steam with rich data-display controls such as the GridView and the no-code data source controls .
And now, ASP.NET developers have the most ambitious high-level data
access tool that Microsoft has invented so far: the Entity Framework.
At its simplest, the Entity
Framework gives you a way to generate code based on the structure of
your database. For example, if you point Visual Studio to the Northwind
database, it will use the Entity Framework to create classes that model
the various types of records (Customers, Employees, Products, and so
on). It will also generate data access code that you can use to
manipulate this data—for example, to query it when you want to show it
in a page and to update it when you need to commit a user's change.
Although the Entity Framework is technically part of ADO.NET (and it
uses the familiar ADO.NET classes behind the scenes), when you use the
Entity Framework, you don't worry about these details. Instead of
writing your own ADO.NET code, you let the Entity Framework take care of
all the details for you.
This sort of automatic
code-generation system is nothing new. In fact, hundreds of companies
and independent developers have spent years inventing their own
technologies that automatically build data code. Some of these
technologies are quite good (and some even resemble the Entity
Framework). However, many suffer from serous limitations. Although they
make the programmer's life easier for basic database operations, they
fail to deal with more sophisticated scenarios such as calling stored
procedures, working with different types of relational database
products, translating data into different representations, dealing with
errors, and assembling data from multiple tables into a single set of
objects. Although the Entity Framework isn't a complete replacement for
traditional ADO.NET, it deals with all these issues, which makes it a
practical option for developers who need to quickly create data-driven
applications.
NOTE
In fact, the Entity
Framework is a replacement for a similar Microsoft technology called
LINQ to SQL, which was released with .NET 3.5. Although LINQ to SQL is
still in use today and has many similarities to the Entity Framework, it
also has disadvantages. Most obviously, it doesn't work with databases
other than SQL Server, and it doesn't give developers the flexibility to
use data objects that don't exactly match the underlying tables.
The Entity Framework isn't for
everyone. If you're already comfortable using the traditional ADO.NET
objects, you may find that the Entity Framework adds little benefit but
introduces additional complexity, because it places a whole new layer
between your web page code and your database. The Entity Framework also
isn't the right choice if you need to squeeze every possible millisecond
of speed out of your web application, because additional layers always
add some extra overhead, even when they're designed as carefully and
cleverly as possible.
To get a sense of how
the Entity Framework works, you can take it for a test spin. In the
following sections, you'll see how to create an entity data model and
use it to retrieve and update data.
1. Creating an Entity Data Model
The first step to use the
Entity Framework is adding an entity data model to your website.
Right-click your website in the Solution Explorer and choose Add New
Item (or pick Website =>
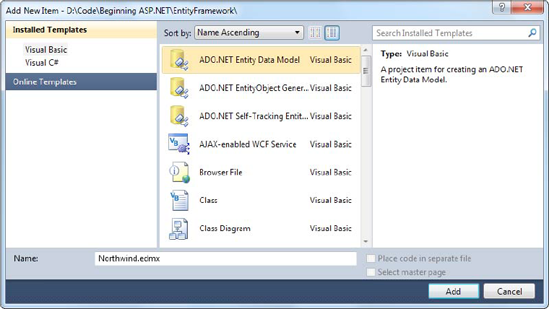
Add New Item from the menu). Choose the ADO.NET Entity Data Model
template, which is the first choice in the list, and supply a good name (Figure 1). For example, if you're creating a model for the Northwind database, the name Northwind.edmx makes sense. (The extension .edmx stands for Entity Data Model.) When you're finished, click Add.
When you add a model to a
projectless website (as opposed to a web project), Visual Studio informs
you that you need to place the automatically generated code in the
App_Code folder. Click Yes to allow it to do that automatically.
Next, Visual Studio starts
the Entity Data Model Wizard. The first step asks you whether you want
to generate your model from an existing data model (which is the
quickest approach) or define all your entities by hand (choose Empty
Model). In most cases, the best bet is to get Visual Studio to do the
work for you, because you can always alter the entities it creates or
remove ones you don't need. When you've chosen, click Next to move to
the next step.
NOTE
An entity
is just another term for a data object. Each entity stores information
about a particular data item. (In the simplest case, each entity
corresponds to a single record in a table.)
In the next step, you pick the
connection for your database. If you've already defined the connection
in the Server Explorer , it automatically appears in the drop-down connection list (Figure 2).
If not, you need to click the New Connection button to create it before
you continue.

Visual Studio stores the
connection string for your connection in the <connectionStrings>
section of the web.config file, which allows you to change it quickly
and easily later. By default, it takes the name of your connection and
adds the word Entities
to name your connection string (as in NorthwindEntities), but you can
type in something else if you prefer. When you're finished, click Next
to continue.
In the third step,
Visual Studio connects to your database and retrieves a complete catalog
of all its tables, views, and stored procedures. You can then choose
which of these database items you want to include in your model and
generate code for. Usually, you'll pick all the tables at once, so you
have access to all your data if you need it (and so that all the
relationships between your tables are preserved). However, you can also
choose to select individual tables, by placing a check mark next to the
ones you want to include. Figure 3
shows an example that includes all the tables but tells Visual Studio
to generate code for just one of the stored procedures (Ten Most
Expensive Products).
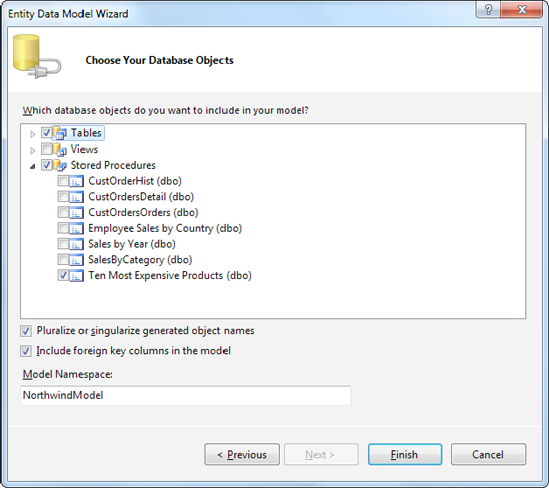
This step of the wizard also gives you two additional options:
Pluralize or singularize object names:
This somewhat confusing option tells Visual Studio to use a remarkably
intelligent name-generation algorithm when it creates your data classes.
If you choose this option (which most people do), Visual Studio will
create a Product item to represent each record in a Products table.
However, it will add a Products
property to represent a collection of products that's referenced by a
ProductCategory record. In short, Visual Studio automatically uses the
names that make the most logical sense. But Visual Studio's name
generating is a lot more sophisticated than simply adding and removing
the letter s.
For example, Visual Studio can correctly pluralize words like Address,
Territory, Person to Addresses, Territories, and People. That's because
it relies on a hefty pluralization dictionary that lists the singular
and plural forms of English-language nouns.
Include foreign key columns:
This option
determines whether Visual Studio will include foreign key columns in
your data model. If you don't, each entity will be a completely distinct
object with no links to any other entity. If you do (which is the most
common approach), you'll be able to navigate the relationships in your
data using properties. For example, you'll be able to find all the
products in a specific category using an automatically generated
navigation property like ProductCategory.Products.
Once you've finished this
step, click Finish. Visual Studio generates the model. Once it's
finished, you'll have two new files in the App_Code project folder: the
model file you specified initially (for example, Northwind.edmx) and a
file that contains the automatically generated VB code for the mode (for
example, Northwind.Designer.vb ). You'll learn about both files in the
next section.