An entirely new feature in IIS 7.0 is the ability to
have multiple Web servers share a single configuration file. This
feature was designed with load-balanced Web farms in mind in order to
eliminate the need to keep multiple server configuration in sync. Toward
this end, shared configuration is an excellent feature that will be
useful in many Web farm situations.
Note
Shared
configuration is not a complete Web farm solution in itself, because it
does not eliminate the need to synchronize application content and
local components like SSL certificates or .NET assemblies registered in
the GAC. |
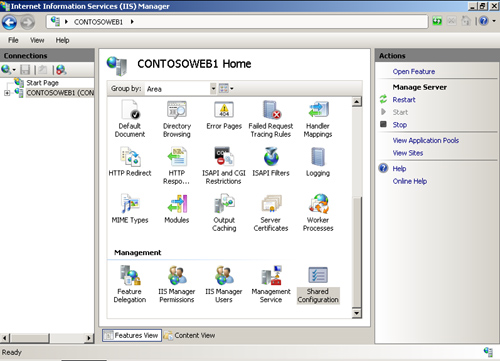
Enabling Shared Configuration
You
can enable shared configuration using the IIS Manager. You’ll find the
IIS Manager Shared Configuration icon in the features pane when the
Server node is selected in the tree view. Look for it at the bottom in
the Management section, as shown in Figure 1.
Note
It
is possible to enable shared configuration without using IIS Manager by
modifying IIS configuration manually and performing all the necessary
import steps. However, IIS Manager is recommended because it automates a
lot of these steps and makes setting up shared configuration a lot
easier than it otherwise would be. |
How Shared Configuration Works
The basic notion behind
shared configuration is to place the main configuration files for IIS
7.0 on a shared UNC path and have all the servers in the farm use the
remote configuration store as if it were local. In addition, if you
direct command line administration tools to modify settings on a server
that uses the shared configuration, those instructions are redirected to
the shared store. The net result is that if you have 10 servers sharing
configuration, and you add an application pool, all 10 servers will
have that pool immediately.
Setting
up shared configuration involves three main actions: First, you have to
create a location with the proper permissions and a user identity that
will be used to access the content. Second, you must export the
configuration files to a centralized location. Third, you have to set up
the servers to use the shared configuration files instead of the local
configuration files. At that point, they are all functionally identical.
Step 1: Preparing for Shared Configuration
The IIS Manager has to
write to the remote configuration as a user of some kind, so it must be
provided with the credentials of a local or domain user that has the
correct permissions. So the first task is to create a user that has the
correct permissions and then assign NTFS permissions for that user to
the shared location.
1. | Create
a user that you will use to provide read and write access to the shared
configuration files. This can be a local user that has the same
credentials on each server, or a domain user presuming all the servers
are joined to a domain.
net user ConfigAccess HighSecurePasswordhere /add
|
2. | Create
a folder that will contain the shared configuration files. This can be
on one of the Web servers or the file server. The only real requirement
is that it be accessible via a standard UNC share from all the servers.
|
3. | Configure the folder for sharing with the appropriate share permissions. We’ll use the SharedConfig folder in this example.
Net share sharedconfig$=%SystemDrive%\sharedconfig /grant:ConfigUser,Read
/grant:Administrators,Full /grant:System,Full
|
4. | Carefully
inspect the configuration of the server you plan to use as the source
for the shared configuration. The IIS 7.0 configuration you export will
be shared by all the other servers, so take some time to make sure it is
correct. You can, of course, change it after you’ve enabled shared
configuration, but the changes will affect multiple servers at that
time.
|
5. | Back up the existing configuration files with the following commands from an administrative command prompt.
windir%\system32\inetsrv appcmd add backup SharedConfigBackup
|
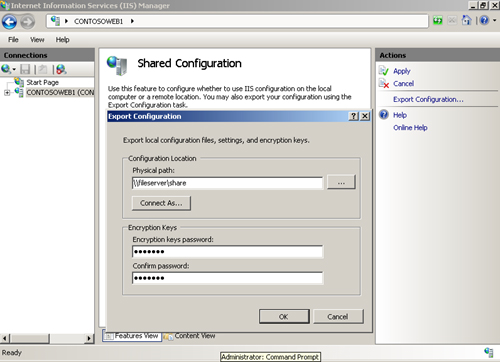
Step 2: Export the Configuration Files
1. | In the IIS Manager, click the server node and then double-click the Shared Configuration icon.
|
2. | In the Actions pane, click Export Configuration to open the Export Configuration dialog box, as shown in Figure 2.
|
3. | Under Configuration Location in the Physical Path text box, enter the UNC path to shared configuration.
Note You
can export the configuration files to a local, nonshared path if you
prefer and then manually copy the files to the shared location. |
|
4. | Click
Connect As and enter the credentials that have write access to the
share. You could also enter administrative credentials here. These
credentials are just used to write the configuration file in this export
step and are not used for regular access to the shared configuration
settings.
Caution Do
not use the ConfigAccess credentials you created for accessing the
configuration from the Web server. These credentials should not have
write access to the share. |
|
5. | Under
Encryption Keys, enter a password that will be required to protect the
exported encryption keys when transported off the server. You will need
to provide this password on any server that will use the shared
configuration files so that it can import the exported encryption keys.
Note that the password must be at least eight characters, have a symbol,
mixed case, and a number before it will be accepted. At this time,
creating the encryption key cannot be automated.
|
6. | Press OK. You will see a message that says the export was successful.
|
At this point you have
not yet enabled shared configuration, just created a set of files that
could be used for shared configuration. Before you proceed, you might
want to see what was (and was not) copied. See the sidebar titled “Inspecting the Exported Configuration Files” for more information.
|
Open
the location where you exported the files and examine the contents.
You’ll find a copy of applicationHost.config, administration.config, and
an encrypted file named ConfigEncryptedKey.key. The .key file is used
to decrypt any secrets stored in the .config files. For this to work,
all the servers in the farm have to know a shared secret, and that’s the
reason for a strong key to be entered when you export these
configuration settings. By default, there are no secrets in the config
files, because the anonymous user is now a built-in account and no
longer requires a password since it cannot be used to log on to the
server. In addition, the IWAM account found on IIS 4.0, IIS 5.0, and IIS
6.0 is deprecated. However, many companies use unique identities as
principals for application pools and the IIS anonymous user in order to
increase security and provide more granular details in audit logs.
Passwords created in
the IIS manager associated with UNC paths, applications pool
principals, and custom anonymous users are encrypted and stored in the
configuration files. These encrypted items cannot be deciphered by
default on other IIS 7.0 servers. Shared configuration, however, makes
this possible by allowing you to export the encryption keys from the
server whose configuration is being exported and reimport them to all
other machines using the shared configuration.
You should note that you
will not see any web.config, custom modules, Web site content,
certificates, or other files that are related to the server
configuration. Centralized configuration enables sharing of
applicationHost.config and administration.config files only. All other
items needed to keep the servers functionally identical need to be
managed by processes you institute outside of IIS 7.0.
Note that you can
expect to see tools or updates to this feature from the IIS team after
Windows Server 2008 is released that will help with replication and
synchronization tasks.
|
Step 3: Enable Shared Configuration
You’re now ready
to enable shared configuration. Typically, you’ll start with the server
used for the shared configuration export. Exporting the configuration
does not automatically cause the server to start using the exported
settings. In fact, if you make any changes at this point to the IIS 7.0
configuration, you will see them on the local server, but unless you
re-export the configuration, the shared configuration will not have the
most recent changes.
The procedure is simple and is the same for each server:
1. | In the Shared Configuration feature, select the Enable Shared Configuration check box.
|
2. | Enter
the Physical Path, User Name, and Password you used to create the share
and user for the share. In our example, this would be:
Path: \\Contoso\SharedConfig\
User: ConfigAccess
Password: HighSecurePasswordHere
|
3. | At the prompt, enter the password you used to export the settings. You will see the message shown in Figure 3.
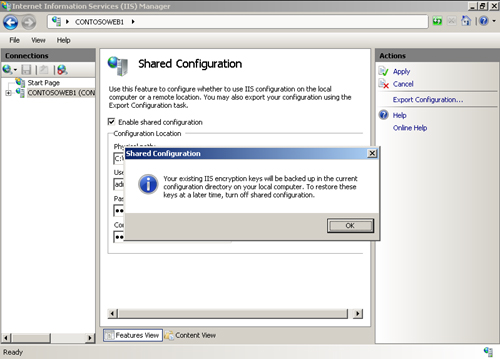
This message informs you that if you decided to revert back to
your local settings, the IIS Manager will fix your encryption keys so
they will work on your local configuration files. Otherwise, any
passwords you entered in the configuration system for UNC paths, custom
anonymous users, or application pool identities could not be deciphered
by IIS.
|
4. | Click
OK to close the message box. You will see another message that says you
need to close and reopen the IIS Manager and reset (stop and start) the
Web Management Service for changes to take effect. When you close and
reopen the IIS Manager, you will load the redirected configuration files
instead of the local files. Restarting the Management Service will
cause remote administration requests to be redirected.
|
You will need to repeat this procedure on each server.
Shared Configuration Considerations
Shared
configuration will help to reduce the administrative burden of
configuration replication between servers in a Web farm. It is not,
however, a Web farm management tool. You will still need to manage
replication of any content or configuration item that is local to a
server in the farm. This typically involves such items as content
replication, directory structure maintenance, SSL certificates,
recycling of services, operating system updates, registering COM
objects, placing new content in the .NET global assembly cache, network
configuration, and other settings that are stored locally.
Consider the scenario in
which you want to change the type of application pool from Classic to
Integrated. This is one of the few settings that will cause an
application pool to recycle. Making changes that affect the application
pool environment, such as the application pool type or pool identity,
will cause all of your application pools to recycle across all the
shared servers, potentially resulting in your Web application becoming
unavailable for a short period of time. As a result of this and other
scenarios such as content updates, you will want to devise a method for
rolling in updates so that you can more precisely control the settings.
For example, if you need
to make a configuration change that would result in a recycle, you
should export the settings from a second server to a new shared
location. This server will be the only one using that location while the
other servers in the farm continue to deliver requests. You then make
the updates you want to this server and test the results. When you are
satisfied, you move the other shared servers to the new shared location
in series. If at any time you don’t like what’s going on, you can roll
back to the prior configuration. If things proceed well, you will
continue moving each server over until all the servers are using the new
configuration.