1. Making Classes the ObjectDataSource Can Understand
Essentially, the
ObjectDataSource allows you to create a declarative link between your
web page controls and a data access component that queries and updates
data. Although the ObjectDataSource is remarkably flexible, it can't
support every conceivable component you could create. In fact, for your
data component to be usable with the ObjectDataSource, you need to
conform to a few rules:
Your
class must be stateless. That's because the ObjectDataSource will create
an instance only when needed and destroy it at the end of every
request.
Your class must have a default, no-argument constructor.
All
the logic must be contained in a single class. (If you want to use
different classes for selecting and updating your data, you'll need to
wrap them in another higher-level class.)
The
query results must be provided as a DataSet, DataTable, or some sort of
collection of objects. (If you decide to use a collection of objects,
each data object needs to expose all the data fields as public
properties.)
Fortunately, many of these
rules are best practices that you should already be following. Even
though the DBUtil class wasn't expressly designed for the
ObjectDataSource, it meets all these criteria.
2. Selecting Records
The first step is to create
the list box with the list of categories. For this list, you need an
ObjectDataSource that links to the DBUtil class and calls the
GetCategories() method to retrieve the full list of category records.
To supply data to the list
box, you need to define an ObjectDataSource and indicate the name of the
class that contains the data access methods. You do this by specifying
the fully qualified class name with the TypeName property, as shown
here:
<asp:ObjectDataSource ID="sourceCategories" runat="server"
 TypeName="DatabaseComponent.DBUtil" ... />
Once you've attached the
ObjectDataSource to a class, the next step is to point it to the methods
it can use to select and update records.
The ObjectDataSource defines
SelectMethod, DeleteMethod, UpdateMethod, and InsertMethod properties
that you use to link your data access class to various tasks. Each
property takes the name of the method in the data access class. In this
example, you simply need to enable querying, so you need to set the
SelectMethod property so it calls the GetCategories() method:
<asp:ObjectDataSource ID="sourceCategories" runat="server"
 TypeName="DatabaseComponent.DBUtil" SelectMethod="GetCategories" />
Once you've set up
the ObjectDataSource, you can bind your web page controls in the same
way you do with the SqlDataSource. Here's the tag you need for the list
box:
<asp:DropDownList ID="lstCategories" runat="server"
  DataSourceID="sourceCategories" DataTextField="Name" DataValueField="ID">
</asp:DropDownList>
This tag shows a list of
category names (thanks to the DataTextField property) and also keeps
track of the category ID (using the DataValueField property).
This example works fine so far. You can run the test web page and see the list of categories in the list .
3. Using Method Parameters
The next step is to show the
list of items in the current category in the GridView underneath. As
with the SqlDataSource, the ObjectDataSource can be used only for a
single query. That means you'll need to create a second ObjectDataSource
that's able to retrieve the list of items by calling GetItems().
The trick here is that the
GetItems() method requires a single parameter (named categoryID). That
means you need to create an ObjectDataSource that includes a single
parameter. You can use all the same types of parameters used with the
SqlDataSource to get values from the query string, other controls, and
so on. In this case, the category ID is provided by the SelectedValue
property of the list box, so you can use a control parameter that points
to this property.
Here's the ObjectDataSource definition you need:
<asp:ObjectDataSource ID="sourceItems" runat="server" SelectMethod="GetItems"
 TypeName="DatabaseComponent.DBUtil" >
  <SelectParameters>
<asp:ControlParameter ControlID="lstCategories" Name="categoryID"
        PropertyName="SelectedValue" Type="Int32" />
  </SelectParameters>
</asp:ObjectDataSource>
Again, you use the DBUtil
class, but this time it's the GetItems() method you need. Even though
there are two overloaded versions of the GetItems() method (one that
takes a categoryID parameter and one that doesn't), you don't need to
worry. The ObjectDataSource automatically uses the correct overload by
looking at the parameters you've defined.
In this case, you use a single
parameter that extracts the selected category ID from the list box and
passes it to the GetItems() method. Notice that the name defined in the
ControlParameter tag matches the parameter name of the GetItems()
method. This is an absolute requirement. The ObjectDataSource searches
for the GetItems() method using reflection, and it verifies that any
potential match has the number of parameters, parameter names, and data
types that you've indicated. This searching process allows the
ObjectDataSource to distinguish between different overloaded versions of
the same method. If the ObjectDataSource can't find the method you've
specified, an exception is raised at this point.
|
If you're ever in doubt what
method is being called in your data-access component, place a breakpoint
on the possible methods, and use Visual Studio's debugging features .
|
|
The final step is to link the GridView to the new ObjectDataSource using the DataSourceID. Here's the tag that does it:
<asp:GridView ID="gridItems" runat="server" DataSourceID="sourceItems"/>
This is all you need. You
should keep the Display button, because it triggers a page postback and
allows the ObjectDataSource to get to work. (If you don't want to use
this button, set the AutoPostback property on the list box to True so it
posts back whenever you change the selection.) You don't need to write
any event handling code to react when the button is clicked. The queries
are executed automatically, and the controls are bound automatically.
4. Updating Records
The final step is to provide
a way for the user to add new items. The easiest way to make this
possible is to use a rich data control that deals with individual
records—either the DetailsView or the FormsView. The DetailsView is the
simpler of the two, because it doesn't require a template. It's the one
used in the following example.
Ideally, you'd define the
DetailsView using a tag like this and let it generate all the fields it
needs based on the bound data source:
<asp:DetailsView ID="detailsAddItem" runat="server" DataSourceID="sourceItems"/>
Unfortunately, this won't work
in this example. The problem is that this approach creates too many
fields. In this example, you don't want the user to specify the item ID
(that's set by the database automatically) or the category ID (that's
based on the currently selected category). So, neither of these details
should appear. The only way to make sure this is the case is to turn off
automatic field generation and define each field you want explicitly,
as shown here:
<asp:DetailsView ID="detailsAddItem" runat="server"
  DataSourceID="sourceItems" AutoGenerateRows="False">
  <Fields>
    <asp:BoundField DataField="Title" HeaderText="Title" />
    <asp:BoundField DataField="Price" HeaderText="Price"/>
    <asp:BoundField DataField="Description" HeaderText="Description" />
  </Fields>
</asp:DetailsView>
You need to make a couple of
other changes. To allow inserting, you need to set the
AutoGenerateInsertButton to True. This way, the DetailsView creates the
links that allow you to start entering a new record and then insert it.
At the same time, you can set the DefaultMode property to Insert. This
way, the DetailsView is always in insert mode and is used exclusively
for adding records (not displaying them), much like the non-data-bound
page shown earlier.
<asp:DetailsView ID="detailsAddItem" runat="server"
  DefaultMode="Insert" AutoGenerateInsertButton="True"
  DataSourceID="sourceItems" AutoGenerateRows="False">
  ...
</asp:DetailsView>
The ObjectDataSource provides
the same type of support for updatable data binding as the
SqlDataSource. The first step is to specify the InsertMethod, which
needs to be a public method in the same class:
<asp:ObjectDataSource ID="sourceItems" runat="server"
 TypeName="DatabaseComponent.DBUtil"
 SelectMethod="GetItems" InsertMethod="AddItem" >
</asp:ObjectDataSource>
The challenge is in making
sure the InsertMethod has the right signature. As with the
SqlDataSource, updates, inserts, and deletes automatically receive a
collection of parameters from the linked data control. These parameters
have the same names as the corresponding field names. So in this case,
the fields are Title, Price, and Description, which exactly match the
parameter names in the AddItem() method. (The capitalization is not the
same, but the ObjectDataSource is not case sensitive, so this isn't a
problem.)
This still has a problem,
however. When the user commits an edit, the DetailsView submits the
three parameters you expect (Title, Price, and Description). However,
the AddItem() method needs a fourth
parameter—CategoryID. We've left that parameter out of the DetailsView
fields, because you don't want the user to be able to set the category
ID. However, you still need to supply it to the method.
So, where can you get the
current category ID from? The easiest choice is to extract it from the
list box, just as you did for the GetItems() method. All you need to do
is add a ControlParameter tag that defines a parameter named CategoryID
and binds it to the SelectedValue property of the list box. Here's the
revised tag for the ObjectDataSource:
<asp:ObjectDataSource ID="sourceItems" runat="server" SelectMethod="GetItems"
 TypeName="DatabaseComponent.DBUtil" InsertMethod="AddItem" >
  <SelectParameters>
    ...
  </SelectParameters>
  <InsertParameters>
    <asp:ControlParameter ControlID="lstCategories" Name="categoryID"
PropertyName="SelectedValue" Type="Int32" />
  </InsertParameters>
</asp:ObjectDataSource>
Now you have all the parameters
you need—the three from the DetailsView and the one extra from the list
box. When the user attempts to insert a new record, the
ObjectDataSource collects these four parameters, makes sure they match
the signature for the AddItem() method, puts them in order, and then
calls the method.
Figure 1 shows an insert in progress.
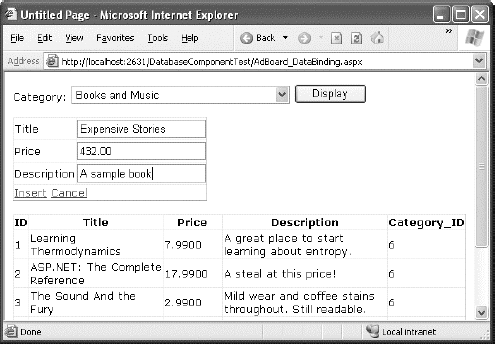
When you click the Insert button, quite a bit takes place behind the scenes. Here's a breakdown of what actually happens:
The DetailsView gathers all the new values and passes them to the ObjectDataSource.
The
ObjectDataSource calls the DBUtil.AddItem() method, passing all the
values it received from the DetailsView in the right positions (by
matching the field names with the parameter names) and the selected
value from the lstCategories list box.
The
DBUtil.AddItem() method builds a parameterized SQL command. It then
opens a database connection and executes the command to insert the new
record. (At this point, the ASP.NET data binding system takes a break
and lets other events occur, such as Page.Load.)
Just
before the page is rendered, the data binding process begins. The
DropDownList asks the first ObjectDataSource for the list of categories
(which triggers a call to the DBUtil.GetCategories() method), and the
GridView requests the list of items from the second ObjectDataSource
(which triggers the DBUtil.GetItems() method).
Because the page is always rebound after
any insert and update operations are finished, you'll always see the
latest information in your web controls. For example, if you add a new
item, you'll see it appear immediately, complete with the unique ID
value that the database server generates automatically.
NOTE
In some cases, you
might need to supply an extra parameter that needs to be set
programmatically. In this case, you need to define a plain-vanilla
Parameter tag (instead of a ControlParameter tag), with a name and data
type but no value. Then you can respond to the appropriate
ObjectDataSource event (such as Inserting, Updating, or Deleting) to
fill in the value you need just in time.