Carrying on with our Equipment Request form, let’s
look at how we can hook up the buttons on the form using a few methods
that follow.
Using the Rules Engine
The easiest way to handle events in an InfoPath form
is to use the built-in rules engine. Three different types of Rules can
be applied to a control or field:
Validation
Allows users to add a validation formula to a field or control. Where
the validation formula does not return true, a user-defined message is
displayed.
Formatting
Formatting works a bit like conditional formatting in Excel. The user
can define a condition or formula that must evaluate to true or false.
If the formula evaluates to true, the format is applied.
Action
Within InfoPath most event handling is done using Action rules. By
using Action rules, a user can perform a series of actions when a
specified condition occurs. Some examples of a condition that can
trigger an action rule are Field Changed and Button Clicked.
We’ll make use of an Action rule to switch to our Customer Search view when the Find Customer button is clicked on our form:
If
you haven’t already done so, switch back to the default view: in the
Page Design tab of the ribbon, select View 1 (default) from the View
drop-down. Then click the Find Customer button.
From the Properties tab’s Button section of the ribbon, select Rules. You’ll see the Rules pane on the right side of the page.
Select New | Action from the Rules pane, and then type the rule name as Do Customer Search.
In the Run These Actions section, click Add |Switch Views, and then select Customer Search Results from the list of views.
As
well as showing our search results page, we need to perform the actual
query. This time select Add | Query For Data, and then select the
Customer data connection from the list.
We can now publish this form and see the results
using the browser. When the user clicks the Find Customer button, a
list of customers is displayed, allowing the user to select an
appropriate record. The next step is to copy the selected customer
details into our main form and then switch back.
In the Page Design tab of the ribbon, switch to the Customer Search Results view, and then highlight the Select button.
From the Properties tab on the ribbon, click Add Rule | When This Button is Clicked | Set A Field’s Value.
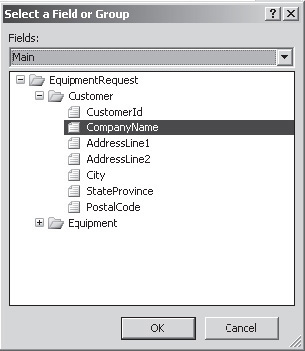
In
the Rule Details dialog, set the Field to the CompanyName field on the
Main data source, as shown. The selector can be accessed by clicking
the down-arrow button at the right of the Fields text box.
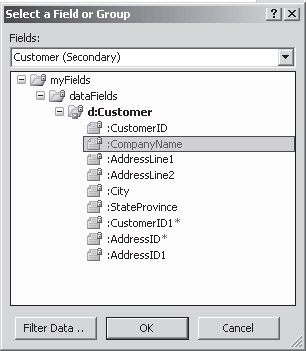
Set
the Value to the CompanyName field of the Customer data source. Again
this can be done by clicking the down-arrow button to the right of the
text box. Click Insert Field Or Group on the Insert Formula dialog that
appears to show the selector.
Repeat
this process to copy all fields from the d:Customer group into the
Customer group of the main data source. Rather than using the Add Rule
button in the ribbon, which will create a new rule, you can add an
additional action to the current rule by choosing Add | Set A Field’s
Value from the Rules pane.
After
all the field values are copied, switch back to default view. From the
Rules pane, click Add | Switch Views and set the view to View 1.
We can now publish the updated form and navigate to
the document library to see the fruits of our labor. This time, when
you click Find Customer and select a customer from the list, the
details are copied into our main form and the search view is hidden
from view.